The Pentacon Six
System
by TRA
Close up tubes
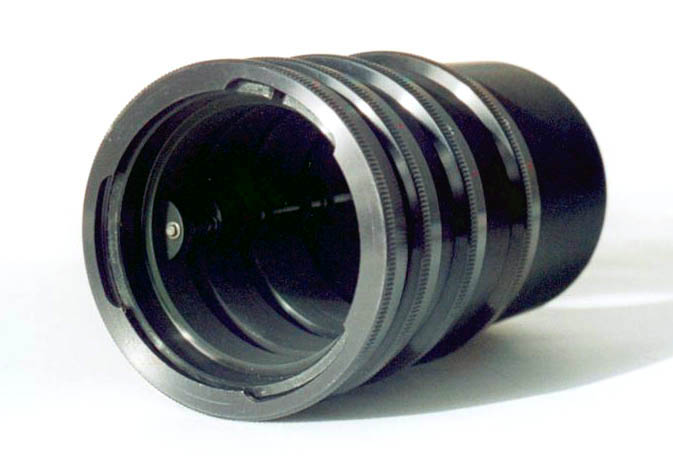
Pentacon Six automatic extension tubes.
The pin that operates the lens diaphragm can be seen inside
the tubes.
[C309-13.jpg]
Close-up (or extension) tubes made by Pentacon,
Exakta and Arsenal are
available. These tubes are placed between the lens and
the camera, thus enabling the user to focus closer to the
subject.
|
Note that when an
extension tube is used behind the lens, the
focussing distances engraved on the lens are no
longer accurate, so focus must be carried out by
looking at the ground-glass focussing screen
of the camera.
For all photography closer
than the normal minimum focussing distance of the
lens, the use of a suitable focussing magnifier is
recommended, to avoid mis-focussing by the
photographer. You can see these magnifiers here and here.
|
Pentacon
This manufacturer made two types of extension tubes over many
years: Manual tubes and automatic
tubes.
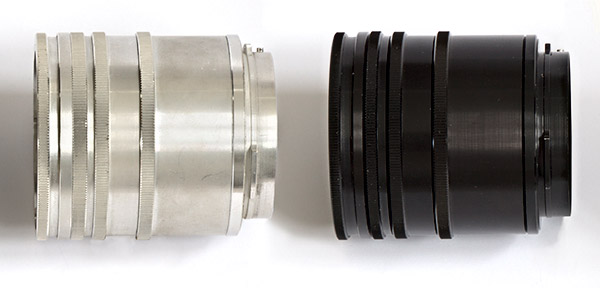
Manual tubes
The manual tubes lack the aperture pin that holds the lens
diaphragm open until the shutter is fired. The manual tubes
were introduced at approximately the same time as the original
Praktisix camera. Nearly all of the manual tubes had a
chrome (or "silver"-coloured) external finish. However,
there were some manual tubes with the black finish that
subsequently became fashionable. Here are both versions:
Obviously, all tubes have to be matt black inside to avoid
reflections, which would ruin contrast and probably also cause
"ghost" images.
[2mantubs.jpg]
To see information on the dimensions of these
tubes and charts showing the image area covered, image scale,
etc., click
here.
Diaphragm automation may be obtained by adding the special
Pentacon aperture control ring with a double cable release – see
the pages on the Pentacon Six bellows.
This ring is also illustrated lower down on this page.
Automatic tubes
Pentacon’s standard automatic extension tubes come as a set of
four. In the image at the top of this page it should be
possible to see the aperture control pin. Using any one of
the tubes, along with the focussing range of the lens, or any
combination of them, provides an enormous range of magnification,
and Pentacon published lists of the image area covered by each
tube or combination of tubes, and the exposure factors necessary
to correct for a meter reading taken without the tubes.
Using a TTL meter avoids the need to use these correction factors,
and is the approach I always use.
As regards the extermal colour of the tubes, in the case of the
automatic Pentacon tubes, the availability is the inverse of the
case with the manual tubes, i.e., most automatic tubes seen have
an external black finish, but some early automatic tubes with an
external chrome finish are occasionally seen.

I have labelled the black tubes with Dymo tape to show the
extension that each one gives.
You can see the auto aperture pin protruding to the right of each
set of tubes
[2auttubs.jpg]
To see the charts showing the image area covered, image scale,
etc., click here and scroll
down.
10mm auto tube
Pentacon realised that there was a gap in the range between using
the standard Biometar 80mm lens on its own at maximum extension, and
using the same lens at minimum extension (i.e., infinity focus) with
the shortest tube in the set. They therefore made a further
auto tube to cover that gap. This tube gives an extension of
10mm, and it is so shallow that there is no space for the standard
breech-lock ring; instead, the tube is mounted first on the lens, by
twisting it into place, and the lens/tube combination is then
mounted on the camera body in the standard way.
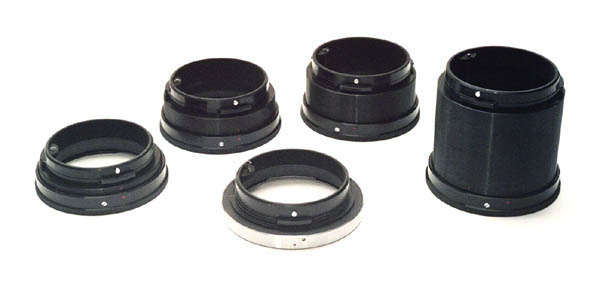
The Pentacon automatic extension tube set at the back, with the
special 10mm tube in front of them.]
You can see the effect of using the four standard automatic
tubes here.
You can see the effect of using the 10mm tube here.
[C309-14]
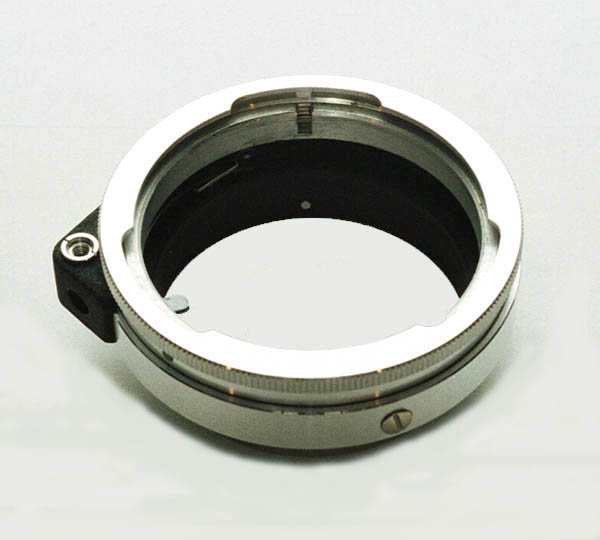
Special aperture control
ring
It will be obvious from the above images that the manual
tubes are shorter than the auto tubes. It may be that
Pentacon expected photographers to add the special aperture
control ring to the front of the manual tubes, in order to
maintain auto aperture stop down, via the use of a double
cable release. At the same time, they would benefit
from the additional extension that the use of this tube
provided.
This aperture control ring was available, along with the
double cable release, from the early days of the manufacture
of the Praktisix camera, and its use is described and
illustrated in Dr W.G. Heyde's book "Praktisix Buch", which
was published in 1964 but reflected recommended techniques
that had been in place for several years. (See pp.
144-145)
The Pentacon Six aperture control ring is described in
detail in the section on the Pentacon
Six bellows.
You can see an example of its use on a reversed lens here. (scroll down)
|
|
 [C311_24.jpg]
|
Arsenal
A two-tube set made by Arsenal is available. A few years
ago these were supplied as a standard accessory with the Kiev 60,
but now they are not usually included in the camera kit, and have
to be purchased separately. While being entirely adequate
for the task, their design is not up to the standard of the
Pentacon tubes, and the maximum degree of extension available is
much shorter.
Manual tubes
For years I thought that Arsenal only produced automatic tubes,
but a set of tubes received in 2012 is manual. As with the
Pentacon tubes, the manual Arsenal tubes lack the aperture pin
that holds the lens diaphragm open until the shutter is
fired. (These manual tubes were clearly not of recent
manufacture in 2012.)
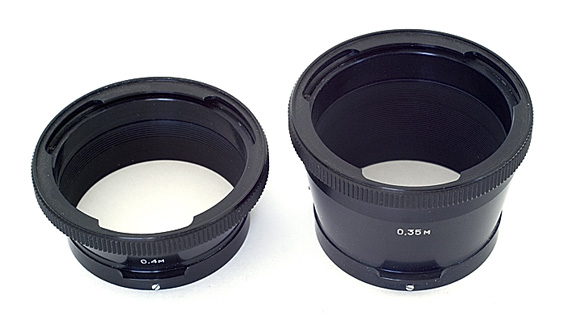
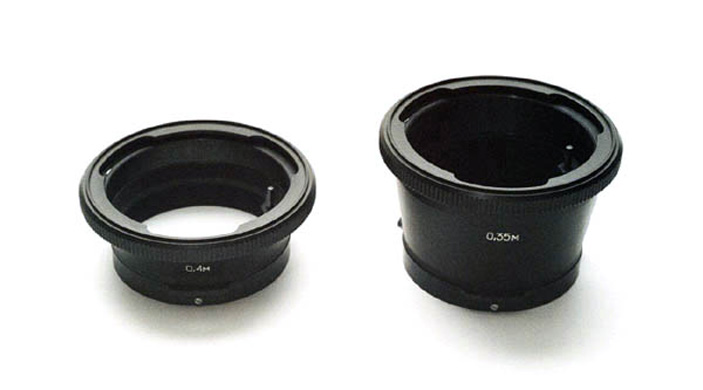
The numbers on the front of this set of tubes
apparently indicate
the minimum focussing distance when used individually
with the standard Arsenal lens.
The tubes can of course be used together.
[asnlmtub1.jpg]
|
|
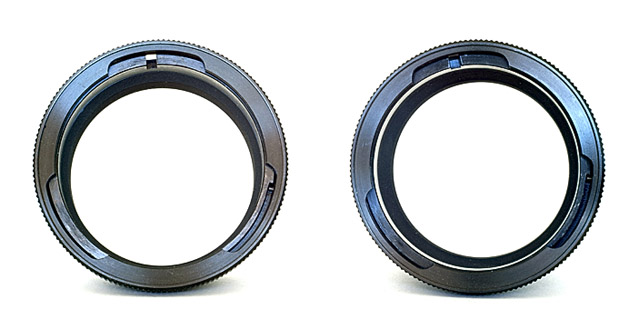
Look! No aperture pins!
[asnlmtub2.jpg]
|
As with the Pentacon manual tubes, diaphragm automation may be
obtained by adding the special Pentacon aperture control ring with
a double cable release.
Automatic tubes
The automatic tubes do have the aperture-transmission pin, just
visible in the next picture. In other respects, they are
identical to the manual tubes.
[C309-15: The Arsenal automatic tubes.]
Manufacturing tolerances again come into play, and when I mount
the Arsenal tubes on my Pentacon Six it is not possible to rotate
the locking ring on the camera body by far enough for me to feel
confident that the combination will not come apart (!). They
work fine on the Kiev 60.
For the use of close-up tubes on the Kiev 88-6 body, follow this
link.
Exakta
 [C326-26A]
|
|
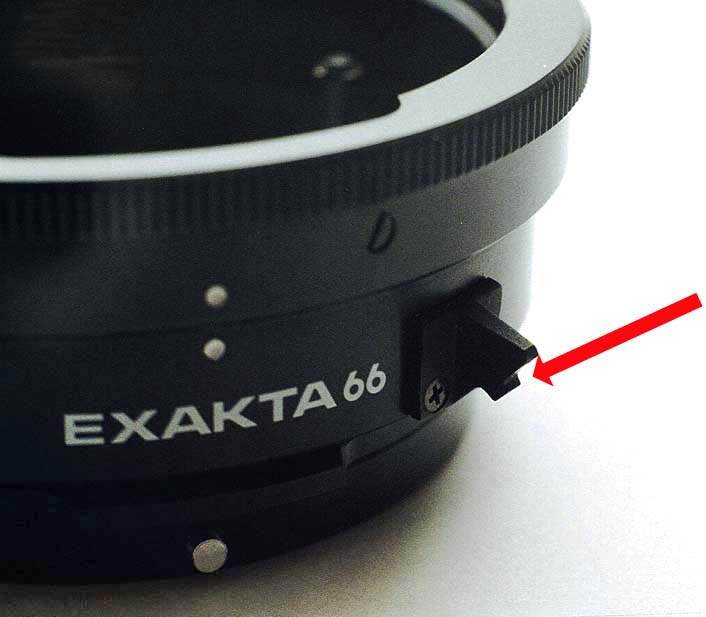
There is a set of four automatic extension tubes for the
Exakta 66. They have the same dimensions as the
Pentacon Six tubes and in fact look as though they
originated in the same factory. There are just two
differences:
- The name “Exakta 66” on each tube
- A protruding “pin” on each tube (see image left),
to depress a contact on the Exakta 66 TTL meter and
set it for stop-down metering.
For a description of stop-down metering with the Exakta 66
TTL prism, click here.
I need to investigate further the operation of
stop-down metering on the Exakta 66, and plan to report
on this website when I know the answers.
|
|
Reversing tubes
Lenses are designed for optimum performance within a
certain focussing range. Generally, this range
extends from infinity to the closest point achieved with
the focussing ring of the lens – although it is well known
for zoom lenses, in particular, to exhibit optical faults
at certain focal lengths. Fortunately, this is not a
problem with the Carl Zeiss Jena and Pentacon lenses.
However, beyond the closest focussing distance, greater
definition may be achieved by reversing the lens – after
all, the rear of the lens operates best over a range of a
few inches (from the focal point of the lens to the film
plane).
Pentacon manufactured a reversing tube. At one end
this has a standard lens mount, so that it can be inserted
into the front of the bellows, the front of an extension
tube, or even directly into the body – although this gives
very little control over the degree of magnification
available.
The other end of the tube has a 58mm diameter thread, which
screws straight into the front of the standard 80mm f/2.8
Biometar lens. Obviously, with adapter rings, other
lenses could be used if required.
You can see this tube in use here
and the effect of using it here.
|
|
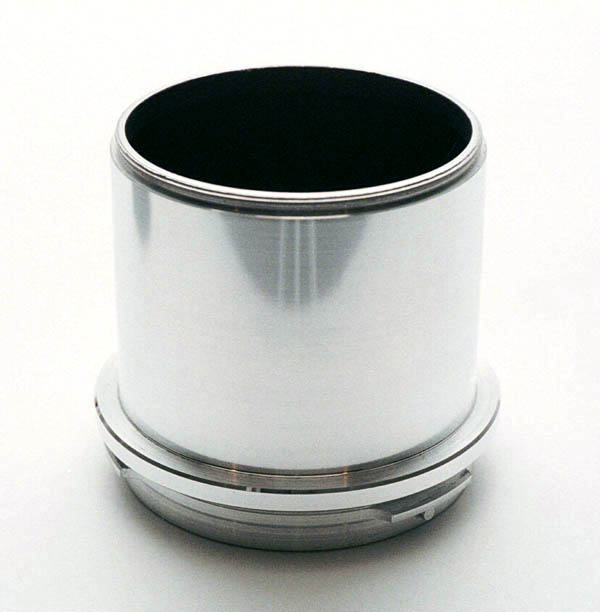
[C311-23: The Pentacon Reversing Tube]
|
 [C370-21A]
|
|
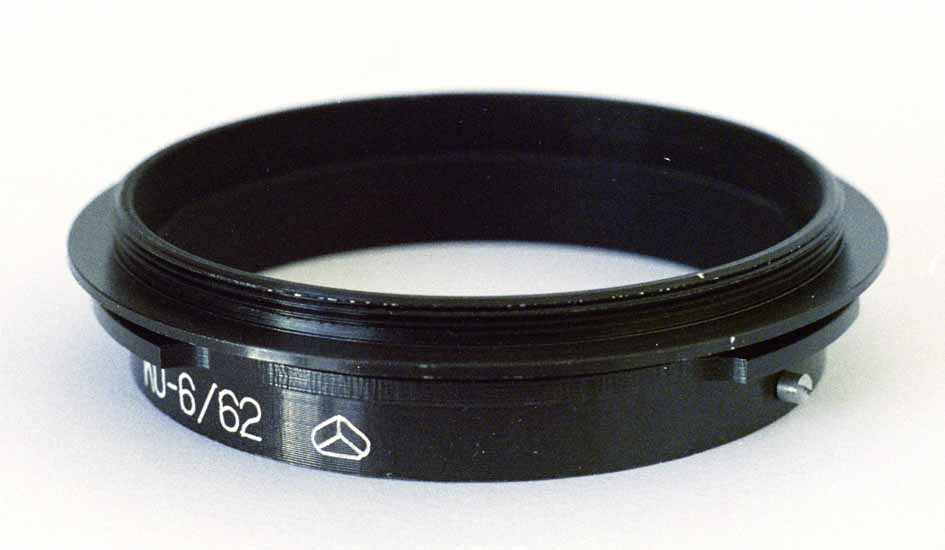
Arsenal also make a reversing ring for use with their
system. As can be seen from the illustration, it is
a very slim affair, with the Pentacon Six bayonet lens
mount at one end, and a screw thread to take their
standard 80mm Volna lens at the other. This has a
62mm thread.
Incidentally, the Arsenal logo is clearly visible on
this accessory.
|
The effect on exposure of using
extension tubes
The further the lens is moved from the film plane, the
more it magnifies the subject being photographed and
the dimmer the image that reaches the film.
To be able to visualise this, you can try turning on a
torch (British English! US English: a flashlight) in
a dark room. If you hold the torch near a wall, you
will get a high level of illumination, but it will only
cover a small area. As you back away from the wall,
the cone of light from the torch will spread out and
progressively illuminate more of the wall, but the light
intensity falling on any particular part of the wall will
be less. The total amount of light has not
decreased, but it is spread over a wider area.
It is often to helpful to imagine light as being rather
like the water coming out of a garden hose (a flexible
rubber or plastic pipe). Many hoses have an
adjustable nozzle at the end. At one setting, it
sends all of the water in a powerful jet to one small
area, which will soon become soaked. Changing the
setting of the nozzle to the other extreme, it sprays
exactly the same amount of water over a much wider area,
so any one part of the garden will receive less water –
even though the same total amount of water
is coming out of the nozzle.
In fact, there is a light loss within every lens: the
closer that we focus, the slightly larger the image on the
film becomes, and as it gets larger, it gets less bright
at any point in the image, as the existing brightness is
spread over a wider area. However, the difference in
the intensity of the light reaching the film is so small
that this can usually be ignored.
In the 1960s and early 1970s, the Carl Zeiss Jena 180mm
and 300mm Sonnar lenses compensated for this light loss by
opening up the lens aperture automatically by up to a
maximum of half a stop as one focussed closer.
In the mid 1970s, this clever technology was abandoned,
probably for three reasons:
- Increasing numbers of photographers were
using the metering prism, which made this correction
unnecessary.
- Even more importantly, the lattitude of
colour film had improved greatly, so that such a small
amount of correction was not necessary.
- Furthermore, for photographers shooting at
maximum aperture, obviously
no aperture compensation was possible.
However, in macro photography, the extra extension
added by using tubes is frequently so great that some
compensation will be
necessary. Otherwise, the image on the film will be
under-exposed. I reproduce in detail here the information
given by Pentacon to enable users to calculate how much
more exposure must be given with each tube or combination of tubes,
and on the same page I also give a more detailed
explanation, also as regards calculating exposure
compensation with lenses other than the standard 80mm
Biometar or Tessar lens.
|
Shading the lens when it is mounted in reverse
The section on the Pentacon Six bellows explains how increased
definition may be obtainable when mounting the lens in reverse,
via the reversing tube. The rear element of the lens is then
unprotected from stray light that might degrade the image, or
objects that might damage the lens. An excellent lens shade
for the rear of the lens can be provided by an extension tube of
suitable length. As the special aperture control ring is
quite shallow, consider adding a further tube if necessary to
shade the lens (checking carefully that no image cut-off is
caused!).
Using tubes with lenses
of various focal lengths
Perhaps the assumption is that tubes are designed for use with the
standard lens only, and this is definitely the most-used lens for
many close-ups. However, consider two other options:
- using a wide-angle lens provides greater magnification for a
given extension tube, although one has to work closer to the
subject, which may lead to lighting problems (shadows from the
equipment);
- use a tube with a longer lens to reduce the minimum focussing
distance. Thus, a short tube can be used with the 150mm
Kaleinar to get closer for portraits – but of course the lens
will not focus to infinity while the tube is in place.
Using the 2× converter
A reference to this accessory may seem out of place here, but
remember that a 2× converter does not affect the minimum focussing
distance of the lens with which it is used.* It therefore
enables you to take closer-up pictures. You can of course
combine a 2× converter with other close-up accessories, as in this
shot taken in my garden one summer. It reminds us that close
up doesn’t just mean microscopic; without the 2× converter and an
extension tube, I just couldn’t get close enough to these plums.

[C300-2: Kiev 60 with Carl Zeiss Jena 80mm Biometar “II”,
Arsenal 2× converter and Pentacon No 3 tube.
1/60 sec f/4, handheld. Notice the shallow depth of
field.]
* I am indebted to Bob for improving on my
wording here. He points out that "The closest focus to
the end of the lens (the working distance) is
unaffected by a converter." However, he goes on to
say, "The 'minimum focusing distance' is measured
from the image plane (film or sensor) to the subject.
This dimension actually increases by the physical length of
the converter .... the subject to lens distance remaining
the same and hence the camera has 'backed-up' to allow the
converter to be slotted in to the setup. In most
normal applications the increase (75-100mm) is irrelevant,
but it can end up being a significant percentage of the
dimension when macro photography is being pursued."
Thank you, Bob, for helping me to get that clear!
|
To go on to the next section, click below.
Next section (Mirror Pre-Release)
To go back to the beginning of the macro section, click here.
To go back to the beginning of the Accessories section, click
below and then choose the accessory that you want to read about.
Back to beginning of the Accessories section
Home
© TRA February 2002, Latest revision: September 2017