by TRA
How the Exakta
66 metering prism
works
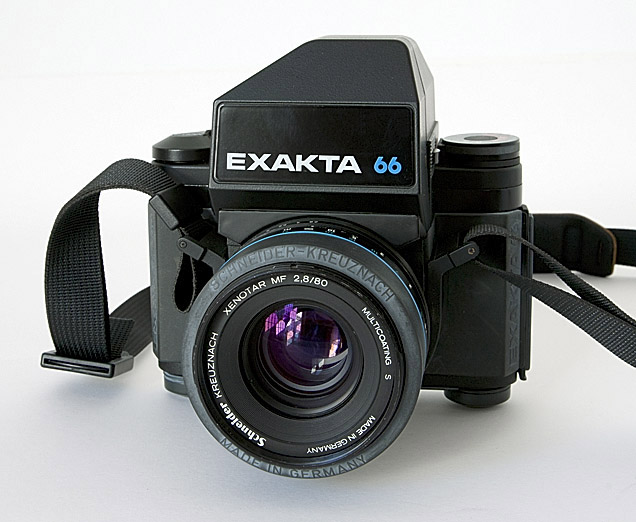
Note how the front of the metering prism
extends forward
of the front of the camera
and comes down to sit snugly against the
lens.
[e66_01.jpg]
|
|
I am regularly asked questions about the
Exakta 66 metering
prism. Here are the answers.
Q1 “Can I
use the Exakta
66 metering prism on the Pentacon Six?”
Answer
No. It is not possible to mount the
Exakta 66 metering
prism onto a Pentacon Six body. This is because
the front of the
prism extends forward and down, and the strap lugs on
the Pentacon Six
body prevent it from being mounted.
It may possible to mount an Exakta 66 non-metering prism on a Pentacon Six, but it blocks the end of the camera shutter-advance lever and so should not be used. In my opinion it also looks a little odd and it brings no gains, as inside the black plastic housing is an unmodified Pentacon Six plain prism.
Q2 “How
does the Exakta 66
metering prism work, then?”
Answer
The Exakta 66 metering prism requires the
input of the
same three pieces of information as any other meter,
plus a fourth piece
of information in most cases.
1) First, it needs to know the
sensitivity rating
of the film. This is input by the user by
adjusting the ISO dial
on the top of the meter when loading the film into the
camera. This
is thereafter not touched, unless a film with a
different sensitivity rating
is loaded.
2) Secondly, the prism needs to know
the shutter
speed selected on the body. Here (and in points 3
and 4) the Exakta
66 is a great advance on the metering prisms for the
Pentacon Six and the
Kiev 60, as the shutter speed selected on the body is
transmitted via electric
contacts to the metering prism.
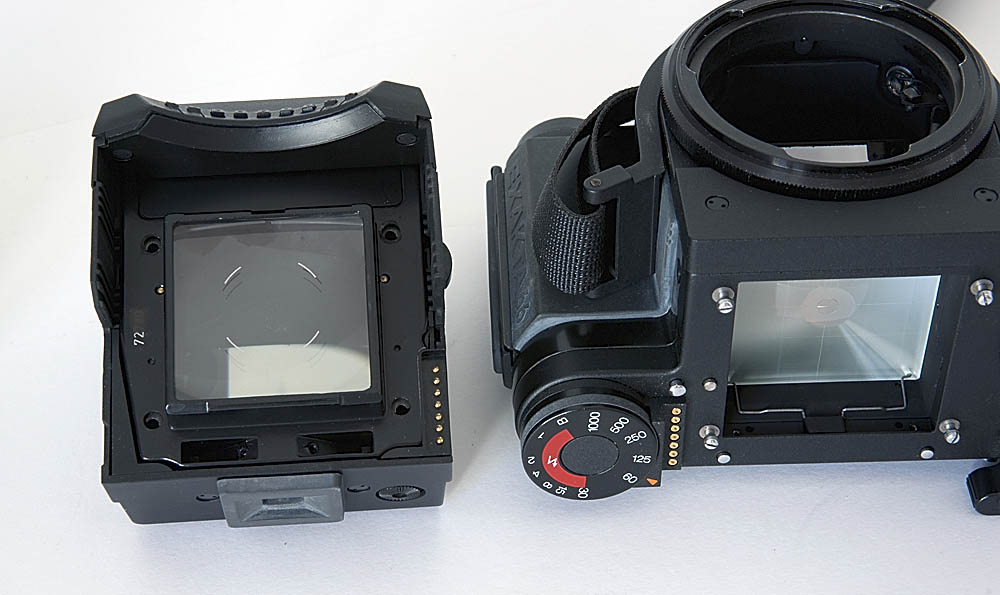
Note the seven gold-plated pins on the
underside of the
metering prism, on the left,
and the seven gold-plated contact points
on the camera
body, on the right.
These transmit the selected shutter
speed to the metering
circuit in the prism.
[e66_03.jpg]
The metering prism will not give a reading until it receives shutter speed information from the camera body. This is another reason why it cannot work on a Pentacon Six, which does not have the contacts that provide this information.
3) Thirdly, the metering prism needs to know the aperture value selected on the lens. This, too, is automatically input into the metering prism, although not electrically. The input system is purely mechanical.
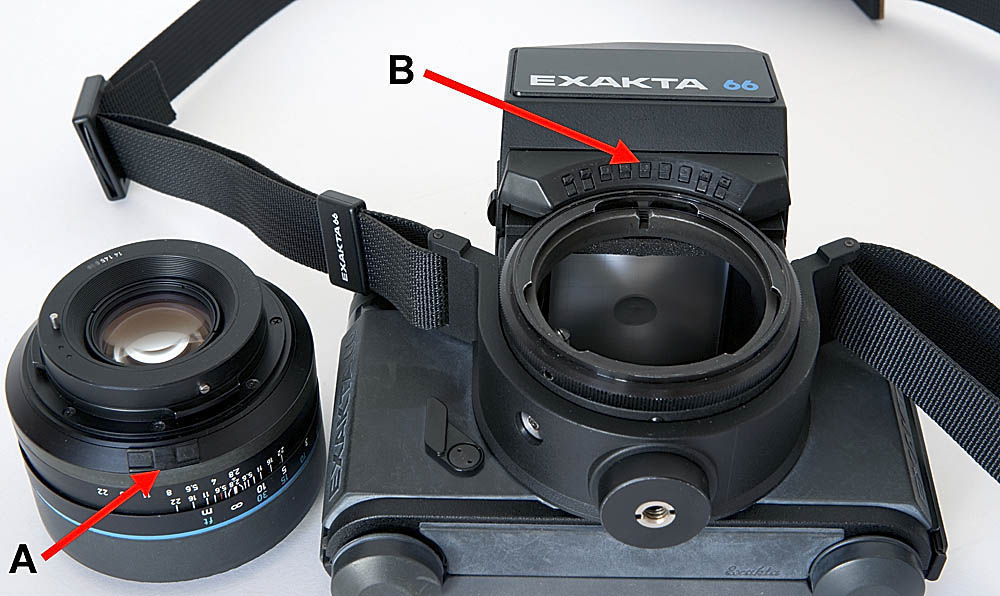
“A” in this image is pointing to
the raised cam
that is on a spring-loaded mount on the back of the
aperture ring of all
Schneider-Kreuznach lenses for the Exakta 66.
Arrow “B” is pointing to the
middle of the nine
contact points on the underside of the metering prism.
(In fact, there are more than nine, as
is explained below.)
[e66_02.jpg]
As the lens aperture ring is rotated, the
cam (“A”, above)
presses in turn on one or two of the contact points on
the metering prism,
inputting the value of the aperture selected.
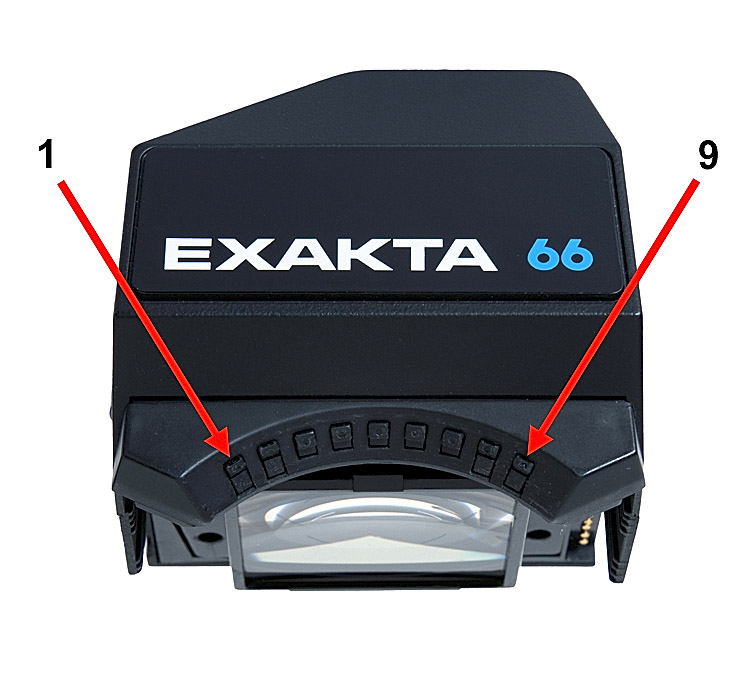
| Suppose we number the contact
points “1” to “9”, as I
have done in the image to the right.
Depressing contact point “1” inputs the f/ stop value f/2 to the meter. (I am not aware of any f/2 lens for the Exakta 66, but if you get or make one, you will be able to input the aperture value!) Depressing contact points “1” and “2” inputs the value f/2.4 - the vertical line on the LCD readout between f/2 and f/2.8. (The same comment applies!) Here are all of the
combinations:
|
[e66_04.jpg] |
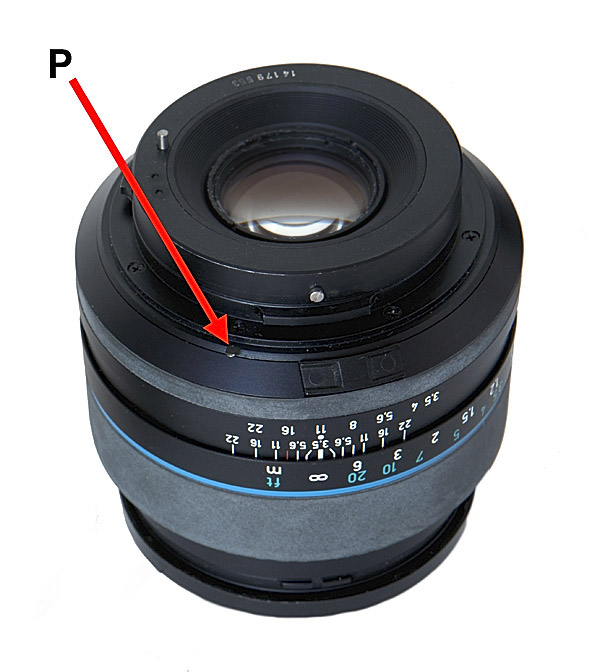
4) The fourth piece of information that
the metering prism
requires is the maximum aperture of the lens. This
is input via a
pin on the lens that depresses one of a series of
switches on the prism.
The default aperture is f/2.8. When none of these
switches is depressed,
the meter assumes that the maximum aperture of the lens
is f/2.8, which
is the case with the 80mm lenses (only), which is why
these lenses do not
need this extra pin.
|
On this 60mm Curtagon lens, the
maximum aperture pin
is indicated with the arrow marked with the
letter “P”. It is behind
the cam that inputs the aperture that has been
selected - beneath it, when
the lens is mounted onto the camera.
If you now look back to the previous picture, you will see that the contact points that, by my numbering system, are 1, 2, 8 and 9 are double the height of the others. For each of these four contact points there are two switches, one above the other. The top one is actuated by the rotating aperture cam on the lens aperture ring. The bottom one is actuated by the maximum aperture pin that is to be found on all lenses other than those with a maximum aperture of f/2.8, which is the “default” aperture, for which no maximum aperture switch is depressed. The other maximum apertures in
the Schneider Exakta 66
lens range are:
|
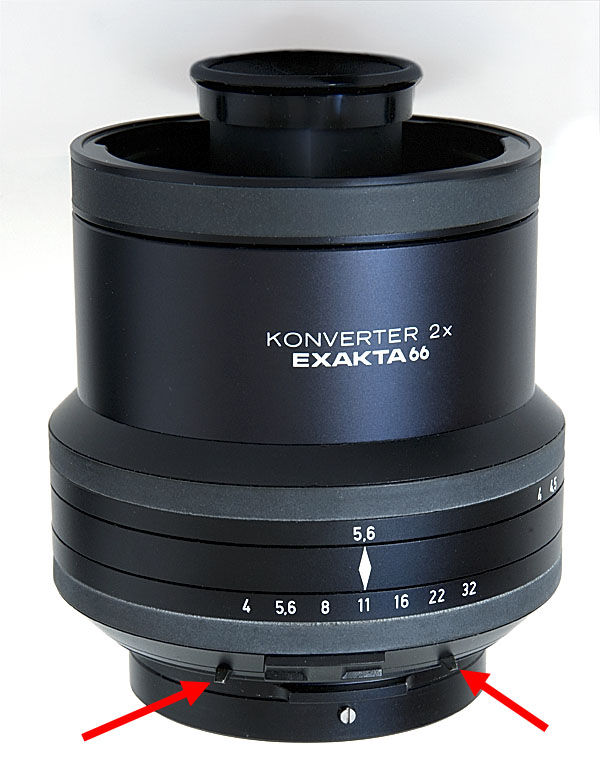
| The Schneider 2× converter is
designed to work
with lenses of 150mm and longer, and with the
75-150mm Variogon zoom lens.
(The early publicity and the instruction manual,
which state that it can
be used with the 80mm lens, is wrong.) It
therefore has a rotating
ring that enables the user to input a maximum
aperture of f/4, f/4.5 or
f/5.6.
It achieves this by using two pins on different parts of the ring. For most apertures, only one pin is used, with the unused pin being in a non-contact position. For f/5.6, both pins are used. The two pins are arrowed in the image to the right. On this converter, the top ring as seen in this image operates the maximum aperture pins, which are at the bottom. The chosen aperture ring, which is between them (and is set at f/11 in this photo) moves the cam to tell the meter which aperture has been set on the lens. (It doesn’t actually change anything on the lens; the same aperture number must be set on the lens and the converter!) The maximum aperture switches
on the metering prism are
as follows:
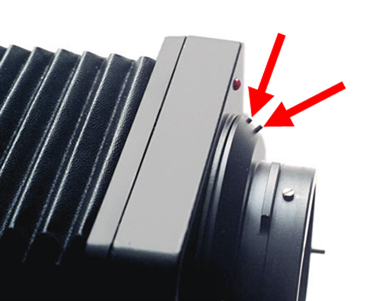
The Exakta 66 bellows switch the meter to stop-down metering. To do this they depress two switches on the prism, using two pins. The two switches are Switch position 1 (by my numbering system): top and bottom switches.
The original Exakta 66 extension tubes (not the Pentacon Six equivalent tubes) have a little lever that also depresses the same two switches: Switch position 1 top and bottom. |
[e66_06.jpg] |
Using lenses from other manufacturers with the Exakta 66 metering prism
Q3 “I have an
Exakta 66 body.
Can I use the Exakta 66 metering prism on it with non
Schneider lenses?”
Answer
The short answer is no, unless you modify
them.
And most non Schneider lenses cannot be suitably
modified.
The Exakta 66 metering prism only gives readings when a Schneider lens is mounted on the body. This depresses an electrical contact on the underside of the front of the prism to tell it which aperture has been chosen. A second pin on lenses with a maximum aperture other than f/2.8 inputs the aperture value to the metering circuit in the prism.
Q4 “Could I
not add the necessary
pins to a lens to activate the contacts in the prism?”
Answer
It might be possible to modify lenses by
adding a pin
that would depress the maximum aperture contact and a
cam on the aperture
ring that would depress the correct selected aperture
contact, but there
are two problems with this:
Most lenses have the aperture ring too far
forward to
make the design of such a cam easy.
Many lenses rotate the aperture ring in
the opposite
direction to the Schneider lenses.
Q5 “So
which lenses might
be modifiable?”
Answer
The Schneider-Kreuznach lenses for the
Exakta 66 have
the largest aperture size (the smallest number)
at the far left
of the aperture ring, viewed from above. Carl
Zeiss Jena lenses have
the largest aperture at the far right of the aperture
ring, viewed from
above, so rotation is in the opposite direction.
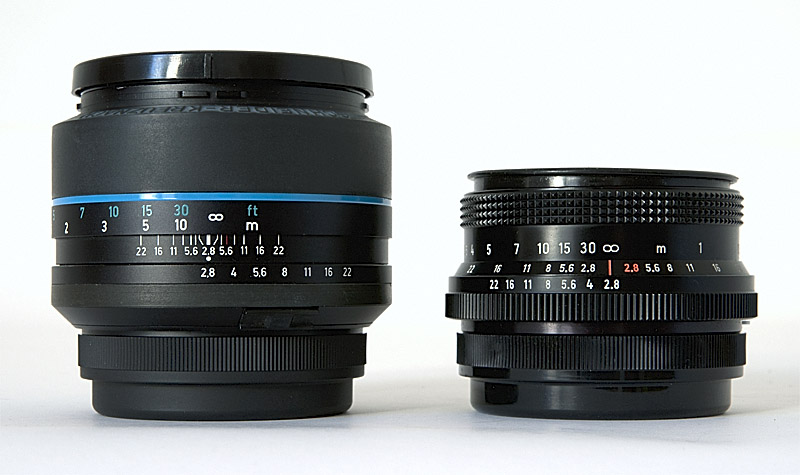
The 80mm Schneider-Kreuznach Xenotar MF
for the Exakta
66, on the left,
and a late example of the 80mm Carl
Zeiss Jena Biometar
for the Pentacon Six, on the right
Note the opposite direction of rotation
of the aperture
ring (the bottom ring in this view).
[ap_dir.jpg]
As the aperture ring on the Schneider lens is rotated, a cam on it depresses contacts on the Exakta 66 metering prism to input the aperture value selected. Even if the aperture ring on a Carl Zeiss Jena lens were fitted with a suitable cam, it would input the wrong values (at all apertures except potentially one).
As regards the Arsenal lenses from the FSU, there is no standardisation as to the direction of travel of the aperture ring: some rotate the aperture in one direction, and some in the other, so some might in theory be adaptable and others not. The 65mm Mir 38B, the 80mm Arsat and Volna standard lenses, the 120mm Vega, the 250mm f/5.6 Arsat or Telear and the rare 45mm Mir-69 have the same direction of travel as the Carl Zeiss Jena lenses, so could not be adapted.
Others, such as the 45mm Mir-26, the 150mm Kaleinar and the 250mm f/3.5 Jupiter, have the aperture ring rotating in the same direction as the Schneider Exakta 66 lenses, but on these three lenses the aperture ring is near the front of the lens, forward of the focussing ring, whereas it needs to be at the back of the lens if it is to connect to the metering prism, so they cannot be adapted either.
Q6 “Could I
modify a lens
from another manufacturer?”
Answer
Well it would need to fulfil the following
requirements:
1) Have a Pentacon Six lens mount
2) Have an automatic aperture pin –
otherwise there
is no point in even trying to adapt for use with the
Exakta 66 metering
prism, whose default setting is for open (or full)
aperture metering
3) Have an aperture ring that
rotates in the correct
direction (with largest apertures on the left, viewed
from above)
4) Have the aperture ring at the
back of the lens
5) Have an aperture ring of the same
external diameter
as the aperture rings on all the Schneider E66 lenses
6) Have the same physical spacing on
the aperture
ring between the different aperture settings.
Bear in mind that the physical distance travelled by the aperture ring on Arsenal lenses is not standardised: some travel further than others to change the aperture by one stop, depending on the diameter of the lens. Therefore wrong values would be input at most settings, even if everything else was right.
If you managed to achieve all the above,
then you would
be ready to try to meet the final two requirements:
7) Install a pin that would input
the maximum aperture
of the lens to the metering prism (unless it were f/2.8,
in which case,
no pin would be required). Tom Page did this for
me with the 40mm
Curtagon, details of which you can see, starting here.
8) Install a cam that will input the
pre-selected
aperture value into the meter.
In practice, I only achieved my modification by inserting the optical assembly of the 40mm Curtagon into the empty lens chassis of an 80mm Exakta 66 lens that I sacrificed for the purpose.
Q7 “Can I
trick the meter
into working?”
Answer
It is possible to “trick”
the meter by
using two straightened-out paper clips or other similar
objects to depress
the correct contacts, but one needs two hands to do
this, plus a hand to
hold the camera, unless it is on a tripod, and one needs
to move to the
front of the camera in order to see the contacts, so it
is not possible
to look through the viewfinder at the same time.
Even though all of this can be achieved
in a “laboratory”
situation, it is not practical for actual taking of
photographs in a real-life
situation, and is impossible to achieve with a hand-held
camera.
Therefore it is as good as useless. It is for this
reason that I
say that the Exakta 66 metering prism only works with
the correct Schneider
lenses designed for use with this camera.
To go to introduction to the cameras, click here.
To go back to the introduction to the prisms, click here.
To choose other options, click below.
Home
© TRA First published: July 2011
Revised: May 2020