- the maximum aperture (if it is anything other than the default value of f/2.8)
- the chosen aperture set on the lens.
transfer the shutter speed data
to the Exakta 66 metering prism
How to use the Exakta 66 Metering Prism
The Exakta 66 metering prism
provides open aperture metering fully coupled to the camera shutter
speed and lens aperture chosen. It provides the best and fastest
metering offered on any Pentacon-Six-mount camera. However, it can
only be mounted onto an Exakta 66, and only works with lenses designed
for use with the Exakta 66. These lenses input to the prism two items
of information:
|
transfer the shutter speed data to the Exakta 66 metering prism |
This is obviously the best and main way to use this prism. Here is how to use it.
Make sure that a suitable battery with adequate power is inserted in the battery compartment, with the correct polarity. The prism uses a 6 volt V 4034 PX, Varta 7H34, Panasonic 4LR44 or equivalent.
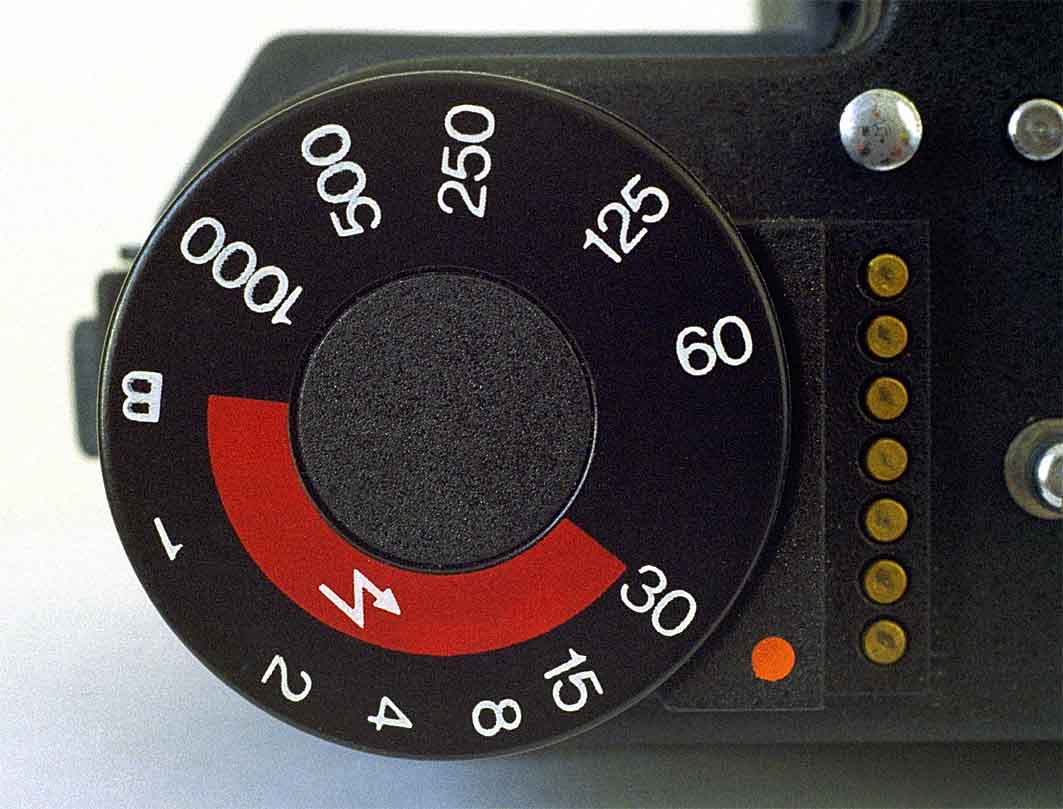
The ISO (“ASA”) speed of the film must of course be set by turning the dial against the index point on the top of the prism.
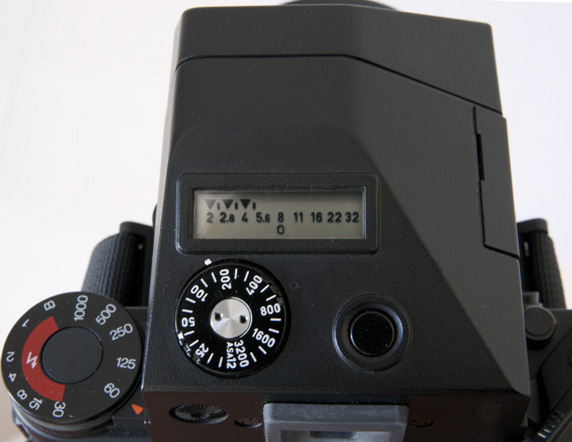
The prism has two sets of indicators, which are only visible when the meter is turned on:
| The aperture numbers
An inverted “pyramid” points at the aperture that has been selected on the lens, and all apertures larger than it. So if you have selected f/4, you will see three pyramids (pointing at f/4, f/2.8 and f/2). A vertical bar between each pyramid shows the half stops. If you have selected f/5.6, you will see four pyramids, etc. The one furthest to the right on the display on top of the prism (and the one lowest down on the display inside the prism) shows the aperture that has been set. |
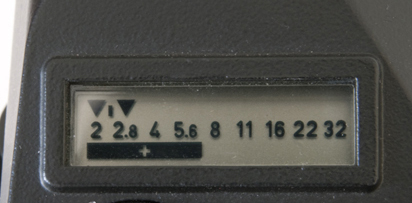
We can see that the lens on this camera has been set to f/2.8 |
The exposure indicators
The exposure indicators consist of a bar with a “+” on the left (at the top within the viewfinder), an “0” in the middle, and a bar with a “-” on the right (at the bottom in the viewfinder). The only time that the “-”, “0” and “+” all light up simultaneously is when the meter is not on the body, or if it is not making good contact to the gold-plated shutter speed contact points on the top of the body. So when you put it on the body, press it firmly home and make sure that your hear it click to engage on each side so that the release button that you will have pressed in on each side comes back out. Now only one or two of the signals should light up.
Obviously, you need to advance the film and take the lens
cap off for the prism to work. Attach an Exakta 66 mount lens to
the body (not a regular Pentacon Six lens) and set the shutter speed and
aperture to a value that may be about right for the prevailing light conditions.
|
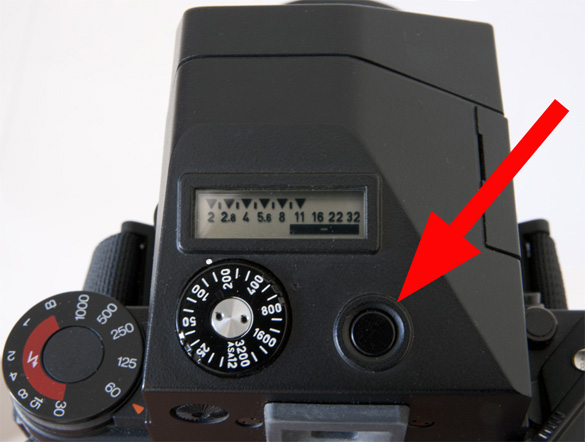
Press the button on the top of the prism (arrowed in
this image) to turn the metering circuit on. (It will turn off automatically
after about 20 seconds to conserve battery power. Press it again
if you have not finished metering.)
Then rotate the aperture ring on the lens. At one extreme (fully stopped down) you should get only the “-” symbol. |
| At the other extreme (fully open) you should get the “+” (over-exposed) symbol. | 
|
|
Somewhere near the middle you should get the “0” symbol only (correct exposure). |
| About half to one stop either side of the correct exposure, the “+” or “-” symbol is likely to be illuminated along with the “0”, or it may flicker on and off. Adjust the aperture until only the “0” is alight. | 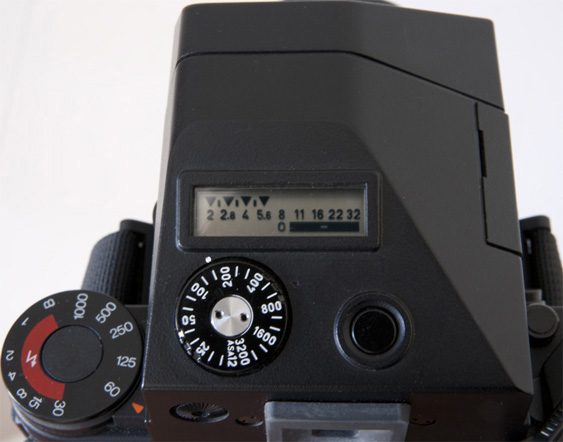
|
If you don't get the “0” at any aperture, change the shutter speed and try again.
Of course, you may prefer aperture priority. In this case, select the aperture of your choice and then obtain correct exposure by changing the shutter speed only. However, working in this way you may need to adjust the aperture by half a stop to get spot-on exposure.
When you first get a metering prism of any make, I recommend that you carry out tests, preferably with slide film or against a known accurate meter, and if you are not happy with the results, make a new white index point on the top of the prism and black out the original one (as I have done with the prism above), to give slightly more or slightly less exposure to give you the density of image on the film that you desire.
Stop-down metering with the Exakta 66 TTL prism
Stop-down metering is only available when using either the Exakta 66 bellows (not those of any other brand!) or the Exakta 66 extension tubes (again, not tubes from any other source). This is because the Exakta 66 bellows and tubes have an external pin that depresses a contact on the underside of the metering prism to switch it to stop-down metering mode.
Andreas Steffen of Pentacon Service in Dresden has sent
me the following fascinating e-mail (the original is on the left, with
my translation on the right):
| Sehr geehrter Herr A,
beim Ansetzen des Balgengerätes oder der Zwischenringe (Originalzubehör) wird das TTL-Prisma der EXAKTA 66 automatisch auf Arbeitsblendenmessung umgeschaltet. Eine am Balgen bzw. Zwischenring befindliche Nase, gibt einen festen Grundwert für die Blende ein. In der Kamera müssen Sie den Springblendenhebel C nach oben schwenken, damit die Objektivblende auf den eingestellten Wert schliesst. Die Einstellung wird wie üblich vorgenommen, mit dem Unterschied, dass sich die Blendenanzeige nicht verändert. Die eingestellte Blende wird in diesem Fall über das einfallende Licht gemessen (Arbeitsblendenmessung). Mit freundlichen Grüßen i. A. Andreas Steffen
|
Dear Mr A
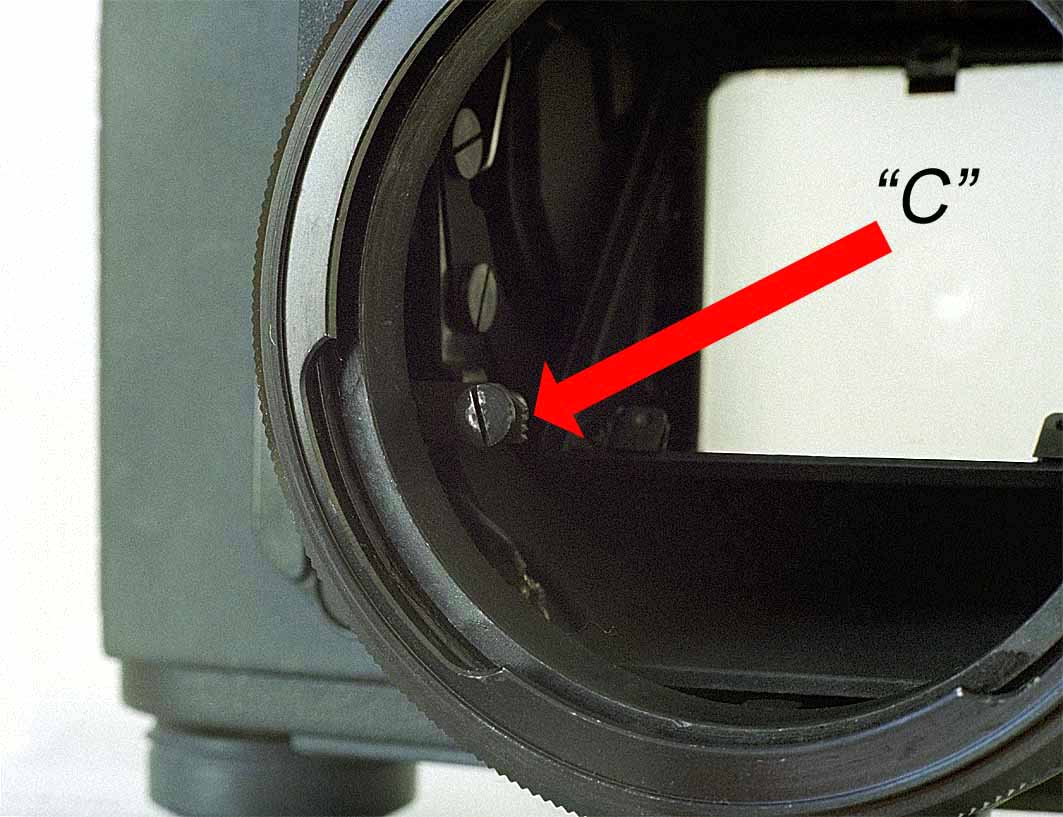
When the bellows or extension tubes (Exakta 66 original accessories) are attached, the Exakta 66 TTL prism is automatically switched over to stop-down metering. A projecting contact on the bellows or extension tube inputs a fixed basic value for the aperture. In the camera you have to swing up the aperture stop-down lever C, so that the lens aperture stops down to the selected stop. Setting up is as normal, with the difference that the aperture display does not change. In this procedure, the light entering the camera is metered via the chosen aperture (stop-down metering). Kind regards
Andreas Steffen
|
| Notes by me:
In the instruction booklet, lever C is indicated (not very clearly!) in the first photograph of instructions (after the pages that label the parts of the camera). Swinging this lever up is described in the last of the paragraphs relating to this photo. The image on the right shows this lever more clearly. As an alternative to swinging this lever up, one can carry out stop-down metering with the Exakta 66 TTL prism (when the Exakta 66 bellows or extension tubes are mounted on the body) by pressing the stop-down lever on the lens while metering. Releasing this lever restores full screen brightness and minimum depth of field for the purpose of focussing with maximum precision. More information on how this
prism works
|
 |
To go back to the section on prisms, click here.
To go back to the Frequently-Asked Questions, click here.
© TRA January 2010, July 2011