by TRA
Hartblei
Equipment for using Pentacon Six & Mamiya RZ67
lenses
on Fujifilm GFX Cameras
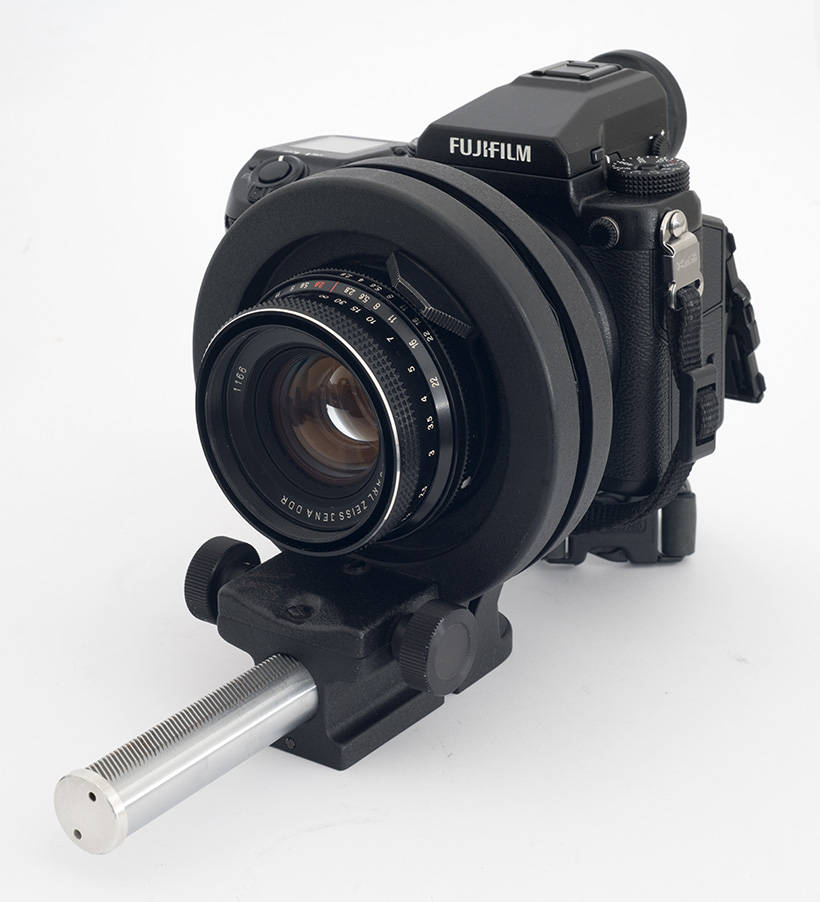 Using a Pentacon Six lens on the Fujifilm GFX camera, via a Hartblei adapter on Pentacon Six bellows [hart_RZ67-GFX_tubes_03.jpg] |
On this page we give more information on
two different types of Hartblei adapters for using
Mamiya RB/RZ67 lenses on Fujifilm GFX medium format
digital cameras:
- Hartblei tubes for use with Pentacon Six bellows to provide focus for Mamiya RZ67 lenses on the Fujifilm GFX camera;
- using the most versatile of the Hartblei adapters for mounting Mamiya RZ67 lenses on the Fujifilm GFX camera.
We then look at storage options for a
sophisticated Hartblei/Mamiya RZ67 outfit.
Using Pentacon
Six Bellows for Focussing with Hartblei adapter
tubes
|
Most of Mamiya’s lenses for their
RB67 and RZ67 cameras do not have a focussing
mount, as focussing bellows are built into the
Mamiya 67 camera bodies. This does create
a problem for those who may wish to use these
excellent medium format lenses on other cameras:
they must find a way of focussing the lenses. Hartblei offers a set of two
adapter tubes that can be used to mount Mamiya
RZ67 lenses onto Fuji GFX medium format digital
cameras, using Pentacon Six bellows to provide
the focussing mechanism. On the left we see the tube that
goes into the front of the Pentacon Six
bellows. At its front it has a mount to
receive Mamiya RB/RZ67 lenses. On the
right we see the tube that goes onto the back of
the Pentacon Six bellows. At its back it
has a Fujifilm GFX camera mount. |
 [hart_RZ67-GFX_tubes_01.jpg] |
 Here we can see these two tubes mounted onto the Pentacon Six bellows. We note the tab that protrudes from the front of the bellows unit. This is swung to the right to lock the lens – or in this case the Hartblei RZ67 lens mount – into place. On some occasions, this detail of the bellows design can cause problems, as we see below. [hart_RZ67-GFX_tubes_02.jpg] |
Using Pentacon
Six lenses
If one wishes to do so,
it is of course possible to use only the back one of
these adapters. Thus, the Hartblei Pentacon Six
to Fuji GFX adapter can be mounted onto the back of
the Pentacon Six bellows, enabling the bellows to be
mounted onto a GFX camera. One can then add to
the front of the bellows some lenses with the Pentacon
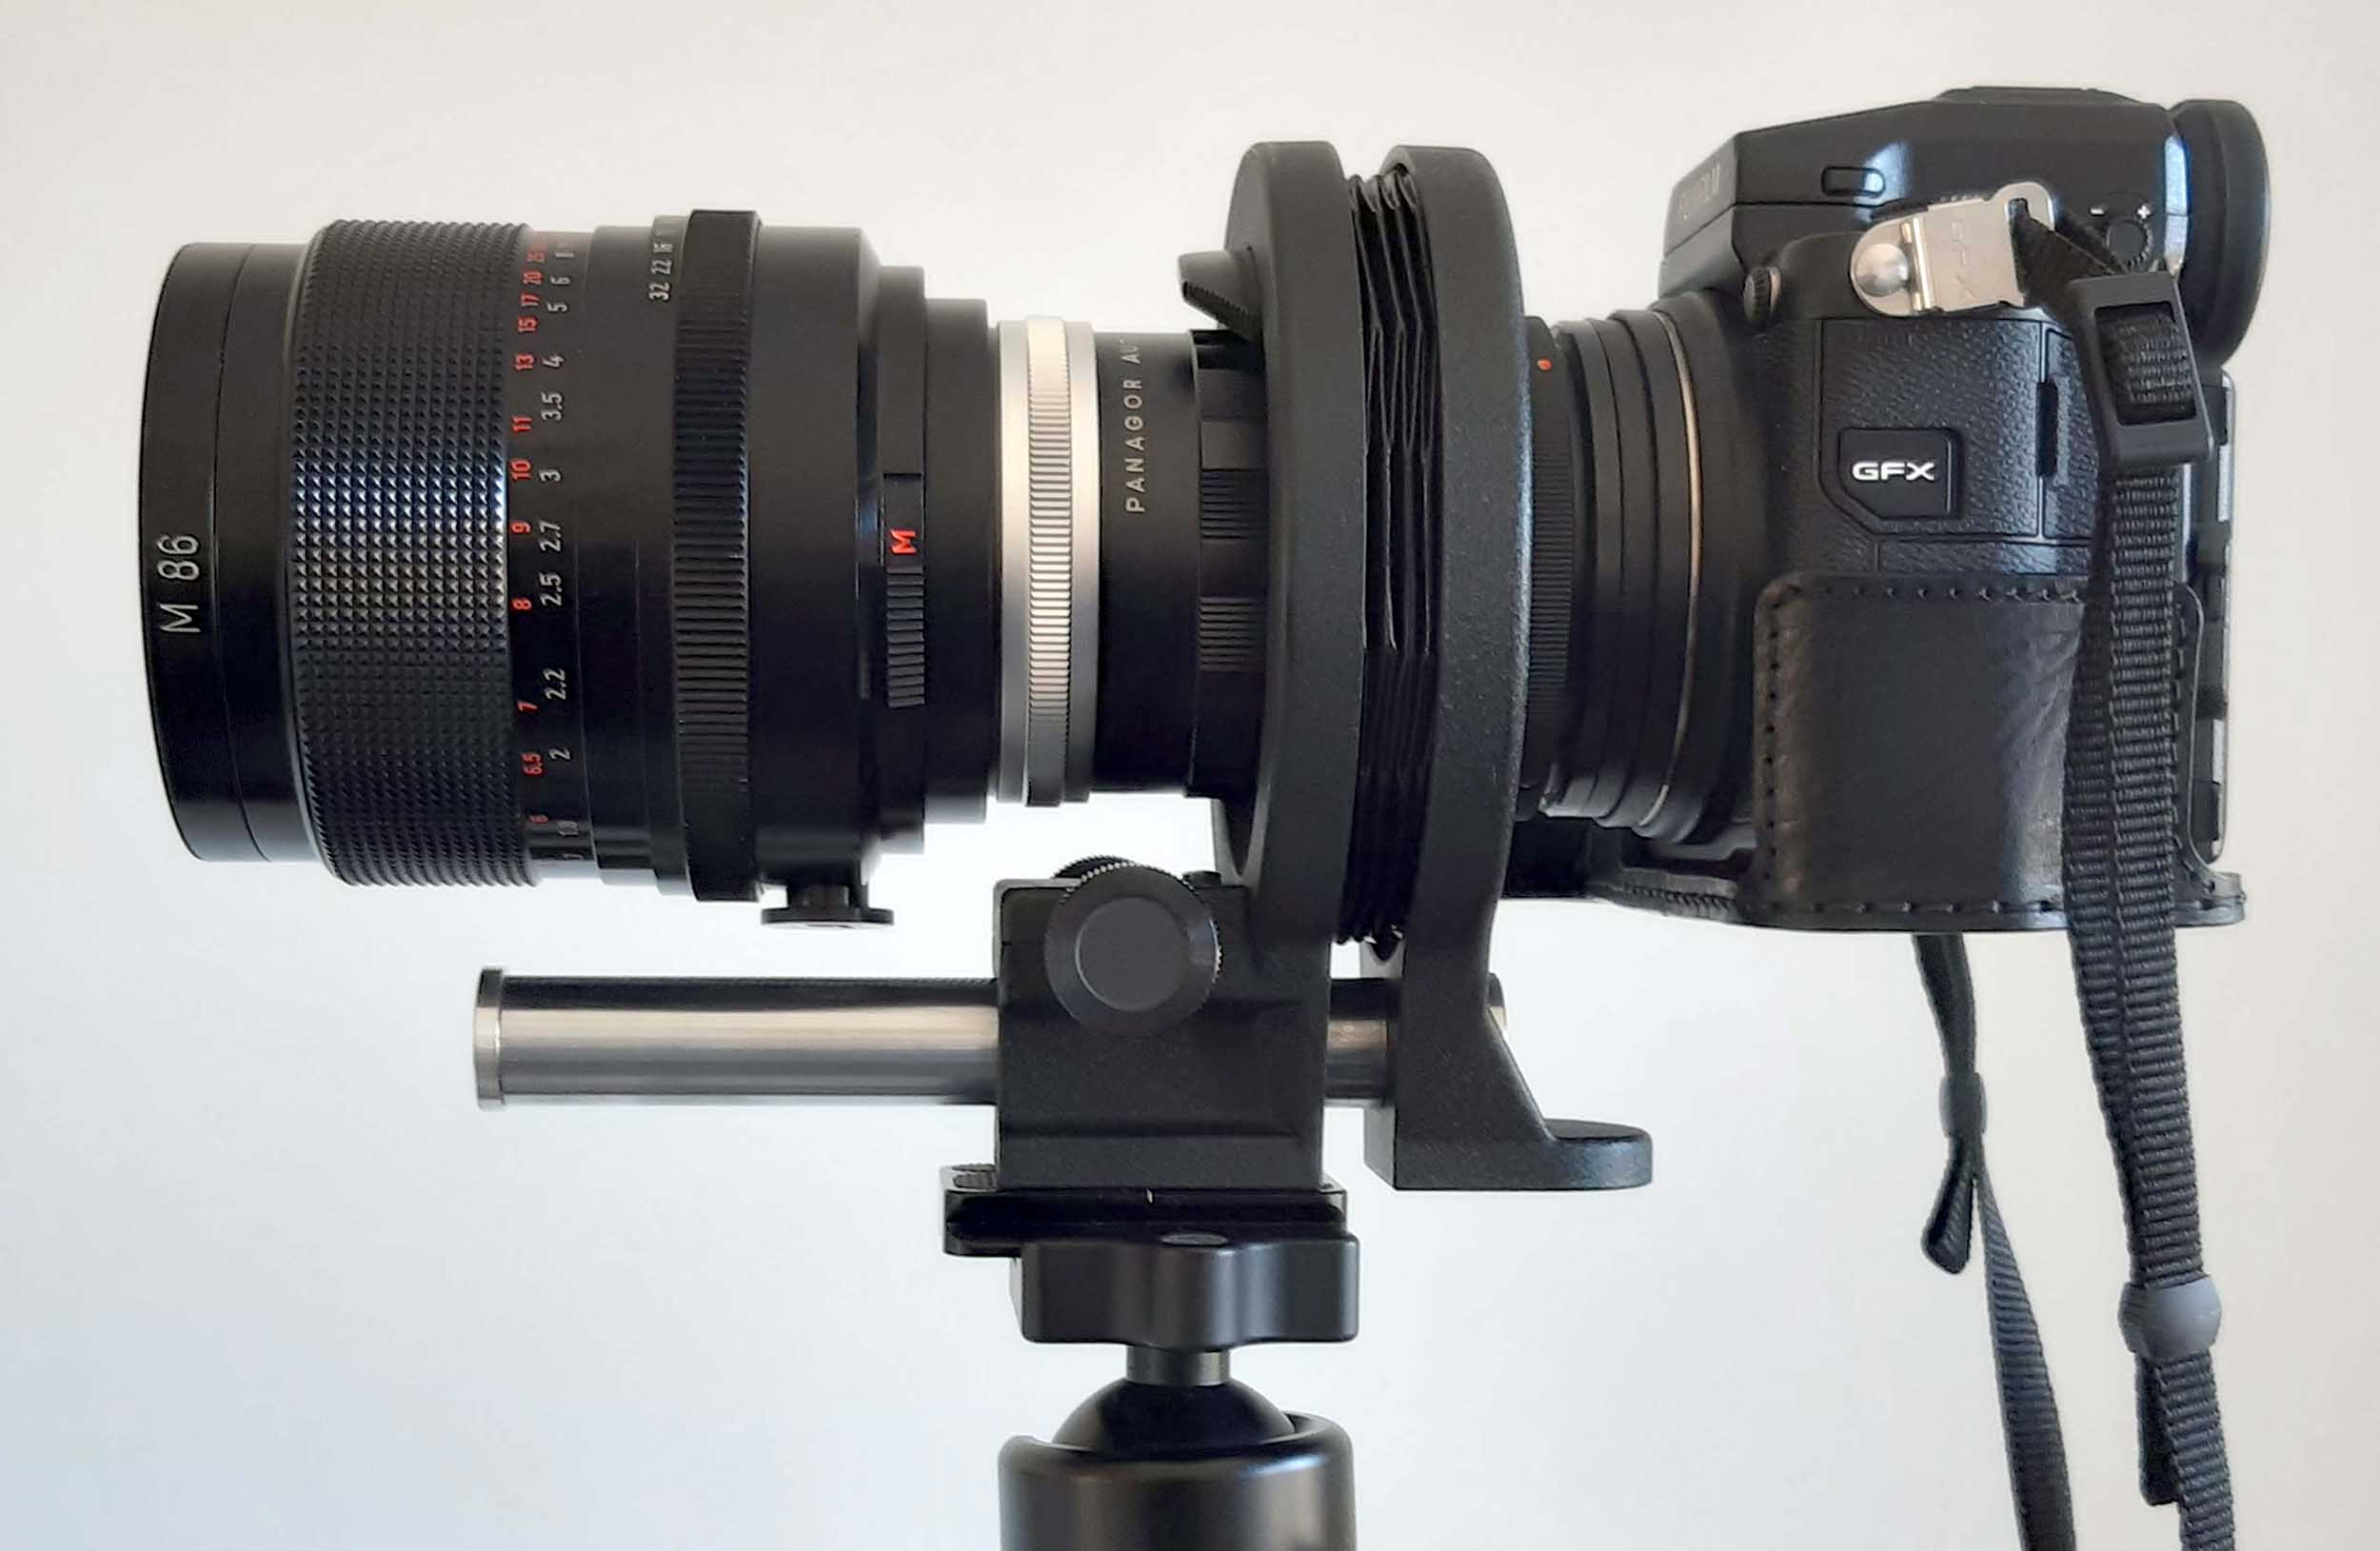
Six mount. At the top of this page we see a Carl
Zeiss Jena 80mm Biometar lens mounted onto a GFX
camera via Pentacon Six bellows and the rear section
of the Hartblei P6 – Fuji GFX adapter. In that
picture we have set the lens at infinity and the
bellows at the right extension for infinity focus with
Pentacon Six lenses (approximately a 5.5mm bellows
extension).
There are of course much
easier ways to mount Pentacon Six lenses on GFX
cameras:
- a simple adapter (with or without a tripod foot)
- a shift adapter
- or a tilt adapter.
Details of all these
items and pictures of them can be seen here.
However, if we do not have any of these adapters but do already have Pentacon Six bellows, buying the Hartblei two-part adapter set shown above is one way to go. It does not provide shift or tilt possibilities, but it does make macro photography with the Fuji GFX possible, using any suitable Pentacon Six lens that can be mounted onto the Pentacon Six bellows.
|
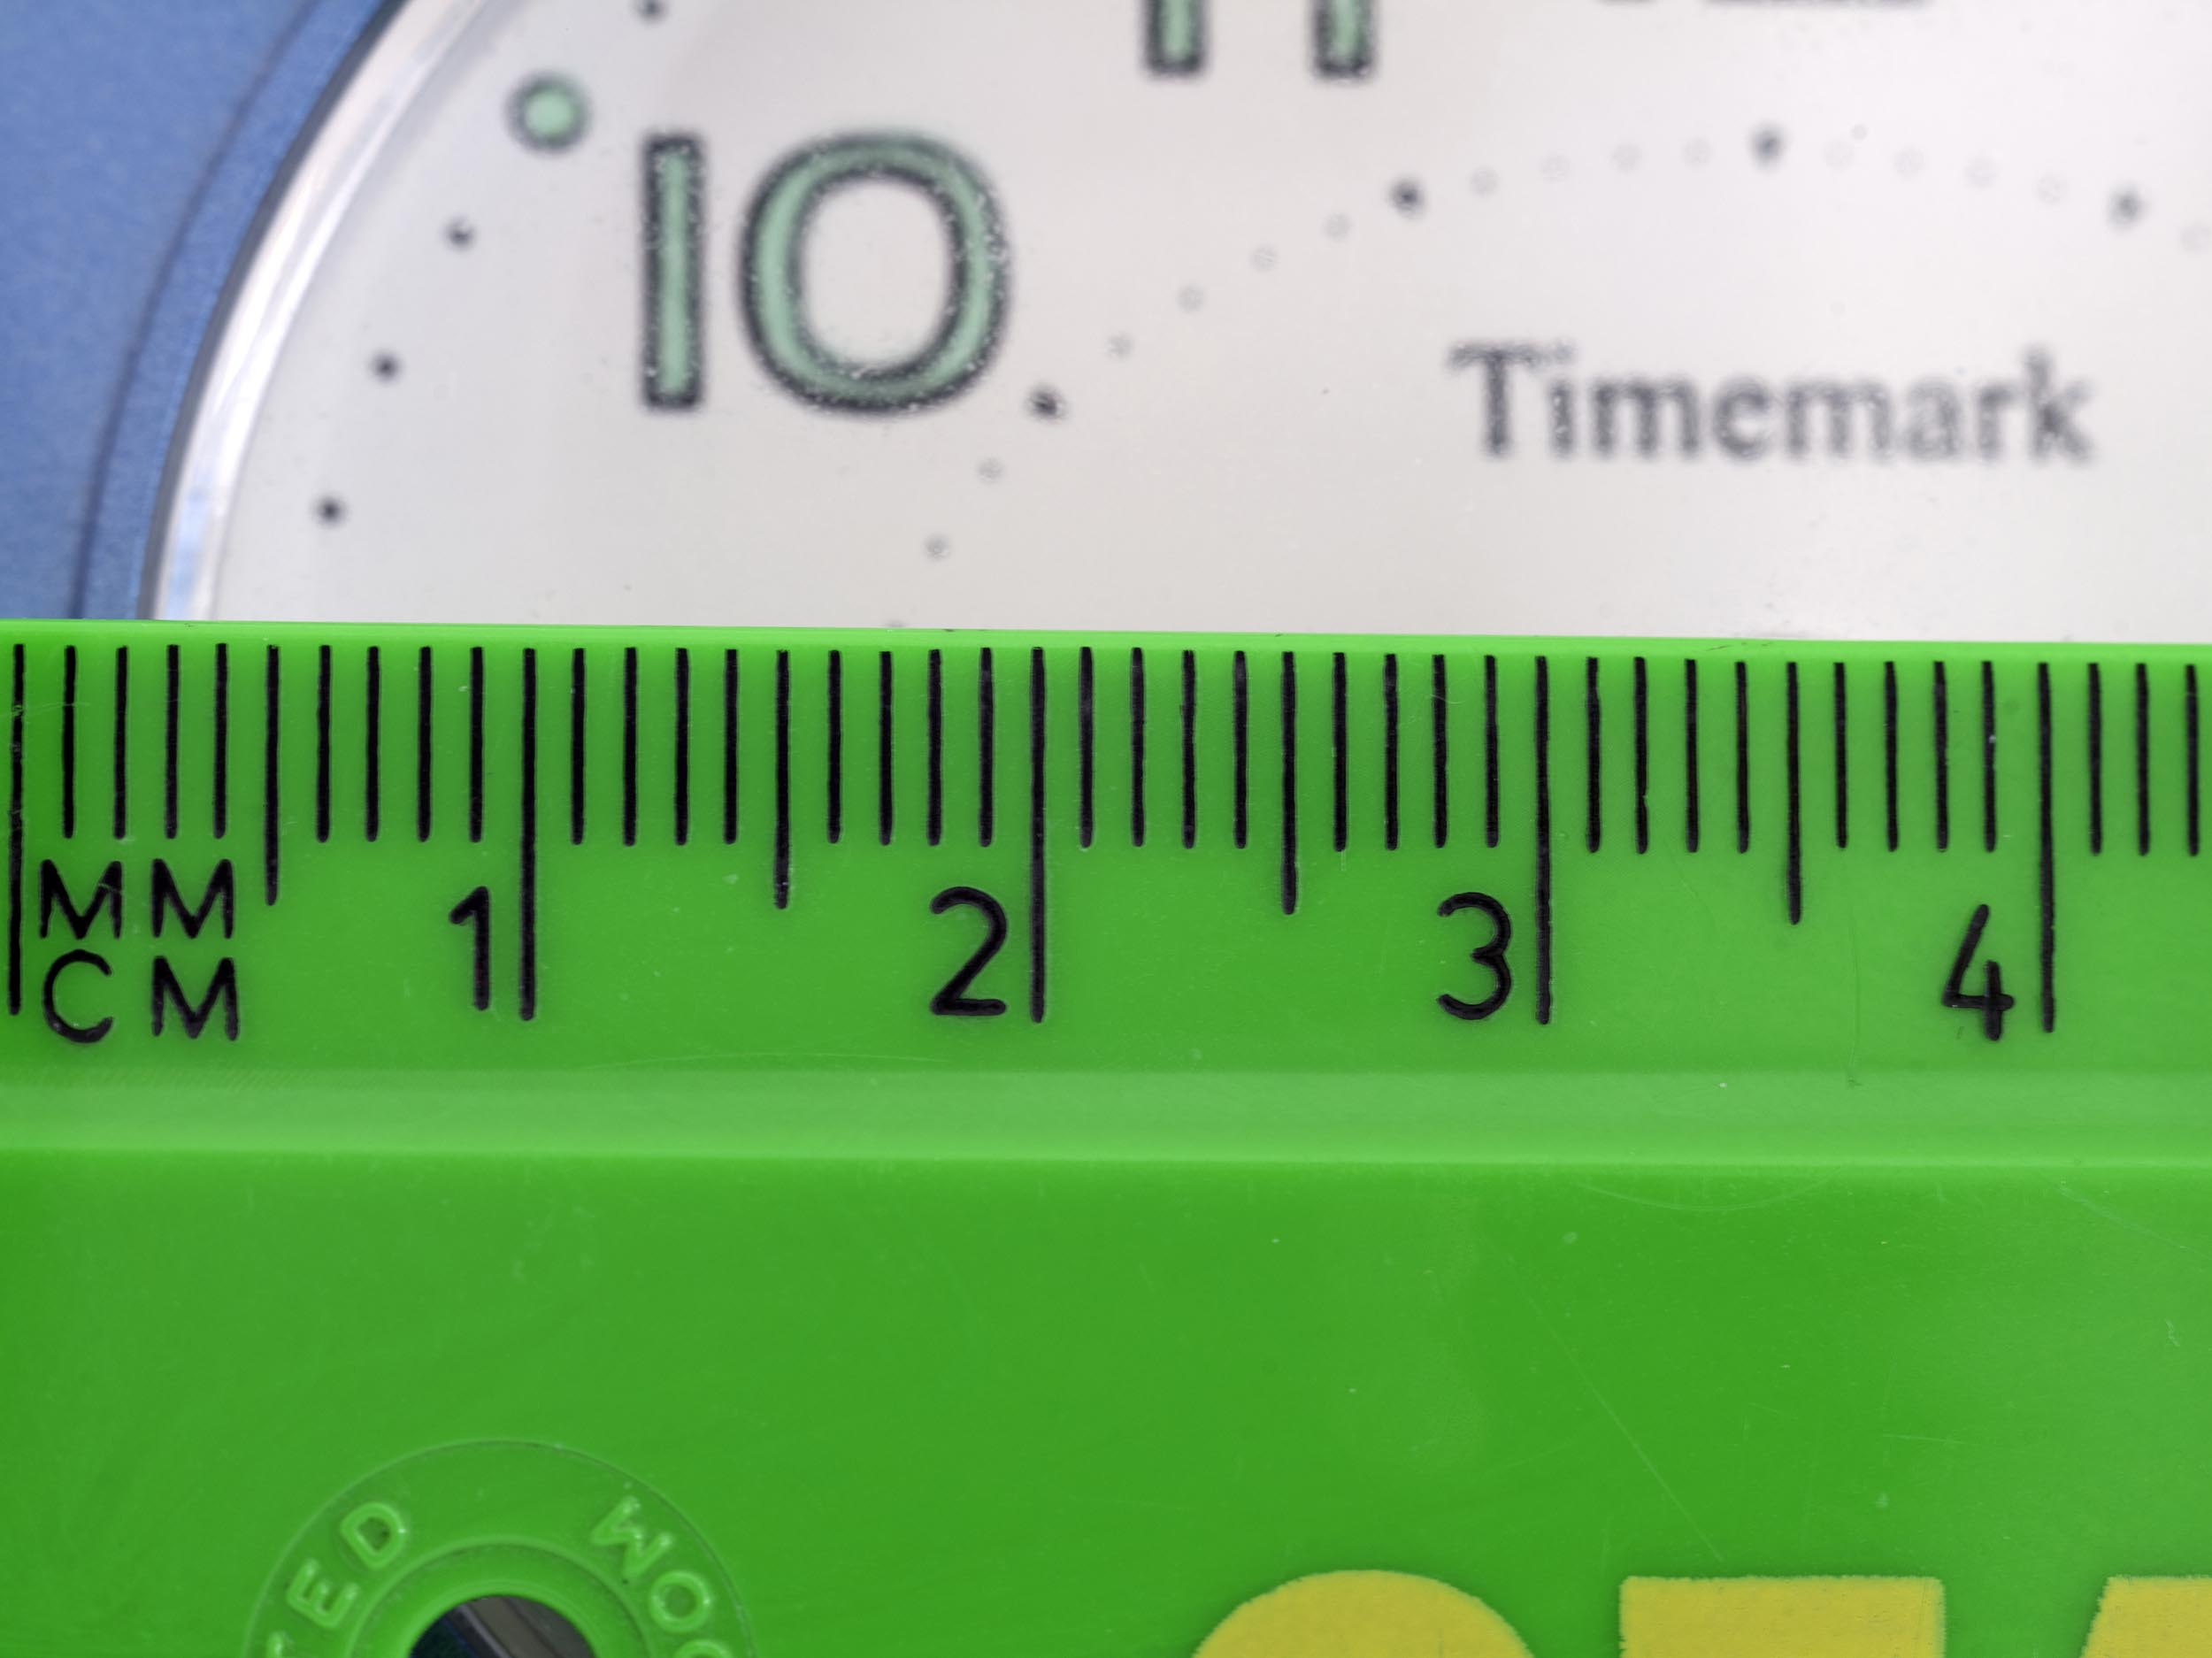
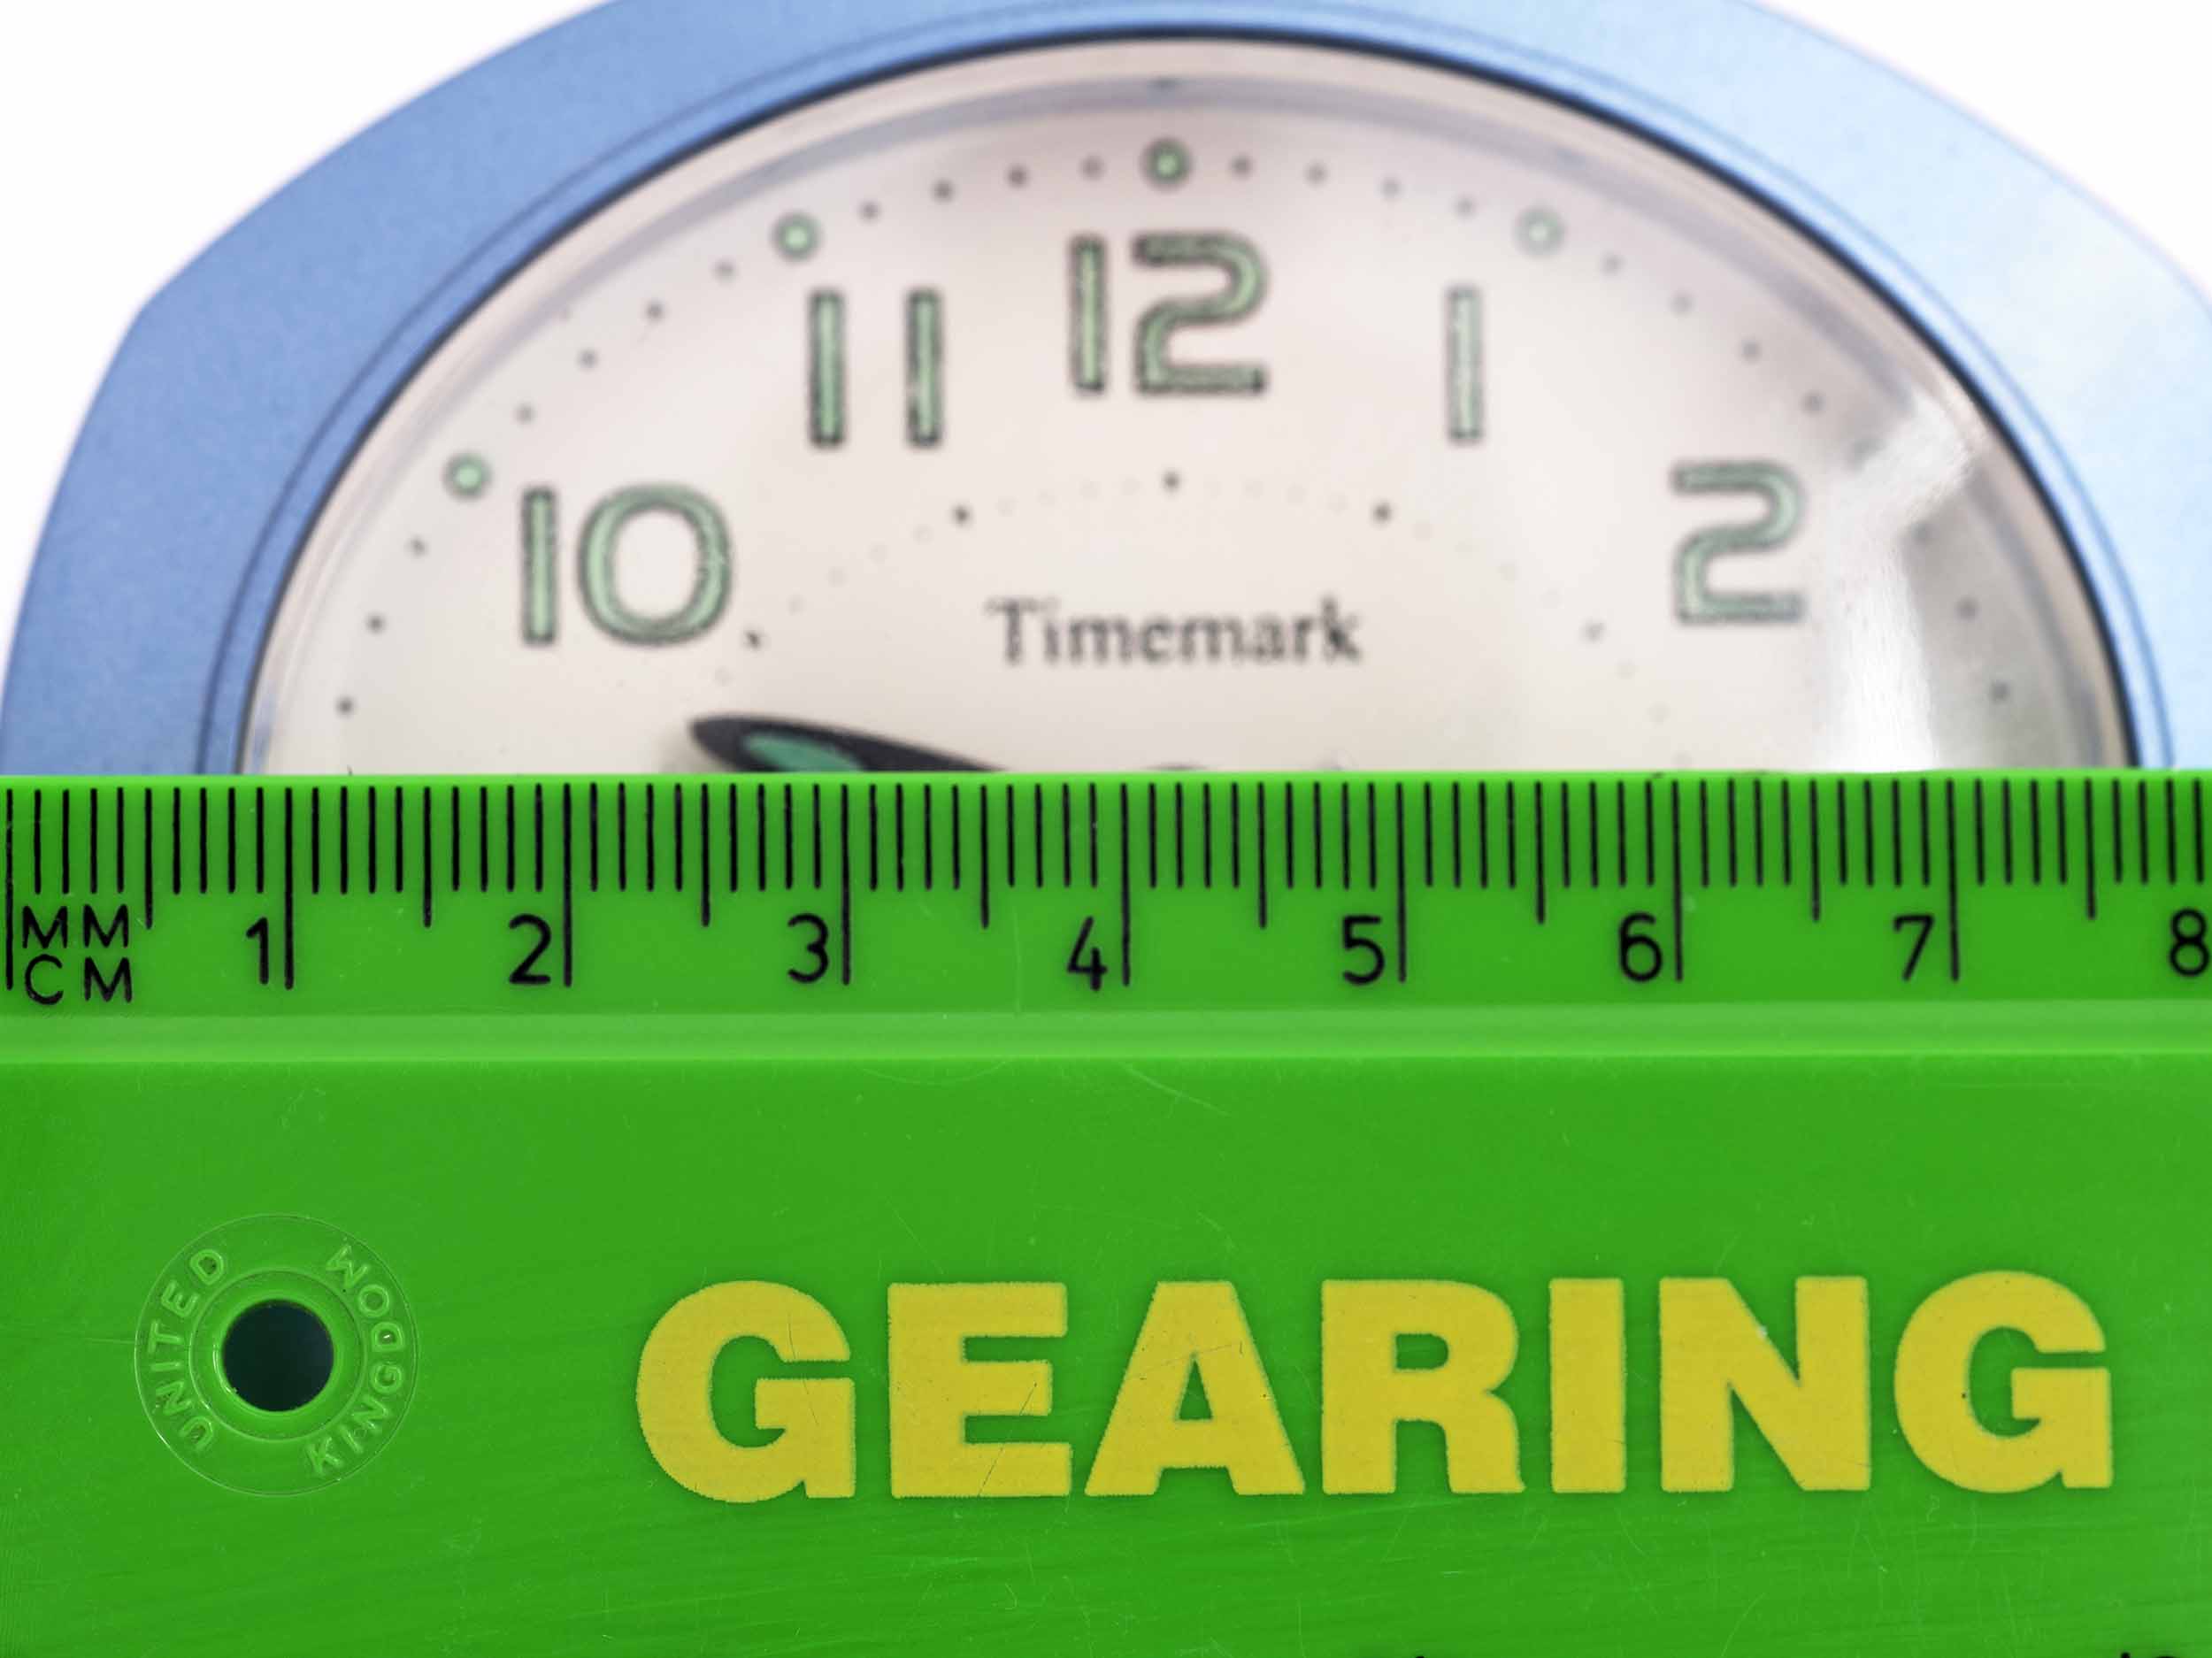
This test picture
was taken on a Fujifilm GFX 50S using the 80mm
Biometar on the Pentacon Six bellows,
connected to the GFX via the rear section of
the above Hartblei adapter. With the
bellows at maximum extension and the lens also
at maximum extension (i.e., minimum focussing
distance), we see that the width of the
subject is 44mm. The width of the GFX
sensor is 43.8mm, so we here have a virtually
1:1 (life-size) macro capability. For this
photograph the aperture of the Biometar was
set at f/11, without which the clock face
behind the ruler would have been very out of
focus, so shallow is the depth of field in
macro photography. The outstanding
quality of both the Biometar lens and the GFX
51 megapixel sensor can be appreciated in the
larger version of this image. We can see other
pictures of this clock here. Click on the
image to the right in order to see it larger
(but not at the original size, which is too
big to host on this website!). |
|
 [80Bm_Bell_GFX_01_s.jpg] |
| This photograph of the setup shows a cable release running from the front of the bellows. It was necessary to depress the plunger on this and lock it, in order to stop down the diaphragm to the aperture set on the lens, as the bellows otherwise ensure maximum aperture for focussing and composition. | |
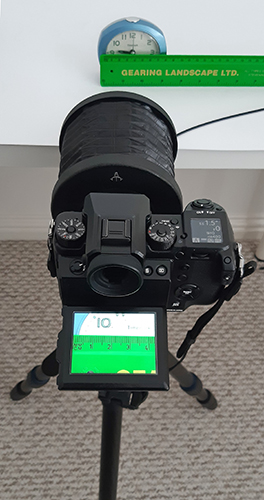 [80Bm_bell_GFX_setup.jpg] |
| If we
turn to other lenses, we immediately discover
that the locking tab on the front of the
Pentacon Six bellows prevents some lenses from
being mounted directly onto the bellows.
One of the lenses that cannot be mounted onto
the bellows is the Carl Zeiss Jena 180mm Sonnar
lens, which is too thick at the back of the
barrel. However, we here show an example
of use of this lens used with the Panagor 2×
converter on a GFX 50S camera. We note that in spite of the weight of the lens, we cannot use the tripod socket that it has, because of the location of the focussing rail of the Pentacon Six bellows. It was clearly never intended or expected that these two items would be used in combination. Click on the image to see it larger. |
|
 [180x2_bell_gfx_s.jpg] |
Using Mamiya
RZ 67 lenses
| However, it was
clearly the intention of Hartblei that both parts
of their Mamiya RZ67 lens to Fujifilm GFX body
should be used on the Pentacon Six bellows, and if
we use both parts of the Hartblei adapter, we can
of course use Mamiya RB/RZ67 lenses, using the
Pentacon Six bellows to provide focus. Here we see the results when
using the Mamiya RZ67 140mm macro lens, again
with the bellows at maximum extension.
This lens is of course much heavier than the
80mm Biometar, which has changed the centre of
gravity for the outfit, so we have again placed
our Arca Swiss-compatible mount on the front
standard of the bellows. Click on the image to see it
larger. |
|
 [140_macro_bell_s.jpg] |
|
With this setup the width of the
subject is a tiny fraction over 80mm, so we are
talking of approximately half the magnification
obtained with the 80mm Biometer. Of
course, extension tubes, whether for Mamiya 67
cameras or for the Pentacon Six, could be
combined to obtain a 1:1 ratio. For this
lens, too, we set the aperture at f/11 and
adjusted the floating elements of the lens to
correspond to that which would have been
obtained if we had used the two macro tubes
produced for the RZ67 by Mamiya. |
|
 [140_macr_bell_setup.jpg] |
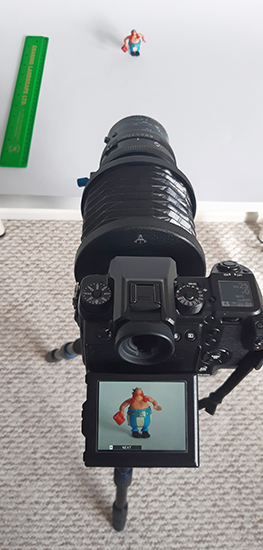
| Let us look at a
different subject photographed with the Mamiya
RZ67 140mm macro lens on the Fujifilm GFX camera
via the Hartblei adapter tubes and the Pentacon
Six bellows. This is not the first time that
Obélix has starred on this website (see here). With
his arms down as in this picture he is just 45mm
tall. From a composition point of view, this image should be cropped to at least square, and possibly vertical. However, for the purpose of these tests, we show the full frame. Click on the image to see it larger. We can see that at f/11 the depth of field has not fully reached Obélix’s feet. This is where using a tilt lens in Pentacon Six mount or a Hartblei tilt adapter with a Pentacon Six lens would have been helpful. For information on the Hartblei tilt adapter for using Pentacon Six lenses on Fujifilm GFX cameras, see here. For information on shift lenses in the Pentacon Six mount, links can be found here. |
|
 [obelix_s.jpg] |
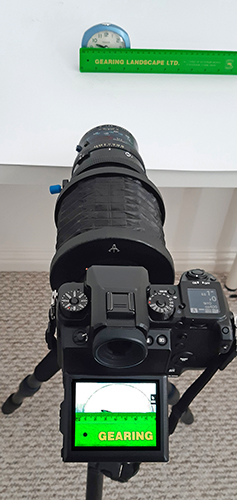
The setup photograph
to the right here helps us to appreciate just how
tiny this figure of Obélix is.
|
|
 [140_macro_oblx_setup.jpg] |
Using a Pentacon
Six Extension Tube with a Hartblei adapter
For the Mamiya RZ67, the manufacturers
produced one lens that did have a
built-in focussing mechanism. It was the
100mm-200mm f/5.2 Mamiya zoom lens. So with this
lens we don’t need to use the Pentacon Six bellows in
order to obtain focus. Is there another,
less-cumbersome, method, especially for hand-held
shots? The answer is “Yes!” We know (from here) that the
minimum extension of the Pentacon Six bellows is
reportedly 19mm. We extended them by approximately
3mm to obtain infinity focus, obtaining an extension
which must be 22mm, if the minimum extension is indeed
19mm, as claimed.
There is a 22.5mm extension tube as part
of the set of four automatic tubes for the Pentacon
Six. So we tried this between the above two
components of the Hartblei RZ67 – Fujifilm GFX
adapter. With the Mamiya RZ 67 zoom lens mounted,
we did in fact have to extend the focus on the lens by
about 1mm to obtain infinity focus, which suggests that
the minimum extension of the Pentacon Six bellows is
probably about 20.5mm. Adding a 3mm extension to
this gives us 23.5mm, the same as using the 22.5mm tube
+ 1mm extension on the lens.
| |
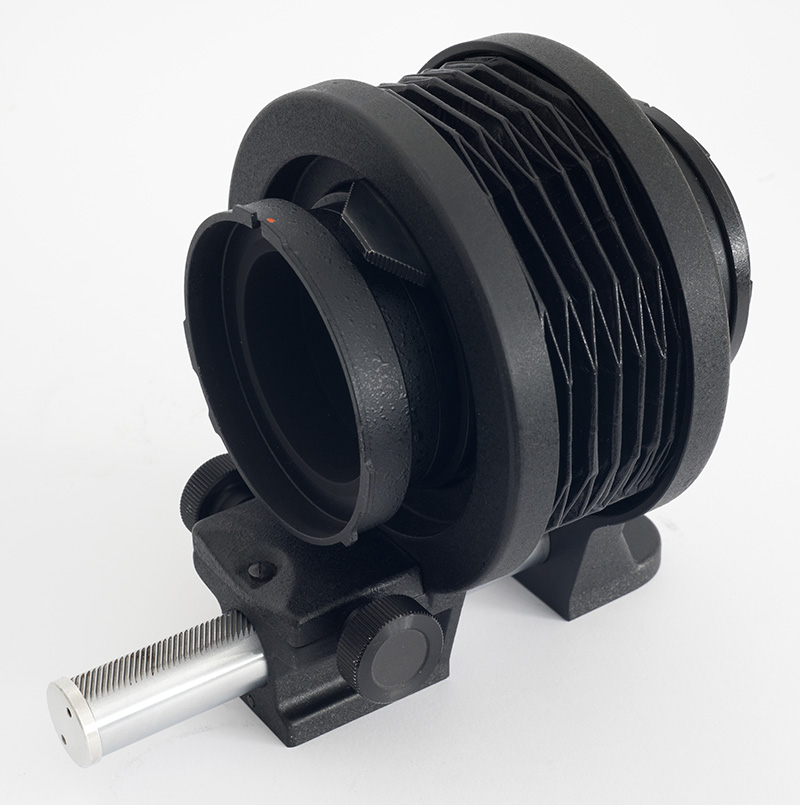
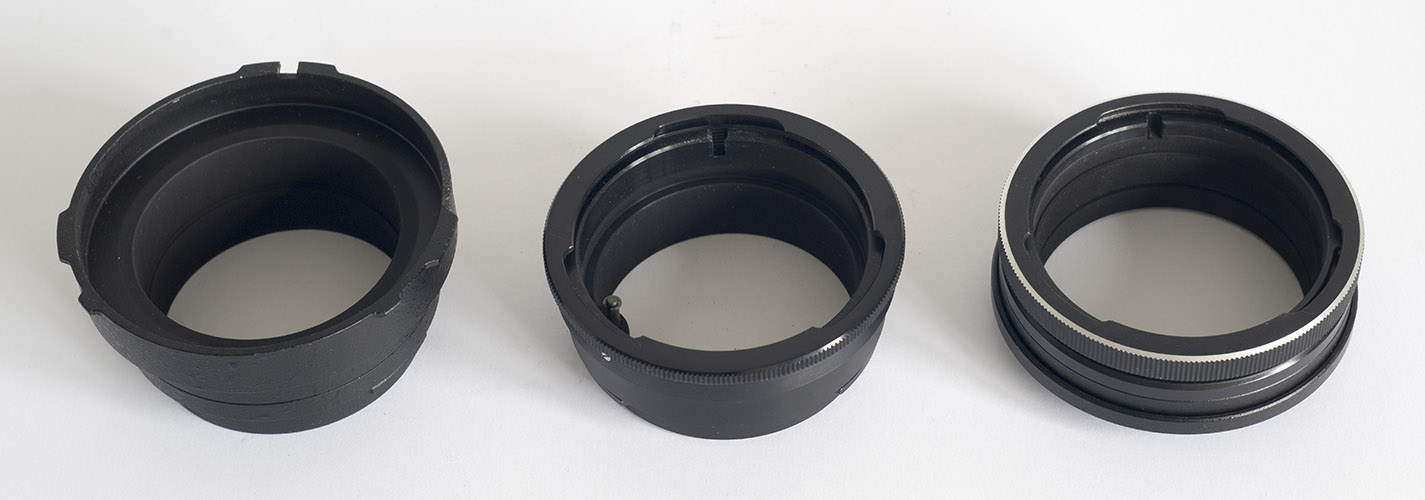 From left to right: Hartblei Mamiya RZ67 lens mount to Pentacon Six body mount (for mounting onto a Pentacon Six body or the front of the Pentacon Six bellows), Pentacon Six 22.5mm auto extension tube, Hartblei Pentacon Six lens mount (for mounting onto the back of the Pentacon Six bellows) to Fujifilm GFX camera body mount for mounting onto a GFX camera [hart_RZ67-GFX_tubes_04.jpg] |
|
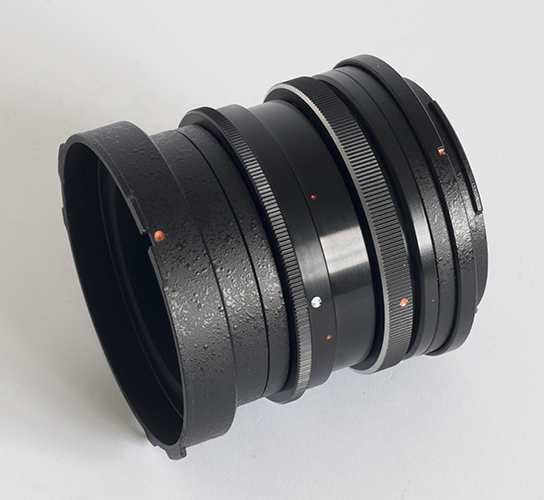 The three components illustrated to the left here, assembled for use between the Mamiya RZ67 100-200mm zoom lens and a Fujifilm GFX camera body [hart_RZ67-GFX_tubes_05.jpg] |
|
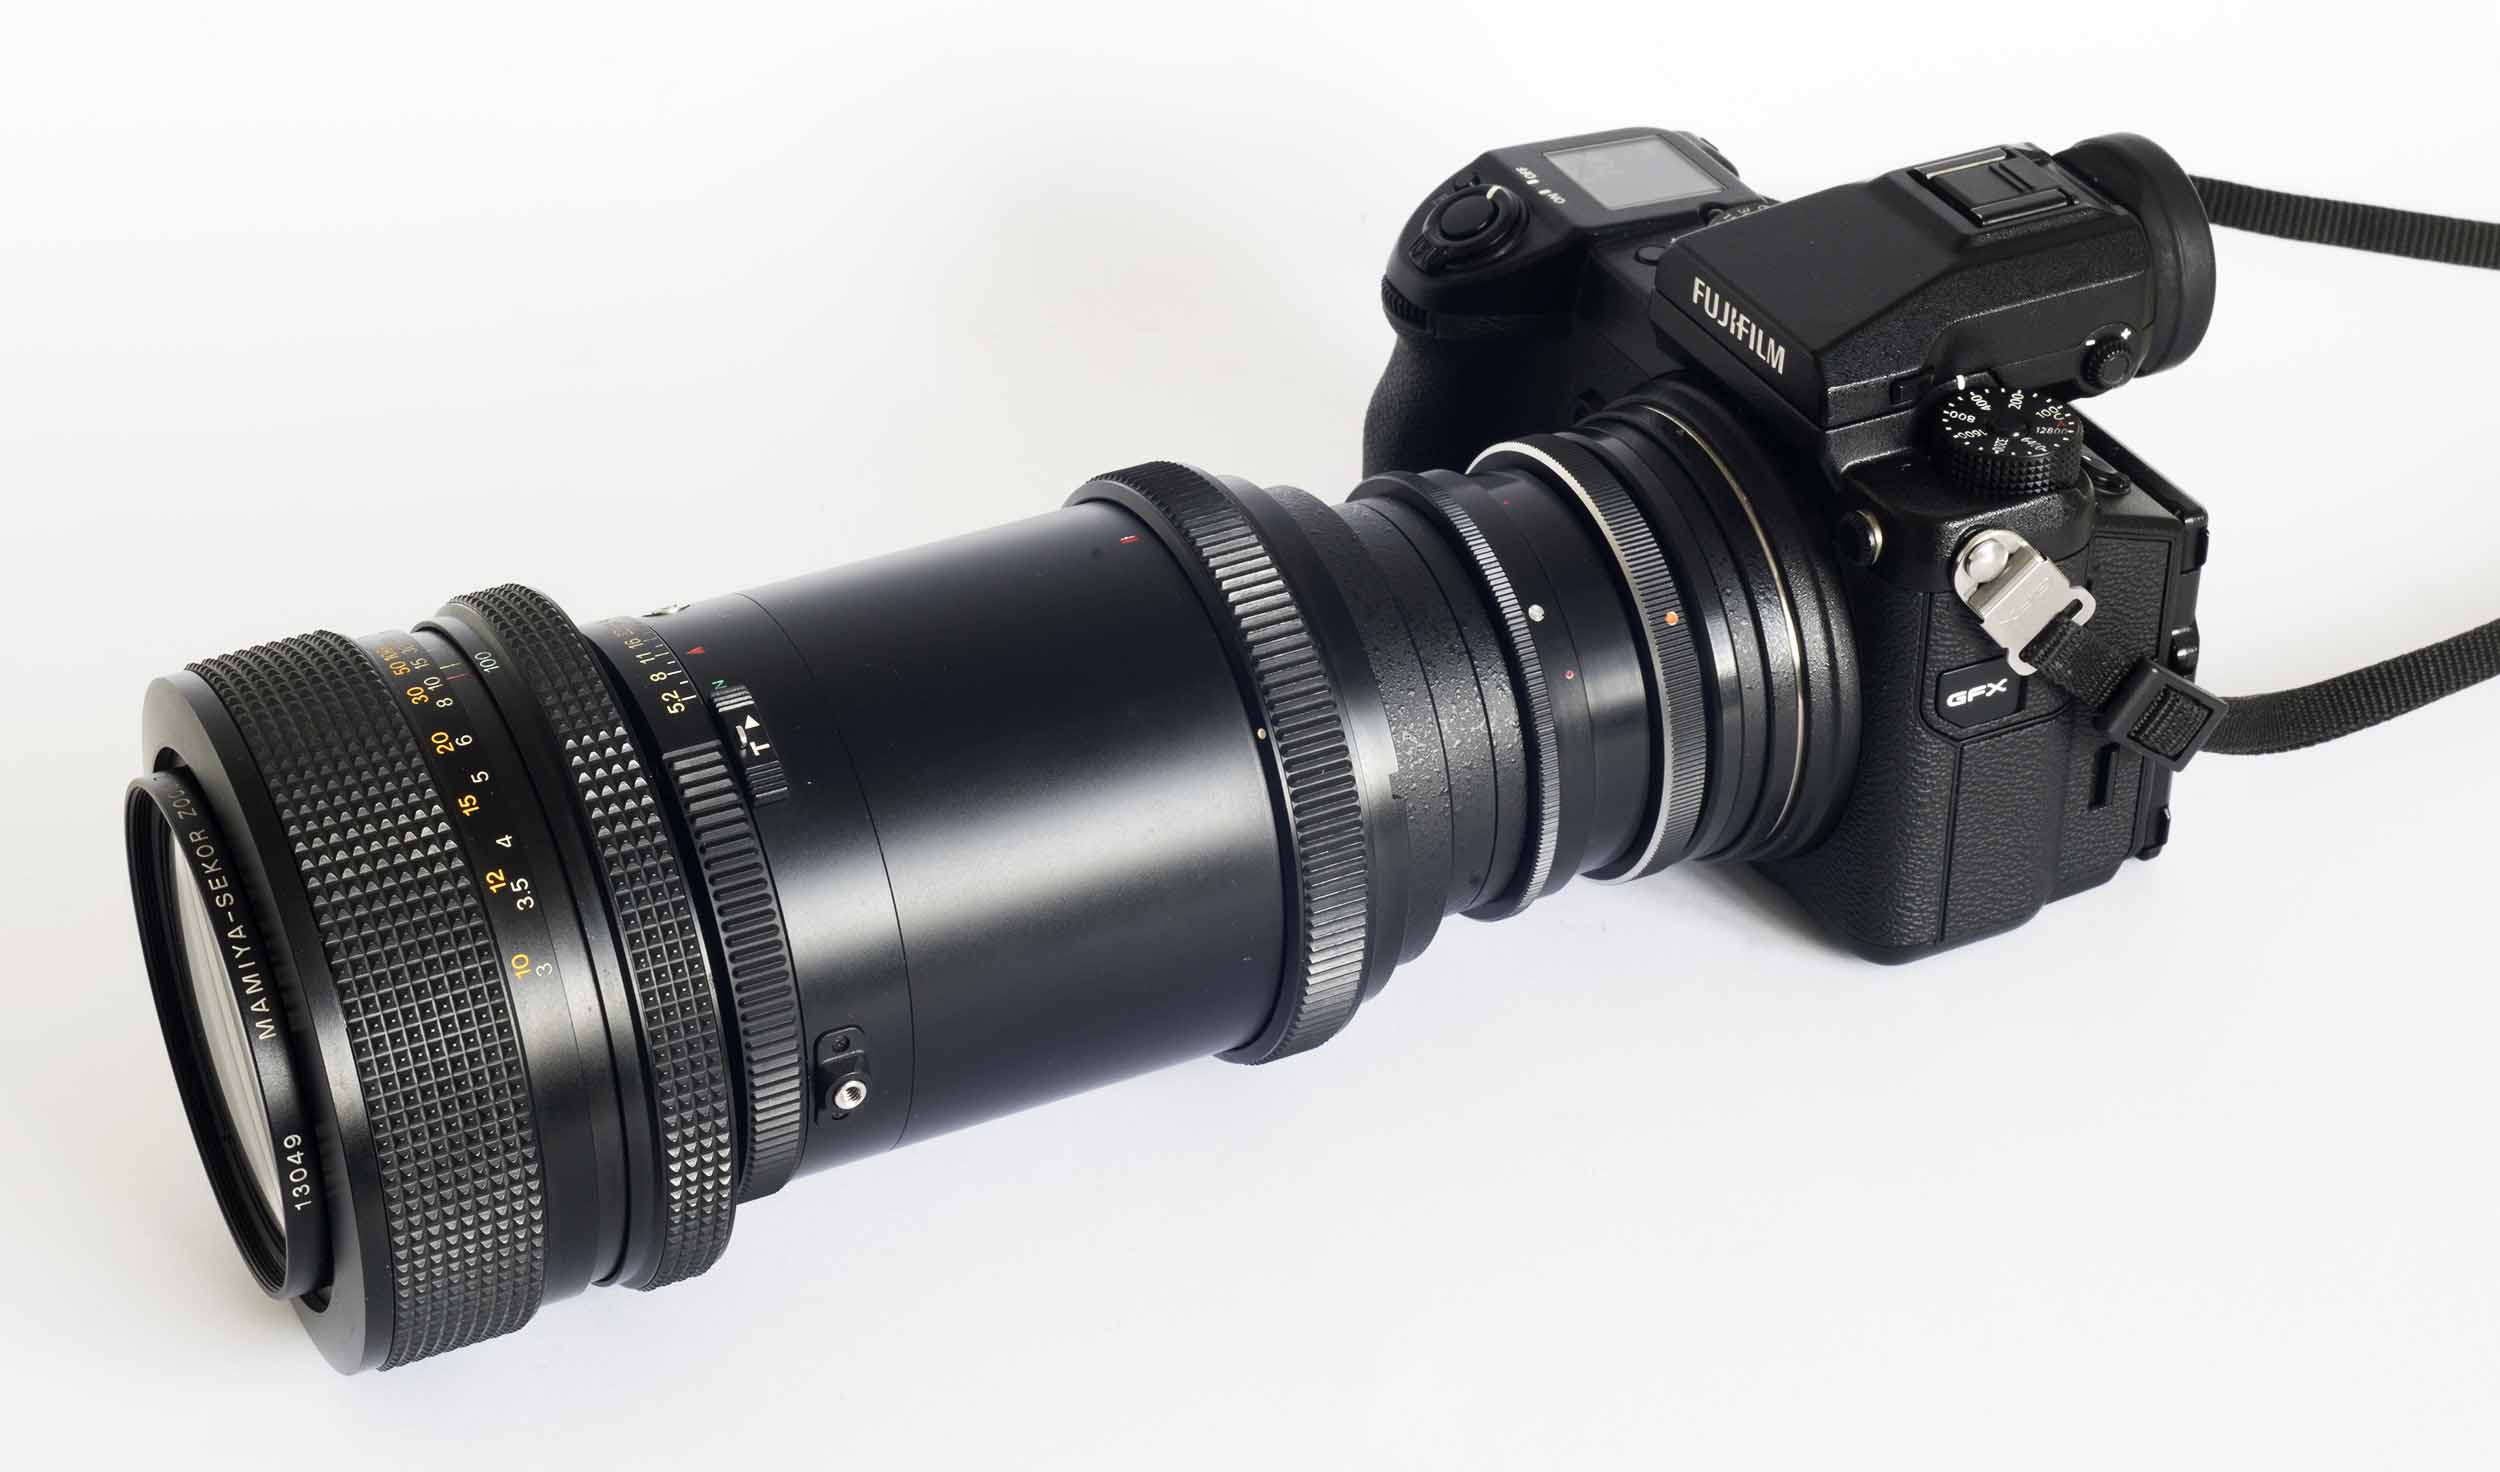 Here we see the Mamiya zoom lens fractionally extended by the lens focussing ring to give infinity focus on the Fujifilm GFX camera. Click on this image to see it larger. [hart_RZ67-GFX_tubes_06_s.jpg] |
Using the most
versatile of the Hartblei adapters for Mamiya
RB/RZ67 lenses
This adapter adds 12mm shift in any
direction with any Mamiya RZ67 lens, and has rotation
points in three different places to enable easy change
of camera orientation, for instance, from horizontal to
vertical, and easy and independent change of shift
direction for the adapter and for any shift lens mounted
on it. Pictures obtained with it are shown here.
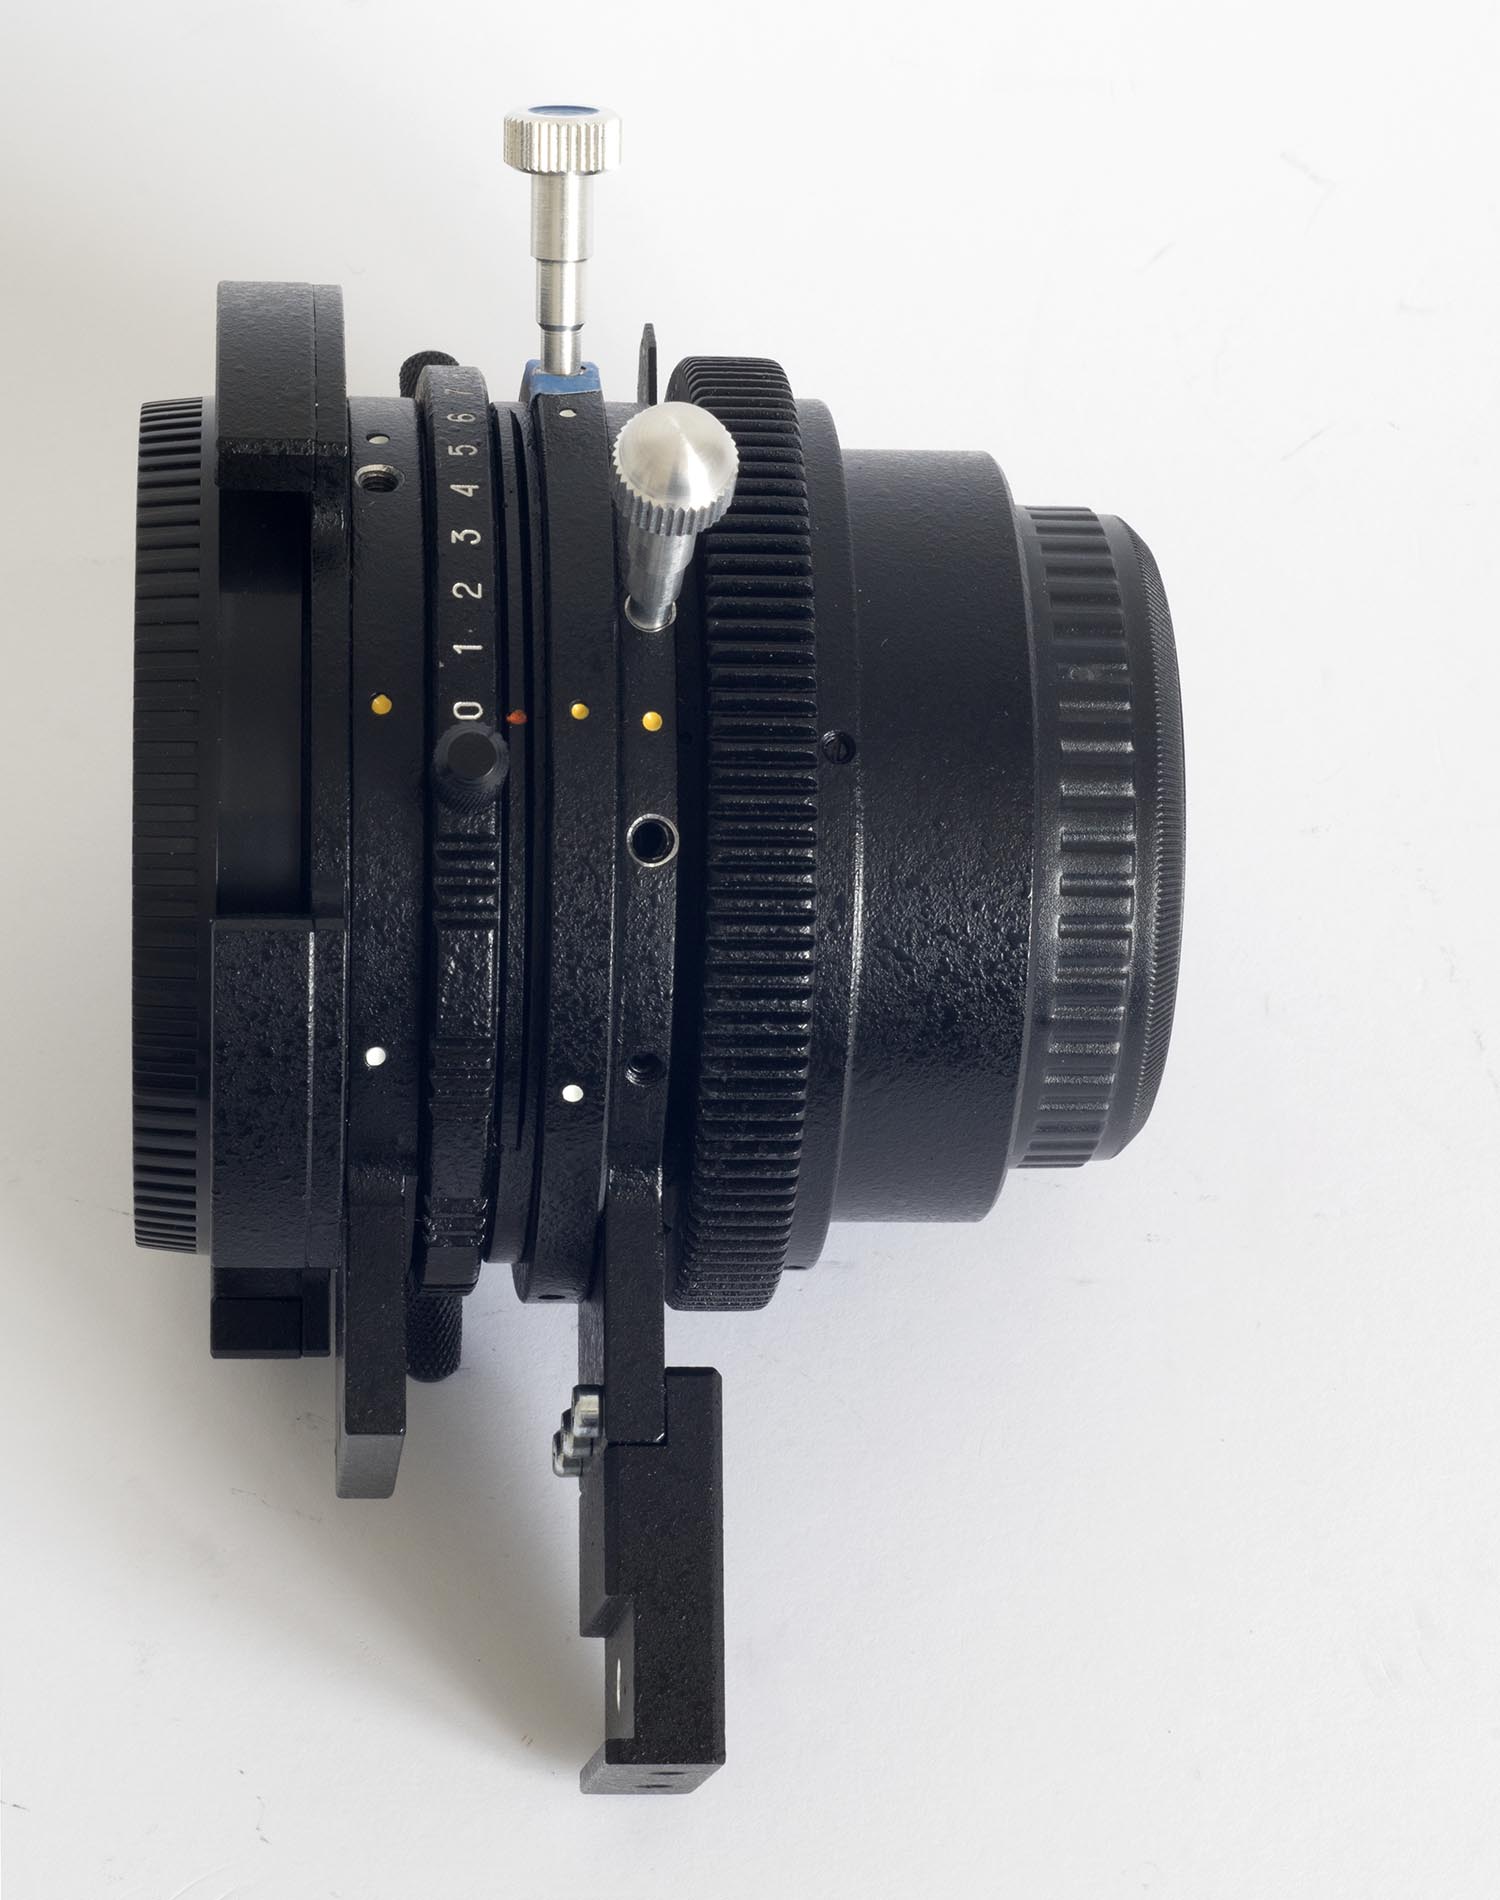 The Hartblei shift and rotation adapter at minimum extension, which provides infinity focus with all Mamiya RZ67 lenses on Fujifilm GFX cameras. [hart_RZ67-GFX_12_s.jpg] |
|
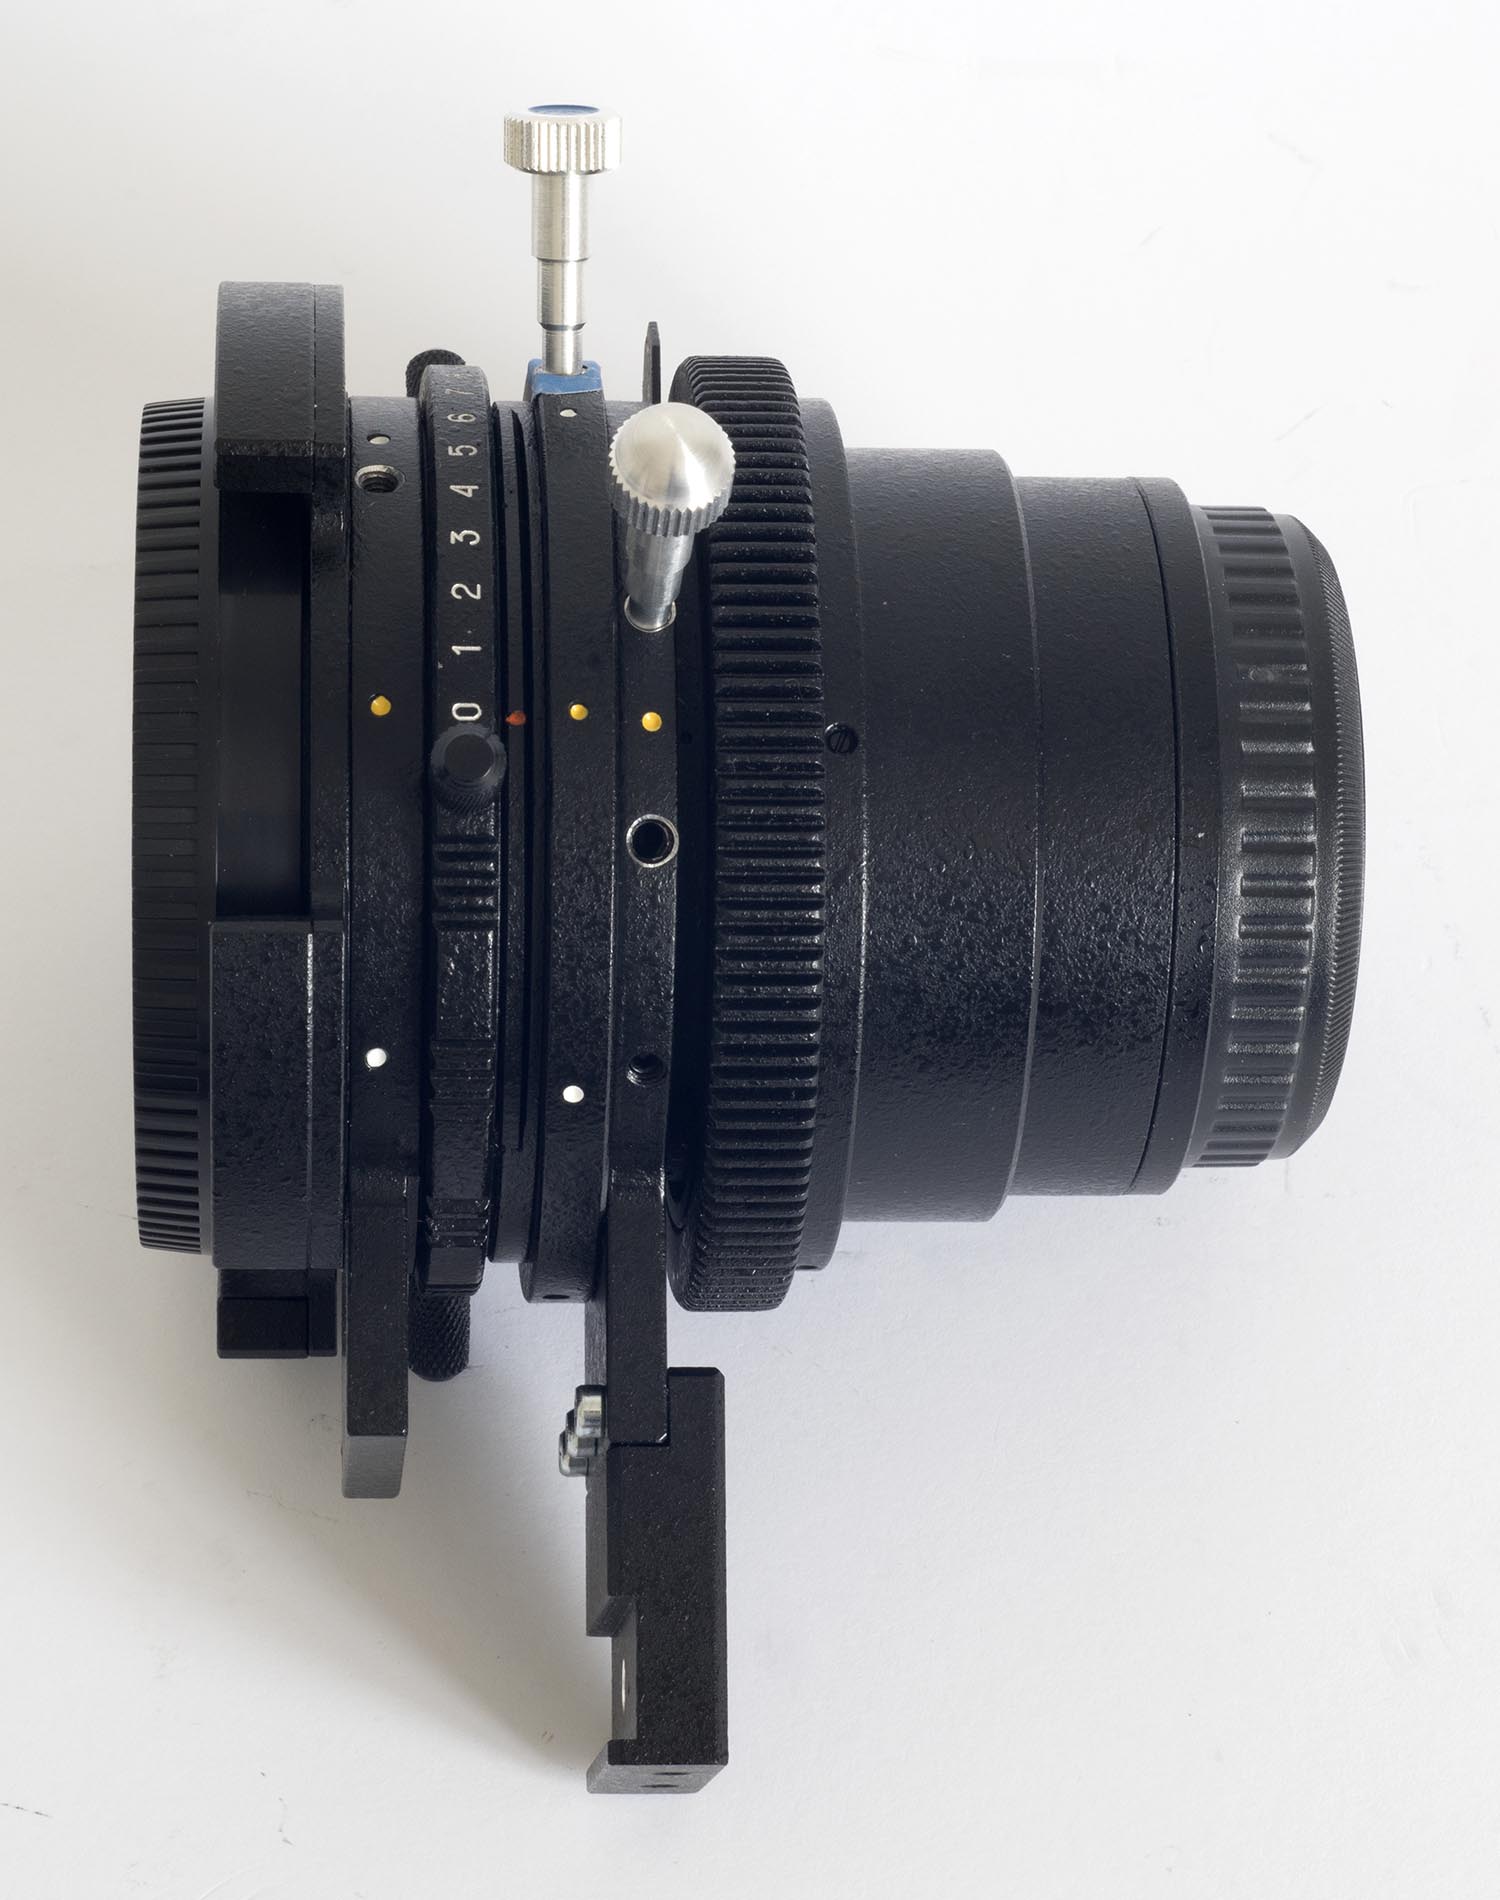 The Hartblei shift and rotation adapter at maximum extension, which provides quite close focus, the exact distance varying, depending on the lens used. [hart_RZ67-GFX_13_s.jpg] |
||
| A small component of the PRO focussing
bracket was left in situ when both of these
pictures were taken. On the barrel, sockets for further locking screws can be seen, and plenty of locking screws are included with the equipment. Click on the images to see them larger. |
||||
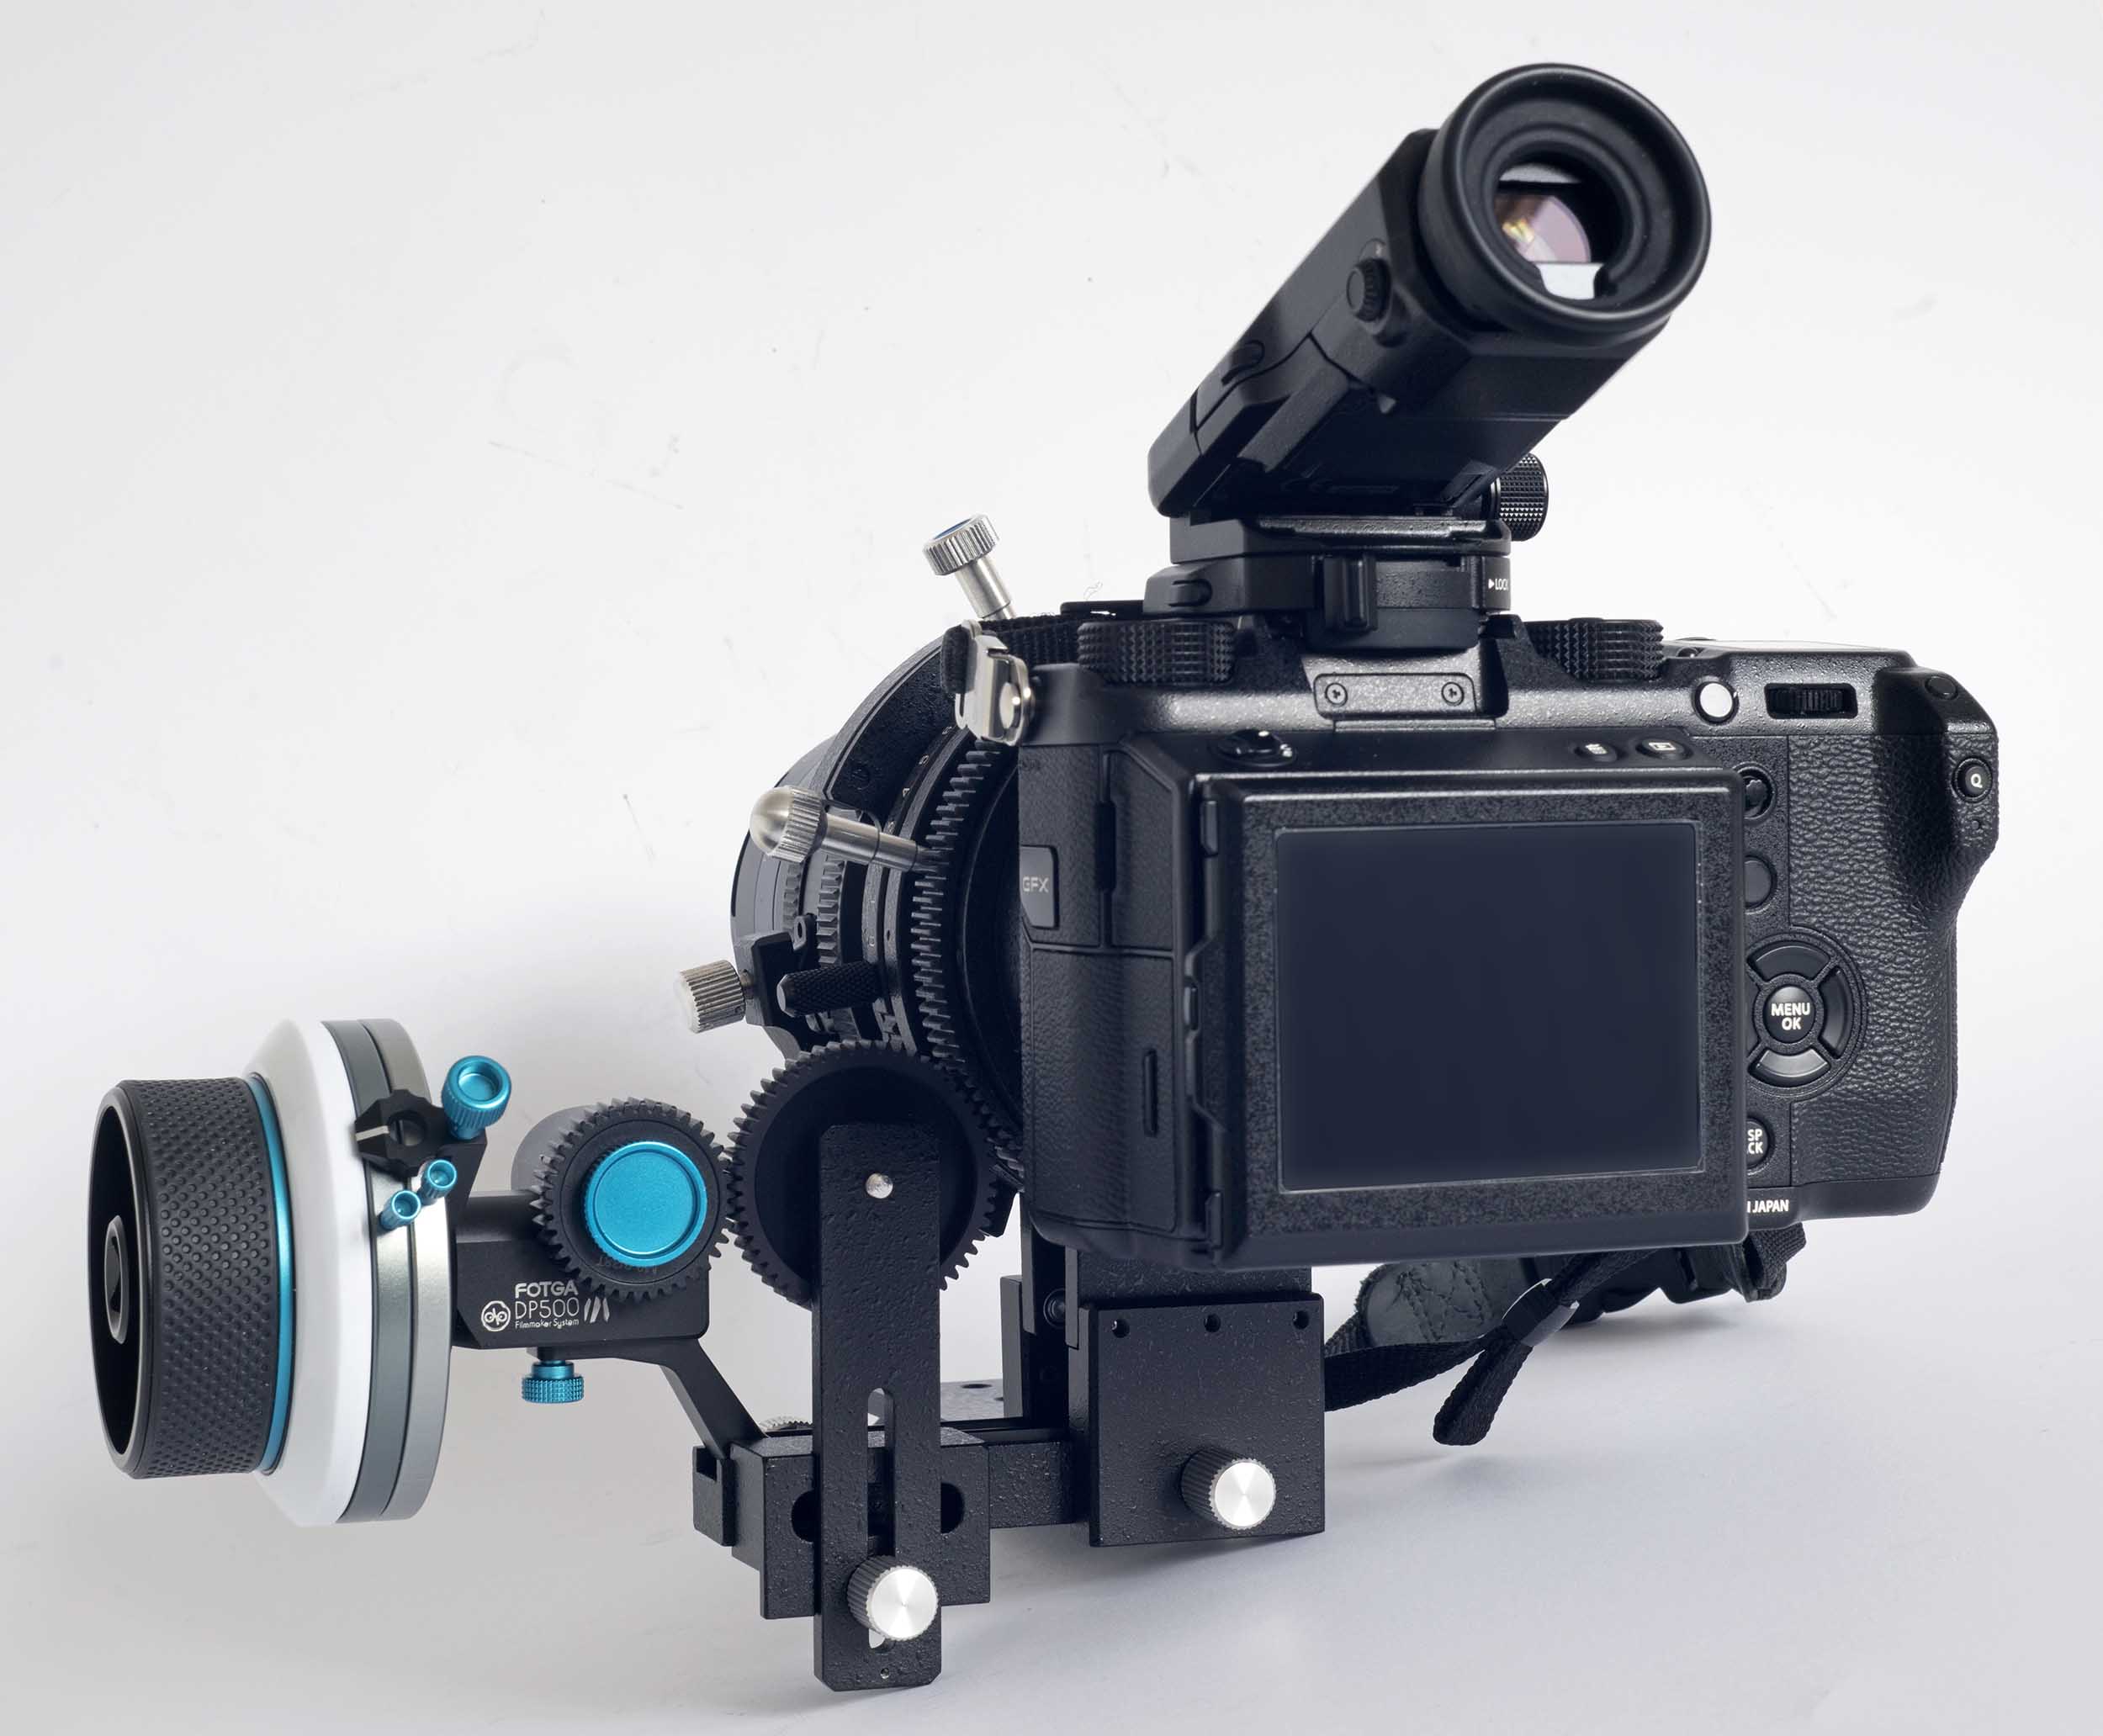
Focussing
Options
It is course possible to turn by hand the focussing
ring (the cogged wheel) on the Hartblei adapter, but a
more sophisticated approach is to use a Fotga Follow
Focus adapter. This uses geared wheels to increase
speed and precision of focus. The
Fotga DP500 II
or III is apparently normally supplied with
this Hartblei adapter.
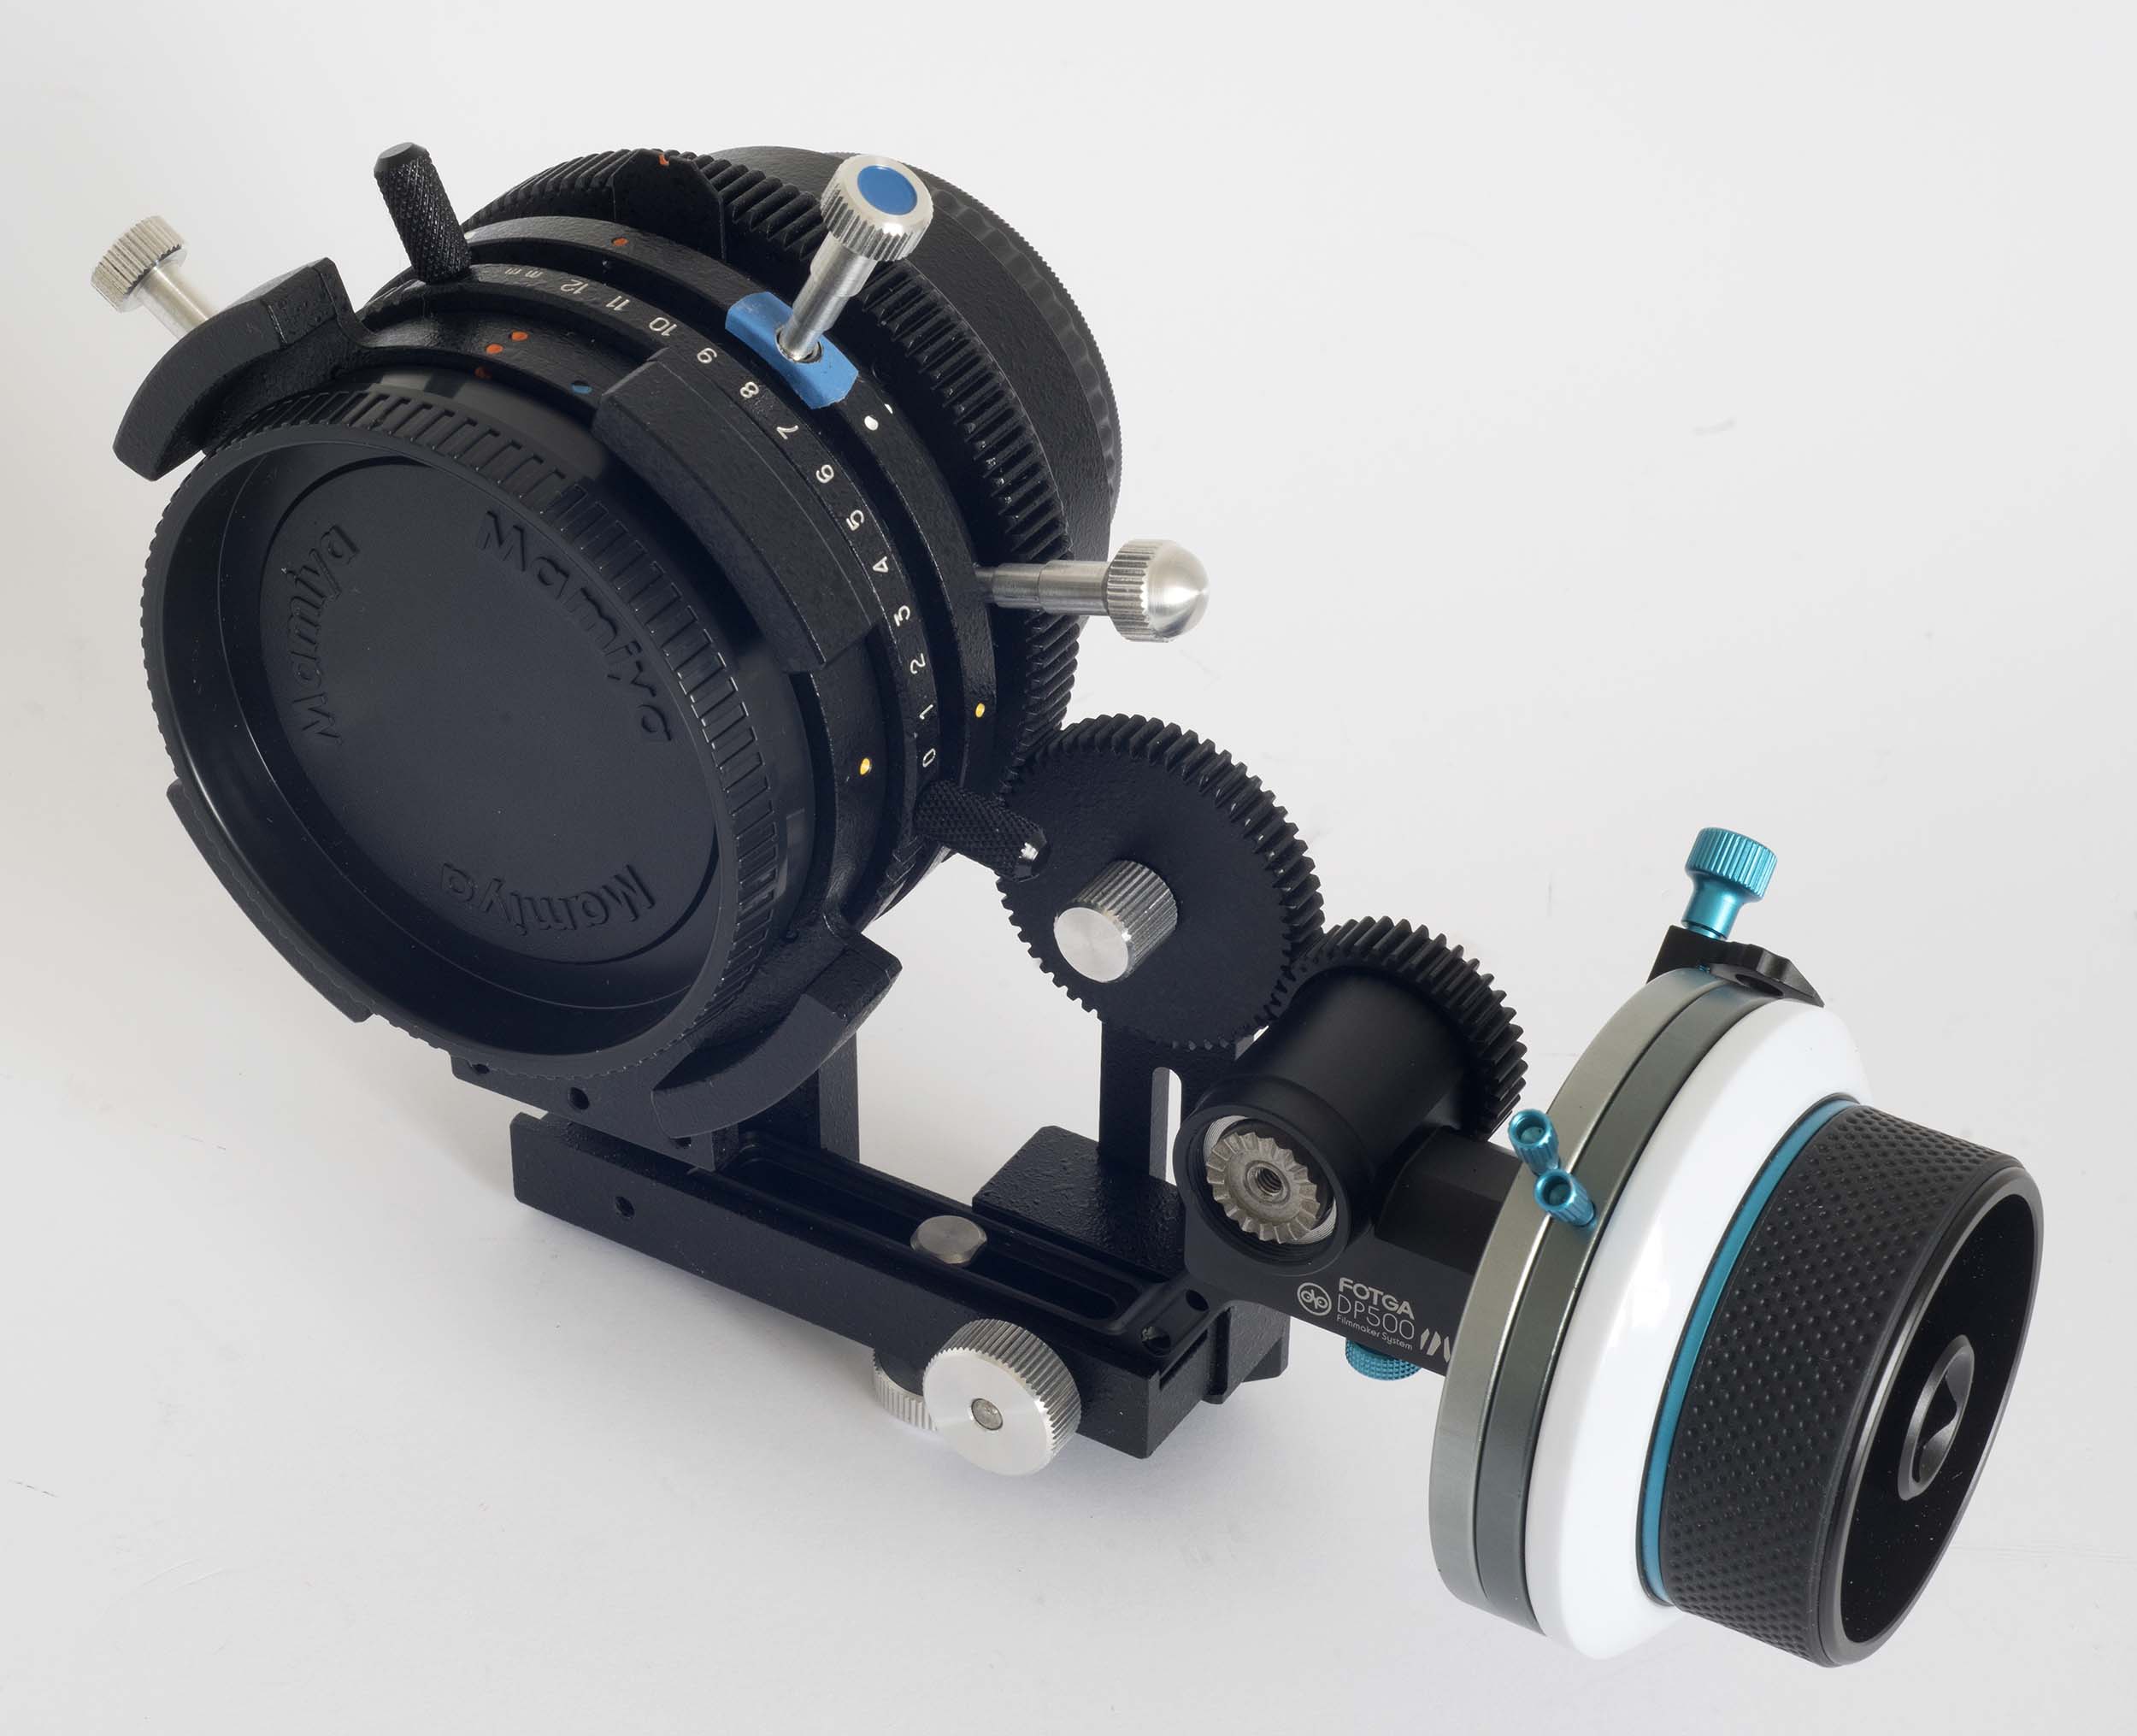
In operation the middle wheel is usually positioned lower.
Its height is easily adjustable.
Click on the image to see it larger.
Hartblei makes two mounts to connect the
Fotga to the Hartblei adapter
 The Hartblei Fotga Standard Mount [Hartblei_Std_Fotga_mnt_s.jpg] |
|
 The Hartblei Fotga PRO mount [Hartblei_PRO_Fotga_mnt_s.jpg] |
||
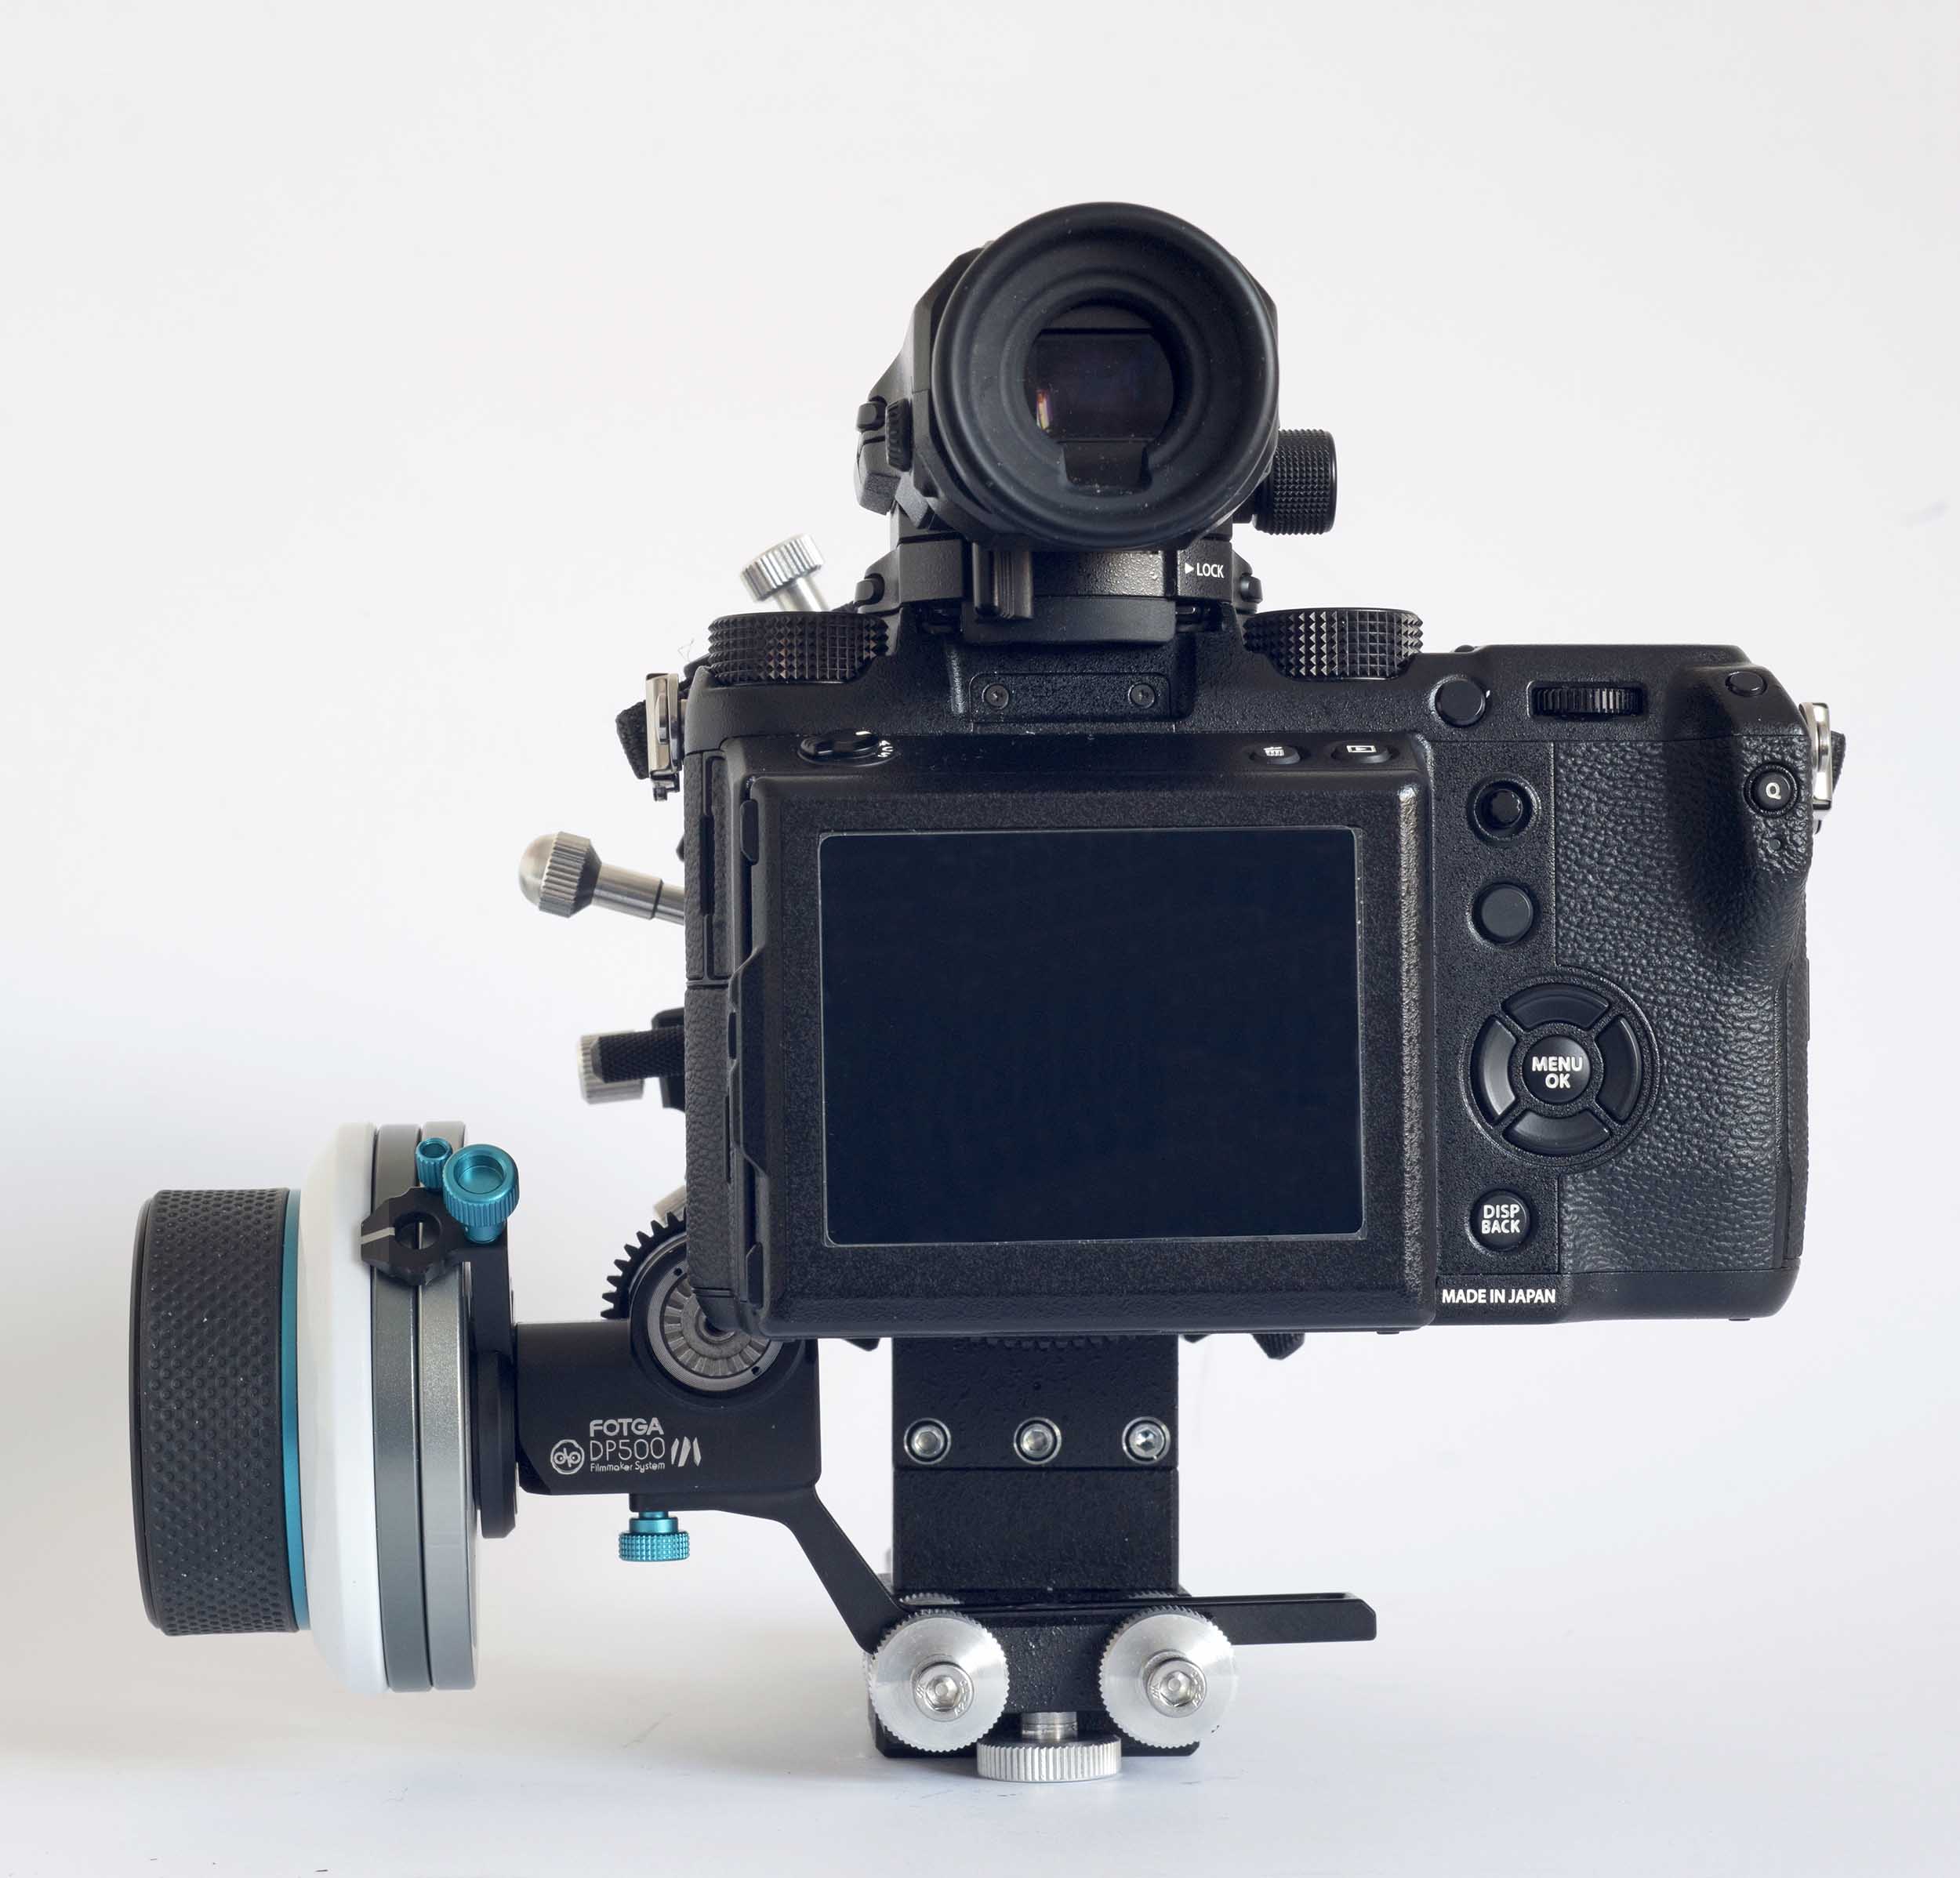
| It is probably easier to see the
difference between the two Hartblei Fotga mounts
by looking at the back of the camera, so here we
show a rear view of both mounts. For normal operation of the PRO mount, the vertical component that carries the black intermediate toothed wheel is usually put much lower than in the picture on the right here. I have here raised it, to reduce the overall height for storage in a case (see below). To understand these mounts better and other components of the system, I would recommend viewing the Hartblei YouTube video “Hartblei RBZ-S Adapter for Mamiya RB/RZ 67 lenses: How to use it with Fujifilm GFX Camera”, here. (last accessed by me on 12th April 2022) |
||||
Depth of Field
Bracket
When looking at the setup
to use the Mamiya RZ67 140mm macro lens, above, we
mentioned the Hartblei Depth of Field bracket.
Here we take a close look at one of these brackets in
use with the Mamiya RZ67 50mm ULD lens. (We can
see some sample pictures taken with this lens here.)
All
Mamiya RZ67 lenses that I have seen have an automatic
diaphragm mechanism in which the action of firing the
built-in shutter stops down the aperture to the
previously-selected value. But when these lenses
are used on other cameras, the built-in shutter is not
used, so the aperture will not stop down. However,
all the lenses have a “Depth of Field Preview” tab
located on the side of the lens, and this can be slid to
the aperture stop-down position at any time, for
instance, in order to check depth of field. When
the Depth of Field preview tab is released, it springs
back to its rest position and the diaphragm opens to
maximum aperture. It would of course not be
difficult for the user to hold this tab in the stop-down
position while taking a photograph. However, there
can be two problems with this:
- the user can forget to press and hold the stop-down tab when taking a photograph;
- more importantly, holding this tab during a long exposure can cause camera movement, resulting in images that are less sharp.
Hartblei has come up with a solution to
this, by designing and manufacturing an aperture “Depth
of Field Bracket”, which can be mounted on the
lens. The following three pictures show how this
works.
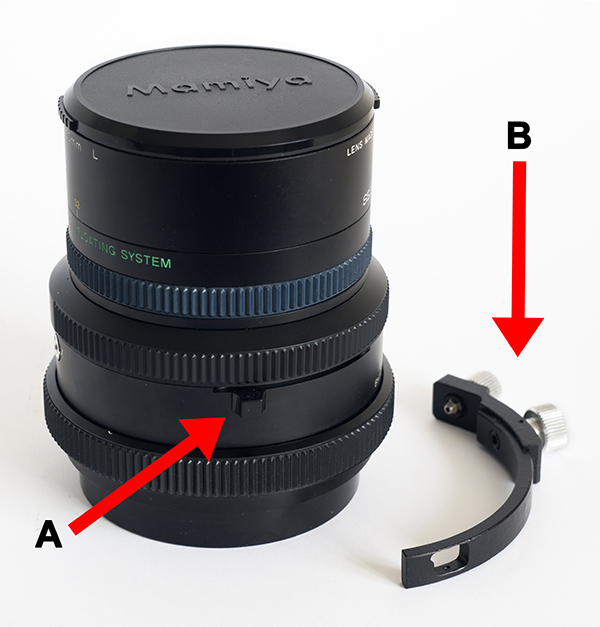 In this picture, the Depth of Field tab on the lens is labelled “A” and the Depth of Field bracket is labelled “B”. It is just possible to see the long, thin slot in which the Depth of Field tab travels in order to stop down the lens aperture to the selected value. [Hartblei_DoF_brkt_01.jpg] |
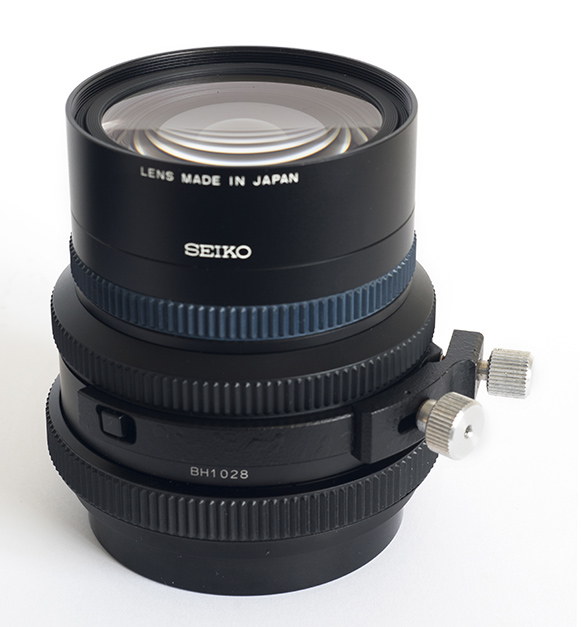 The rectangular hole in the bracket is hooked onto the Depth of Field tab and the bracket is moved round the lens, pulling with it the tab to its stop-down position. The screw farthest from us as seen in this image is then attached to the cable-release socket on the lens. The screw that is nearer to us in this picture enables fine adjustment of the total length of the bracket, to ensure that the lens will be stopped down to its minimum aperture, if that aperture has been selected. [Hartblei_DoF_brkt_02.jpg] |
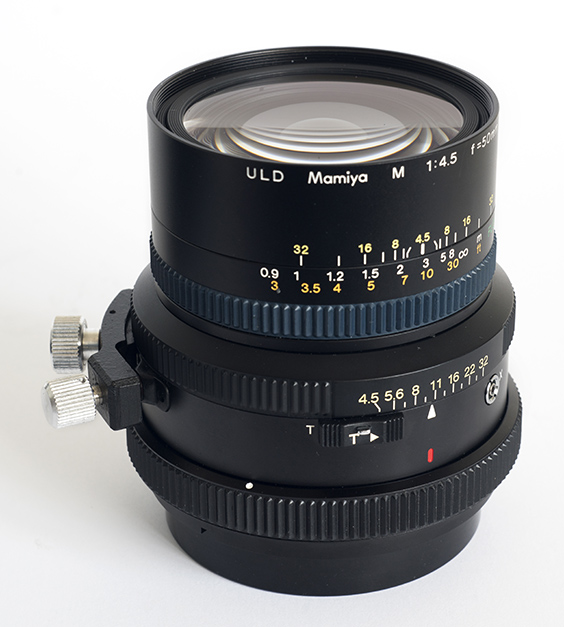 The same lens and bracket seen from a different angle. On all Mamiya RZ67 lenses so far checked, the barrel diameter at the point where the depth of field tab is located is the same and the distance between the depth of field tab end of travel point and the cable release socket is the same. This means that the Hartblei Depth of Field bracket can be used on any of the lenses. [Hartblei_DoF_brkt_03.jpg] |
I am aware of one Mamiya
RZ67 lens that does not require the Depth of Field
bracket: the 180mm SOFT lens has a stop-down lock
position for its Depth of Field tab.
The other occasion when the Hartblei
Depth of Field bracket may not be needed is when using a
Hartblei Parallax-free mount (described here), as it
incorporates its own Depth of Field tab holding
mechanism. However, with the Mamiya RZ67 100-200mm
zoom lens, the Depth of Field tab is so far forward on
the lens that it will be possible to balance the camera
– Hartblei adapter – lens combination better by mounting
the Parallax-free mount further back on the lens and
adding to the lens a Hartblei Depth of Field bracket to
hold the lens aperture stop-down tab.
Storing and
Transporting a Hartblei outfit
The Hartblei adapter for using Mamiya
RZ67 lenses on Fujifilm GFX cameras is well designed and
easy to use, mounted on a tripod. Using the Fotga
DP500 Fast Focus attachment increases speed and accuracy
of operation. But it has an unwieldy shape that is
not easy to carry and not easy to store or to protect in
transit. In fact, the one that I bought came with
a hard plastic case, but I found that case too small for
storing the outfit when it is fully assembled, and I
don’t want to have to take it apart each time that I
need to put it away. The small case is not a
problem; it will be used for other Mamiya RZ67 lenses
and accessories.
I wanted to store mine with the Fotga on
the side of the Hartblei unit and the Mamiya RZ67 75mm
Shift lens mounted on the front, so I needed a larger
case. By my measurements, the dimensions when
using the Hartblei Standard Fotga mount are:
- 26cm long (from front of lens to cover on the back of the Hartblei unit)
- 23cm wide including the Fotga control wheel
- 20cm high.
If the Hartblei Fotga PRO mount is used,
the width increases to 24.2 cm. The other
dimensions are not affected.
So to ensure some protection for the unit
I needed a hard case that was at least 21cm high.
The one that I found on eBay had the following external
dimensions:
- 46cm wide
- 34cm deep (front to back of case)
- 21cm high.
I wrote to two vendors asking them for
the internal dimensions and neither of
them was able to give me this information.
However, I bought a case and it has proved to be a good
size for the Hartblei RZ67-GFX outfit, with space for
some accessories or other lenses.
The case came with several layers of foam
and it is not difficult to remove sections to match the
shape of the equipment to be stored. The bottom
layer of foam provides a base that should not be
cut. One then removes sections from one layer at a
time, bearing in mind that the space may need to be
bigger higher up and that for some additional items that
are not as tall, it is not necessary to make the hole
the full depth of the case, in all the layers of the
foam.
 Part way through the preparation of the case. The top of the equipment that is above the top layer of foam should be protected by the “convoluted foam” in the lid. For more on this product, see here. [hartblei_case_01.jpg] |
What else might
we wish to store in this case?
It is clearly desirable to store some
other items in the case, for instance, the hexagonal
Allen keys that are provided with the equipment, the
special screwdriver, additional locking screws,
etc. It would also be good to include a few key
Mamiya RZ67 accessories or lenses that one may wish to
have to hand when using the equipment.
I do not intend to buy all the lenses that Mamiya made
available for the RB67 and the RZ67, and for my type of
shift photography of architecture, landscapes and
cityscapes, the longer lenses (250mm, 350mm, 500mm) are
not of interest. However, here is a selection of
Mamiya RZ67 lenses that may be of interest:
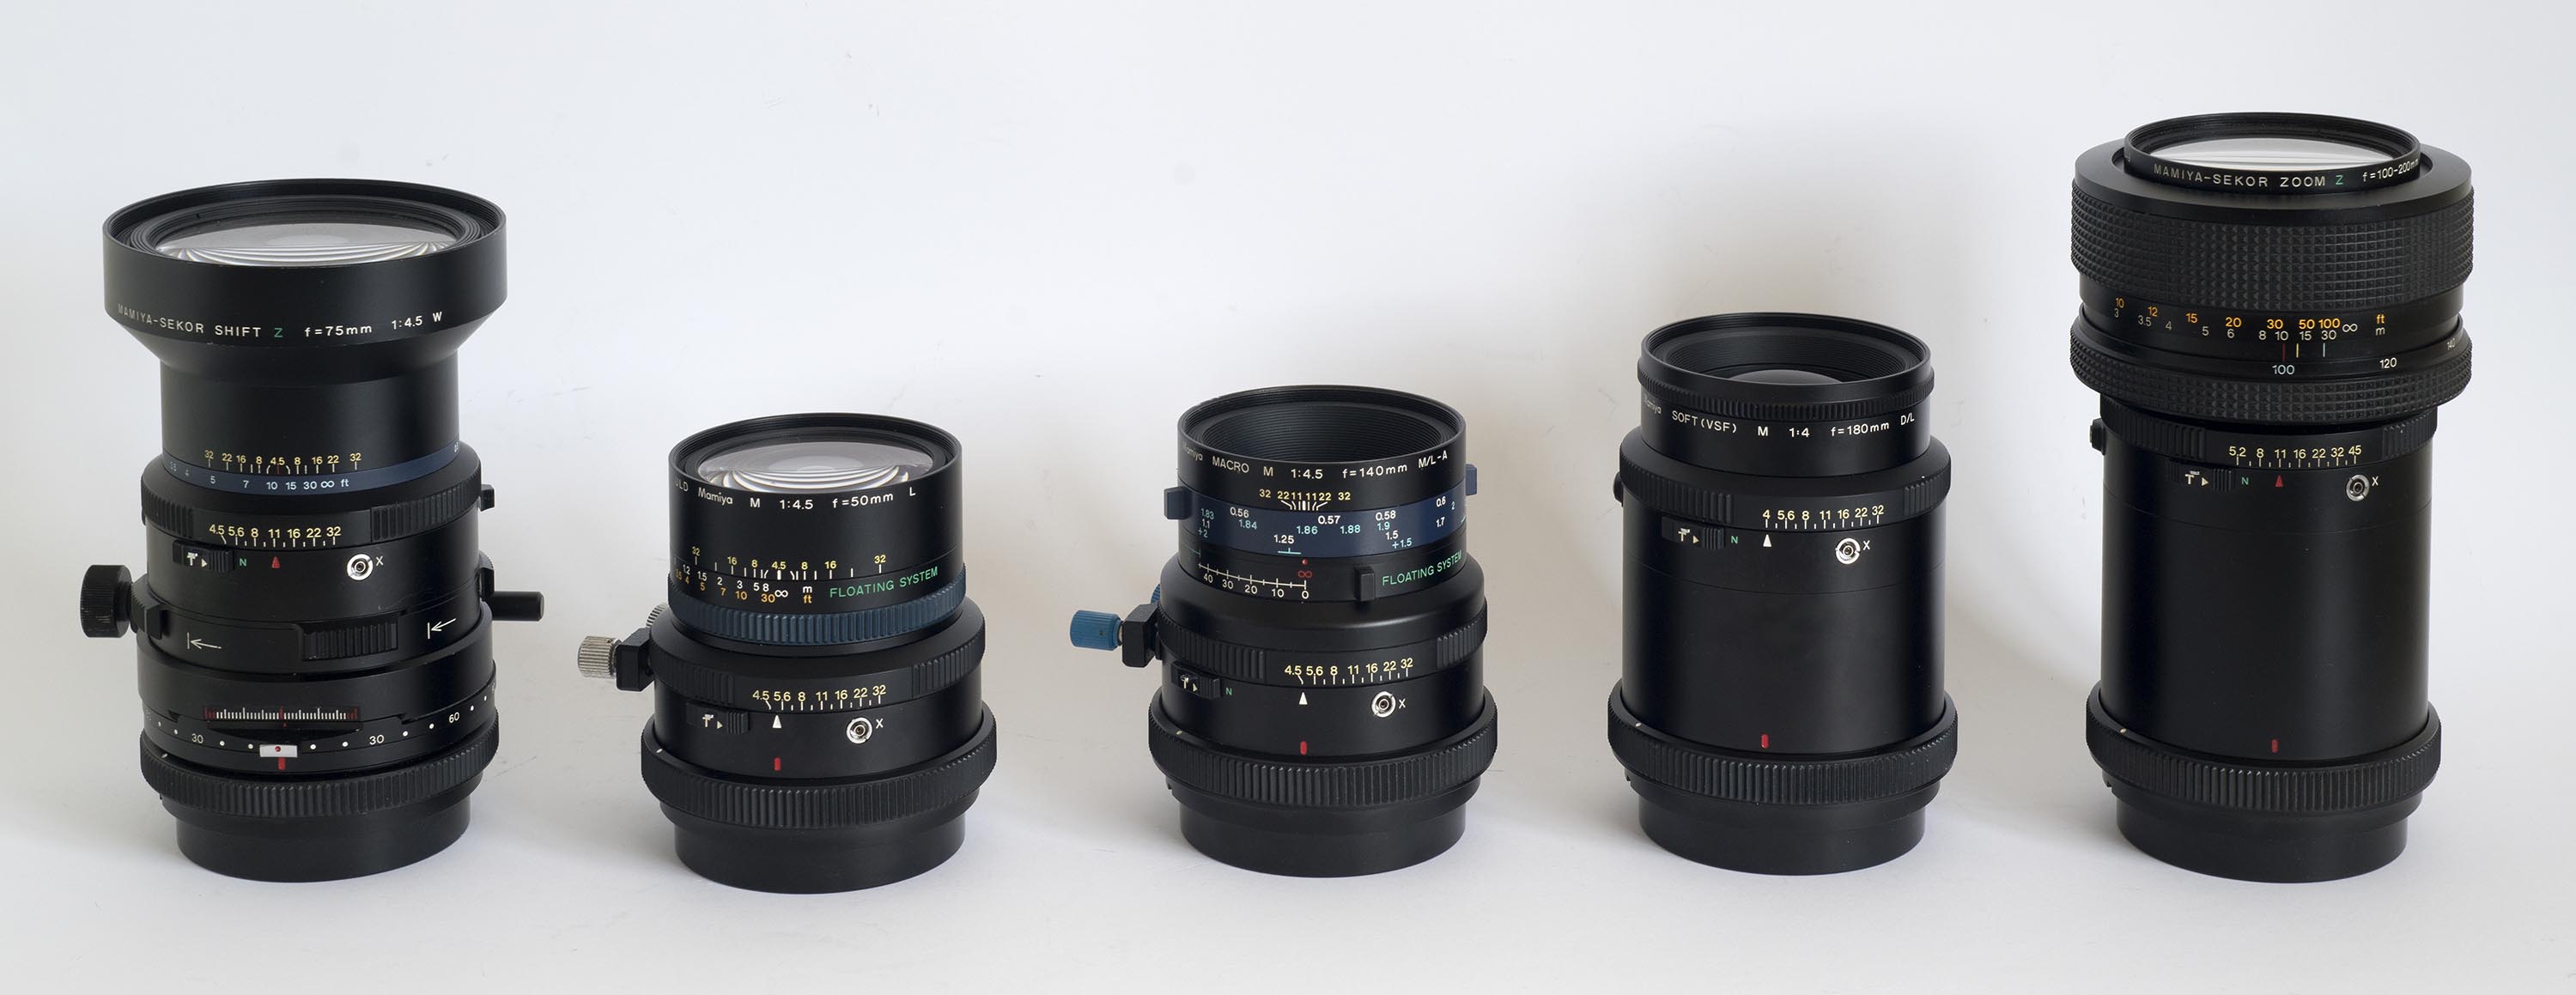
In this image we can
see (from Left to Right) the following
Mamiya-Sekor RZ67 lenses:
Click on the image to see it larger. |
|
 [RZ67_lenses_s.jpg] |
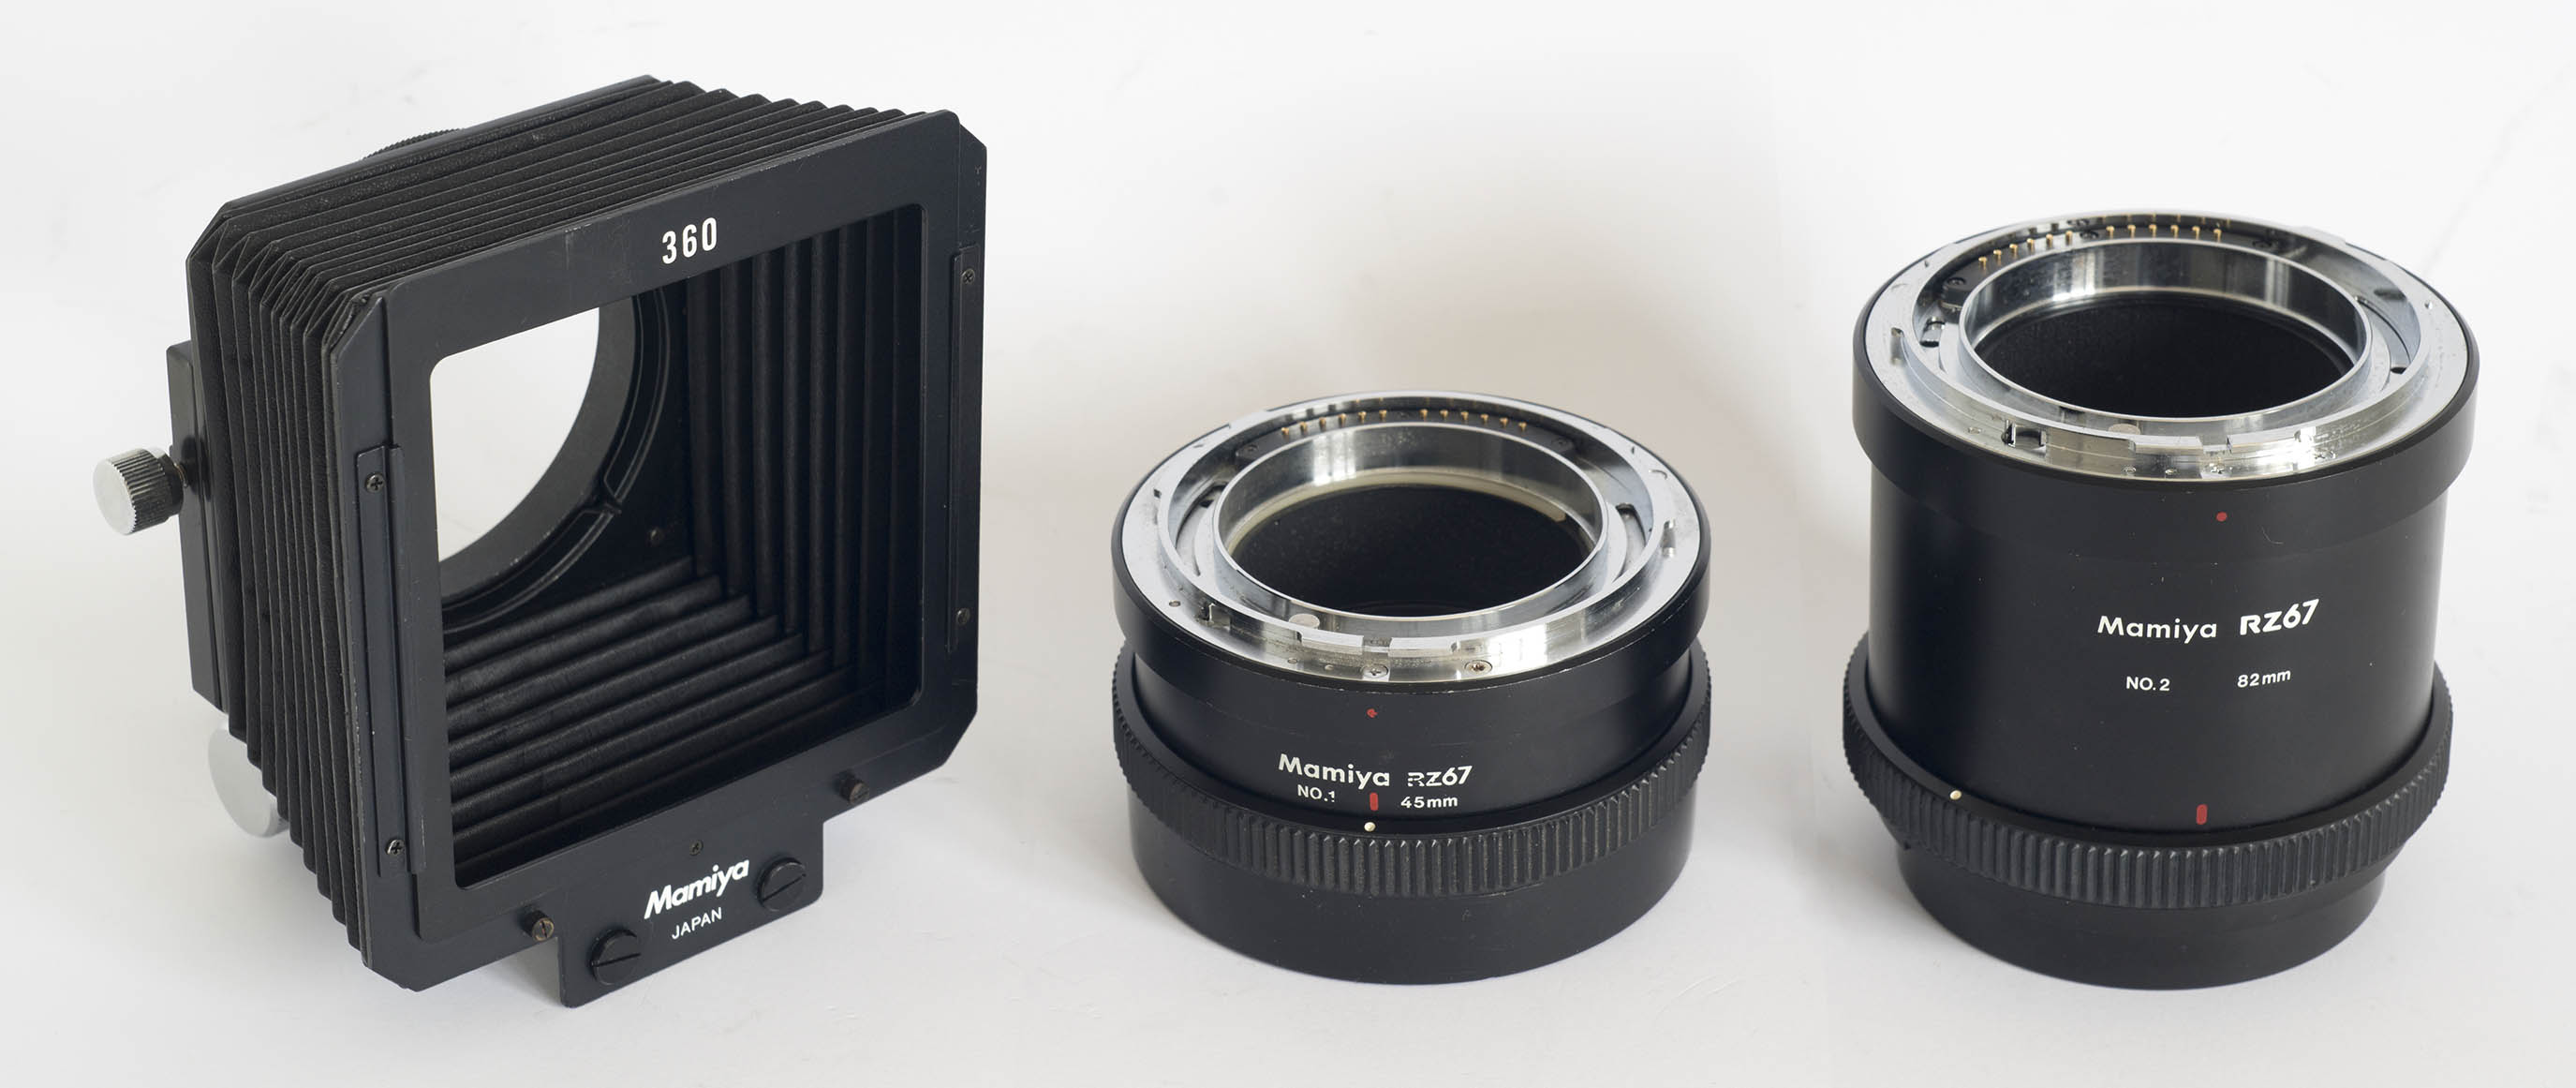
| We have already seen
that to achieve 1:1 macro photographs with the
Mamiya RZ67 140mm macro lens, some macro tubes
would be needed. To the right here we show
the two RZ67 macro tubes as well as a compendium
lens shade that can be adjusted to the angles of
view of lenses of different focal lengths. Click on the image to see it larger. |
|
 [RZ67_hood_tubes_s.jpg] |
| The Mamiya RZ67 180mm
SOFT focus lens is designed for portraits and
other subjects where the aim is to have an image
that is fully in focus, but not hard. This
is achieved by producing soft highlights
throughout the image. The manufacturers say
that it is difficult to focus, and they recommend
that it be stopped down to f/8 for
focussing. From this aperture down to the
smallest aperture, Mamiya states that the lens is
as sharp as its regular 180mm lens. It can
be opened up if the soft-focus effect is desired. Here we see the deep rubber lens hood (shade), which can be depressed to approximately half the height for storage. There is also a container with three diffusion disks (see below).
|
|
 [RZ180SOFT_01_s.jpg] Click on this image to see it larger. |

We naturally do not wish to store or
carry all of these items in the same case, which would
then be so big and so heavy that we might be reluctant
to take it with us on a photographic trip. So what
items would it make sense to include in the case
illustrated above, containing our Hartblei unit, the
Fotga Fast Focus and the Mamiya RZ67 75mm Shift lens?
The next picture shows what we decided to
include.
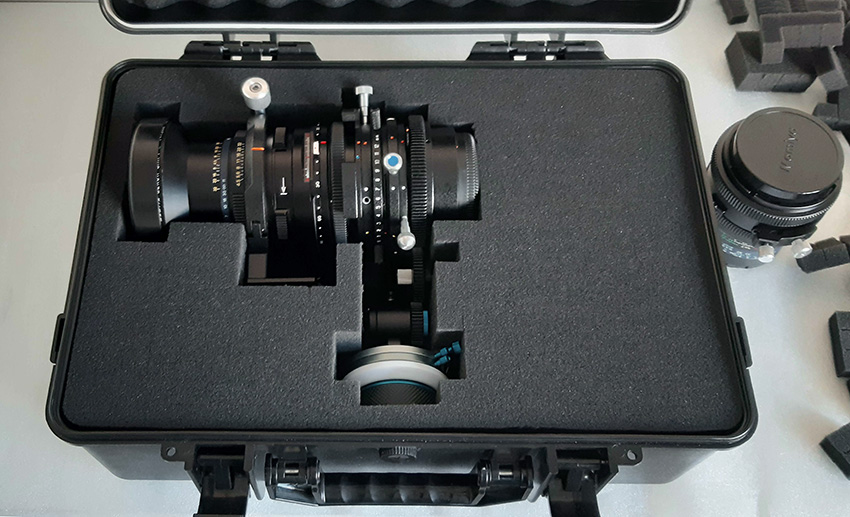
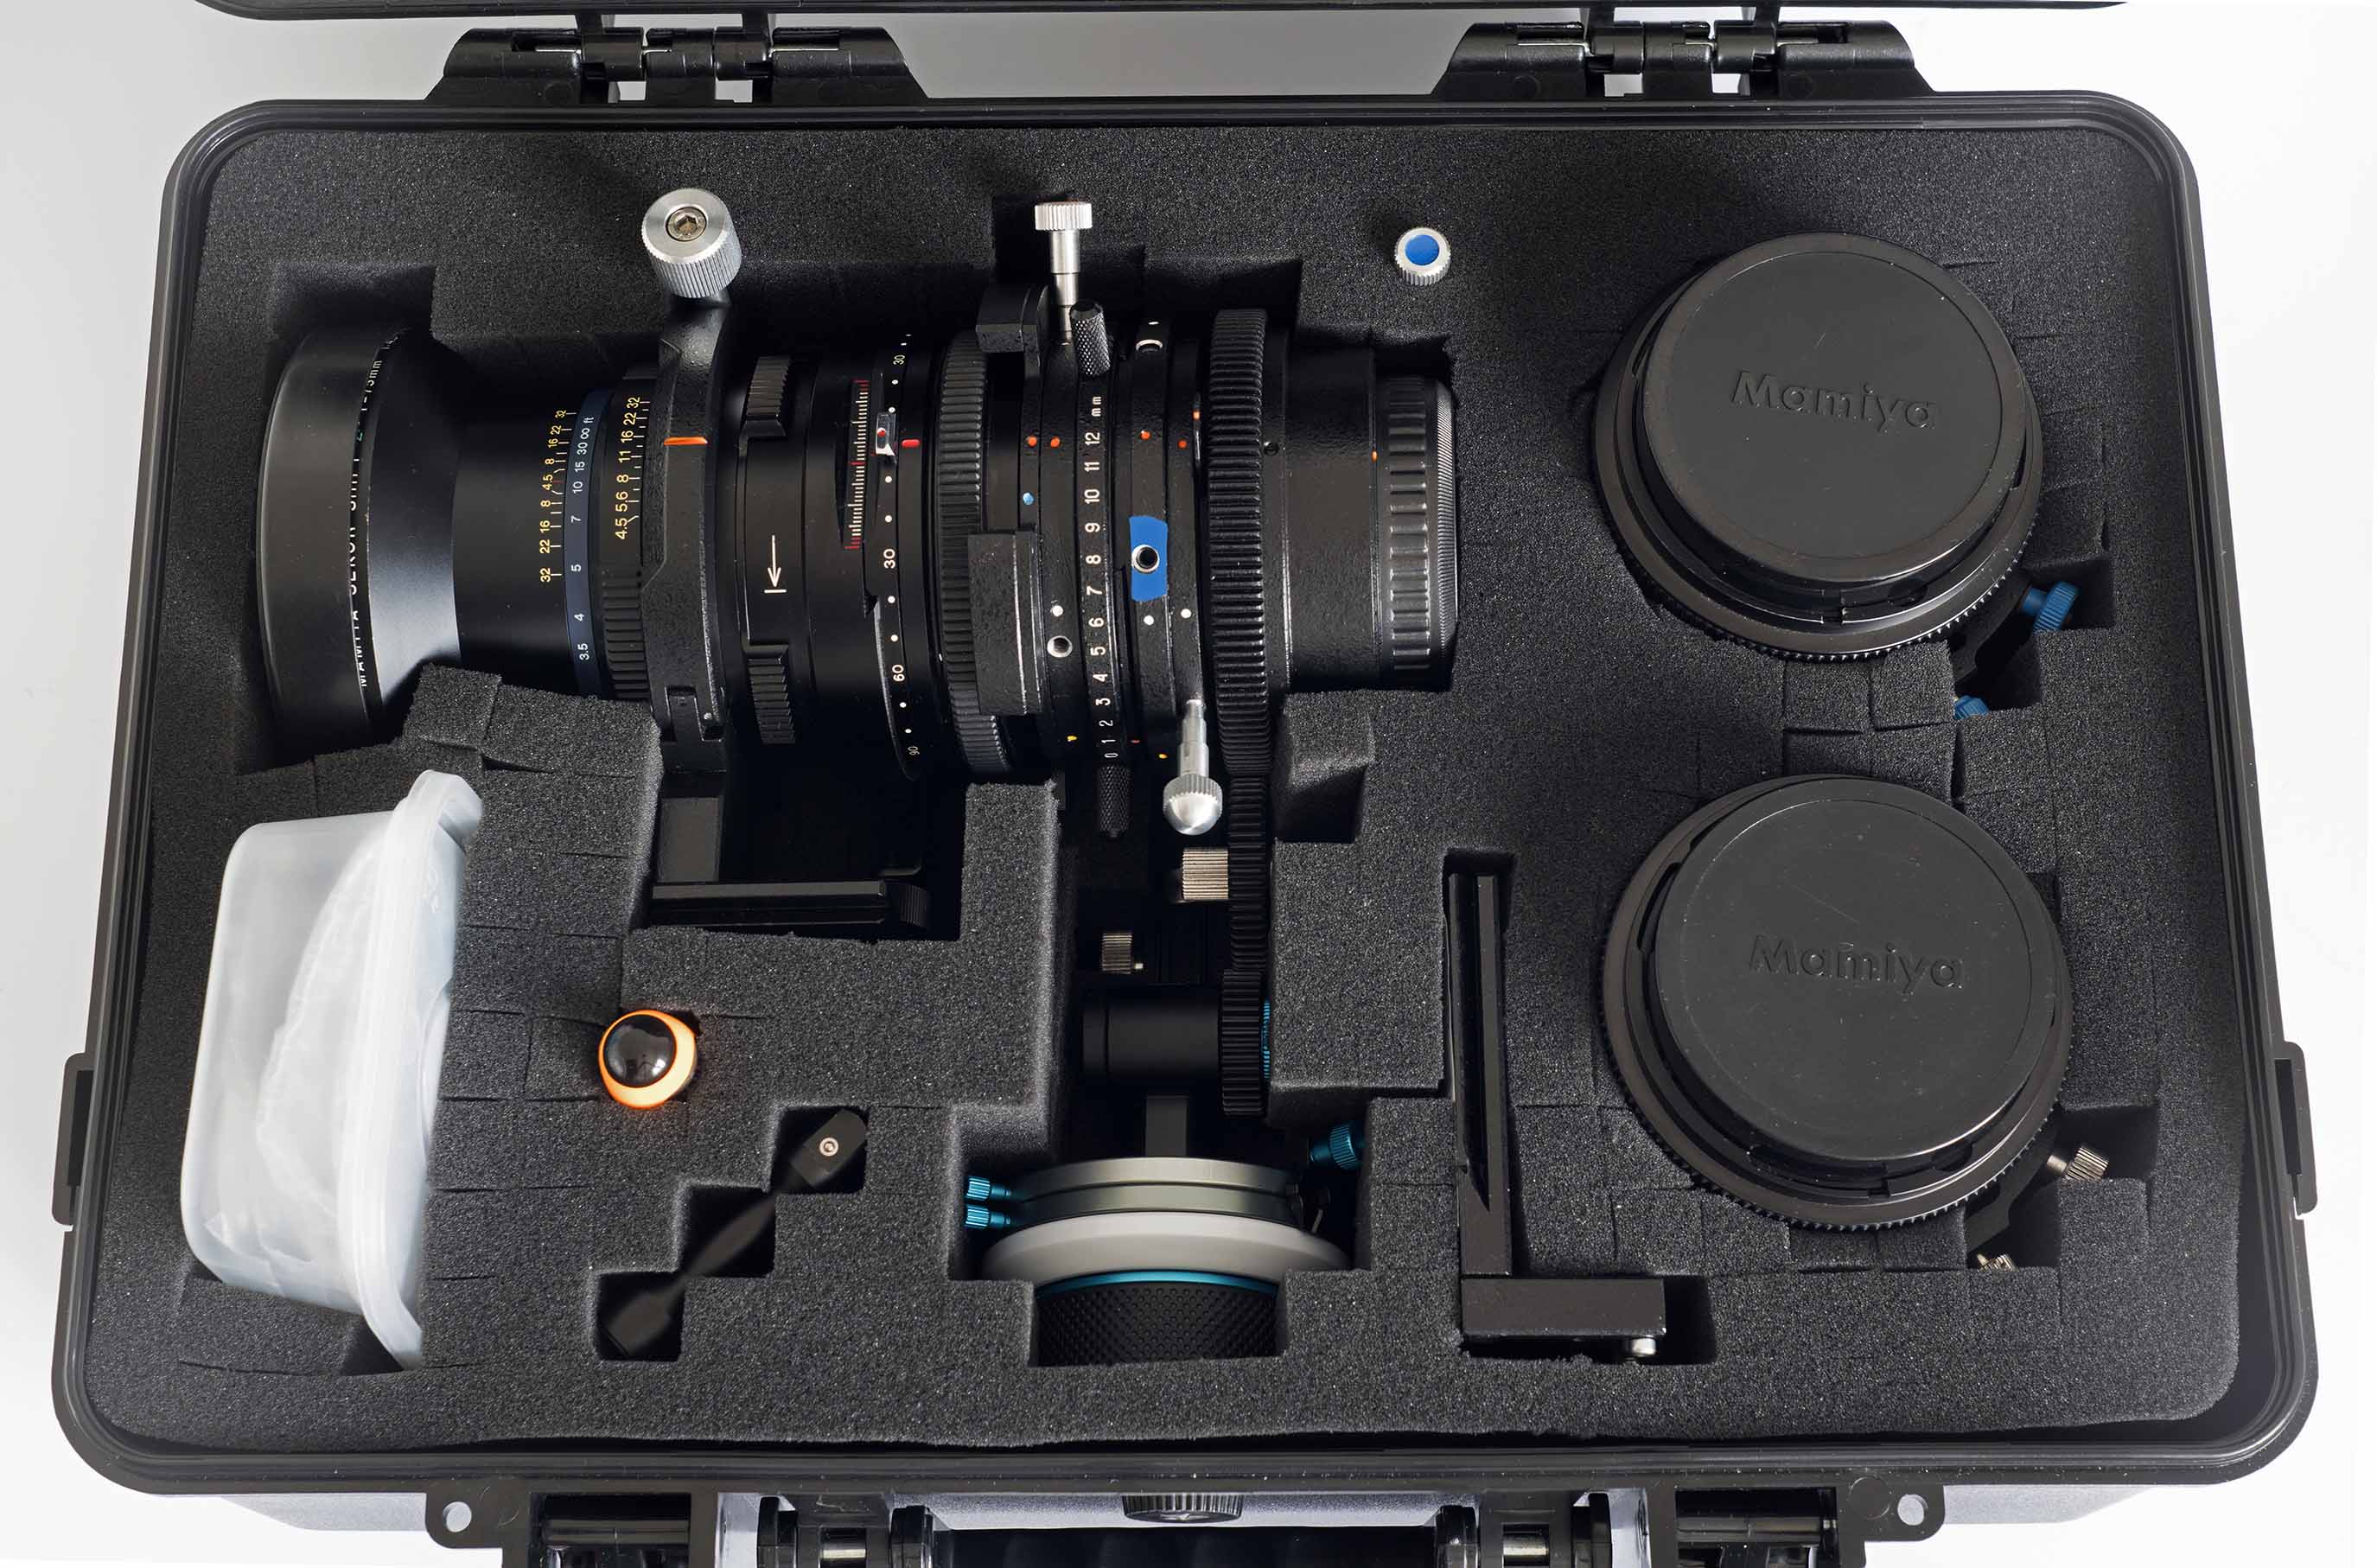
| The locking screws
are made of aluminium and do their job perfectly,
but aluminium is not a strong metal and so I was
concerned that the top locking screw, which in my
setup is the blue one, could be bent when the case
was closed. I have therefore removed it for
storage and added blue marking round the socket
where it needs to be inserted for usage. It
is stored just above the Hartblei set, near to the
back of the unit. Bottom left is a plastic case with the Allen keys, spare locking screws and other small accessories. To the right of this we can see the black and orange head of the screwdriver. Below that is the crank handle for the Fotga Follow Focus unit. To the right of the Fotga controls is the L-shaped Arca Swiss-compatible tripod bracket, which I use on the second parallax-free tab at the bottom of the unit when not using the parallax-free lens collar. At the back of the case on the right is the RZ67 140mm macro lens. Front right is the RZ67 50mm ULD lens. The lens shade for the 50mm lens (not included in the photo to the right here) clips onto the back of the lens for storage. See image below: 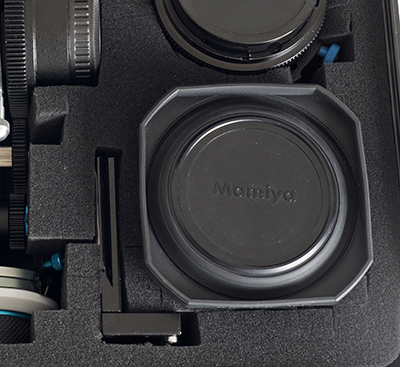 [hartblei_case_03.jpg] |
|
 [hartblei_case_02_s.jpg] Click on this image to see it larger. |
|