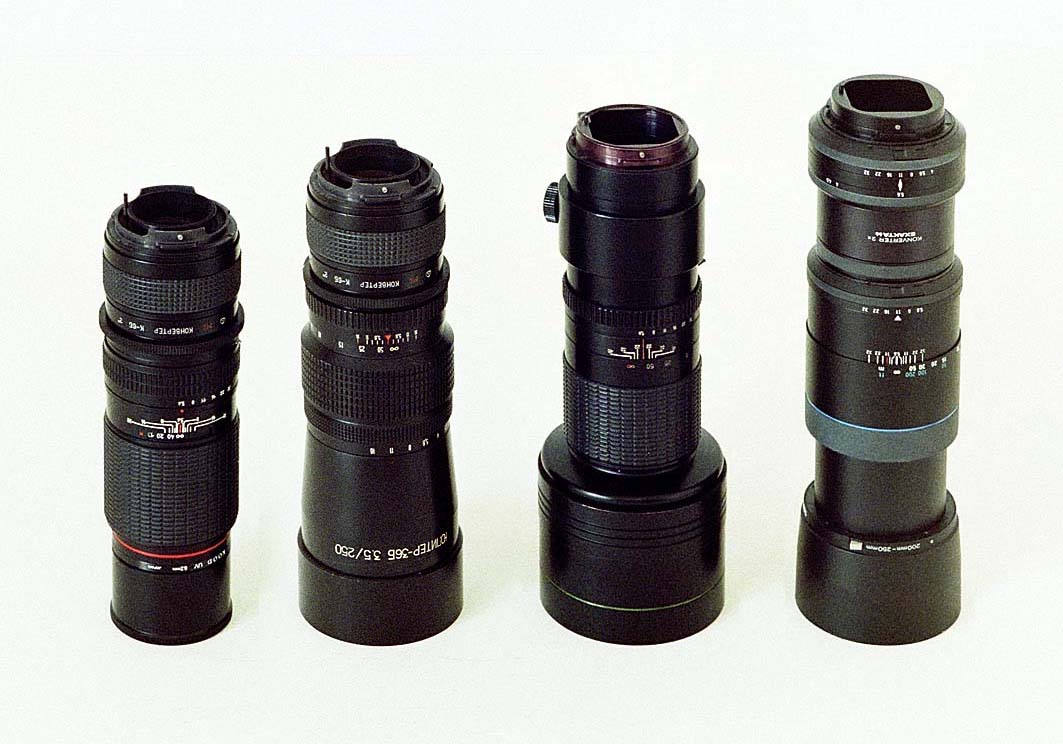
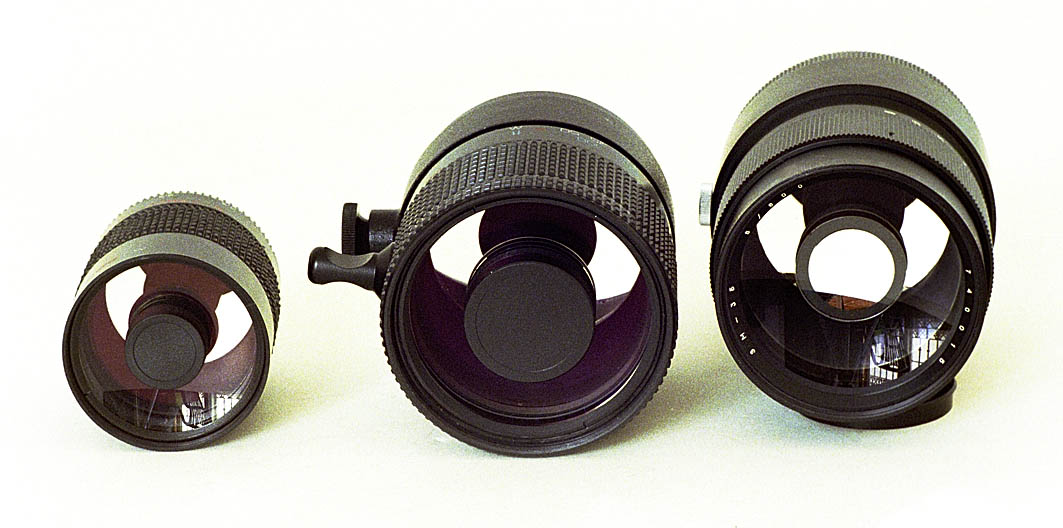
 [C428-10A&11A] From left to right: 250mm f/5.6 Arsat lens (formerly known as “Telear”) with Arsenal 2× converter, 250mm f/3.5 Arsenal Jupiter with Arsenal 2× converter, 500mm Arsat APO, 250mm Schneider Tele-Xenar with Schneider 2× converter |
Further tests of 500 & 600mm lenses
Part 1
This new test re-uses the lenses tested in 2002 and adds a number
of extra lenses with these focal lengths.
This time I carried out side-by-side tests with the following
lenses:
• Pentacon f/5.6 500mm
• Arsat APO f/5.6 500mm
• Rubinar f/5.6 500mm mirror lens
• Rubinar f/8 500mm mirror lens
• Arsat 3M – 3B f/8 600mm mirror lens
• Arsenal Telear/Arsat f/5.6 250mm lens with Arsenal 2× converter
• Arsenal Jupiter f/3.5 250mm lens with Arsenal 2× converter
• Joseph Schneider-Kreuznach Tele-Xenar f/5.6 250mm lens with
Schneider 2× converter.
The 500mm lenses were also tested with a 2× converter and compared with the 1000mm Carl Zeiss mirror lens. See the 1000mm page for results of those tests.
We will look at the results with each of of these lenses in turn. But first we should take a look at the lenses that are being introduced for the first time in this section.
The new lenses
|
[C428-10A&11A] From left to right: 250mm f/5.6 Arsat lens (formerly known as “Telear”) with Arsenal 2× converter, 250mm f/3.5 Arsenal Jupiter with Arsenal 2× converter, 500mm Arsat APO, 250mm Schneider Tele-Xenar with Schneider 2× converter |
The Arsenal 250mm f/3.5 Jupiter and the Schneider 250mm f/5.6 Tele-Xenar were included in the original tests, and are included here with a 2× converter and to facilitate size comparisons with the other two lenses. The f/5.6 “Telear” is a lot smaller and lighter than the f/3.5 Jupiter. The 500mm Arsat APO lens is very compact for the aperture and focal length. In this picture, standing on end, its lens shade is retracted. The other three lenses have their lens shades fitted, making them appear longer.
Arsenal Arsat 500mm APO lens
This extremely rare lens was made in small numbers in Kiev in
1995. It has a maximum aperture of f/5.6, like the Pentacon
500mm lens, but – unlike that lens! – it has an automatic
diaphragm, while the Pentacon lens has a manual pre-set diaphragm
that you must stop down to the working aperture before firing the
shutter. It also has a stop-down lever to enable the user to
check depth of field, or to use stop-down metering if desired (my
preferred method).
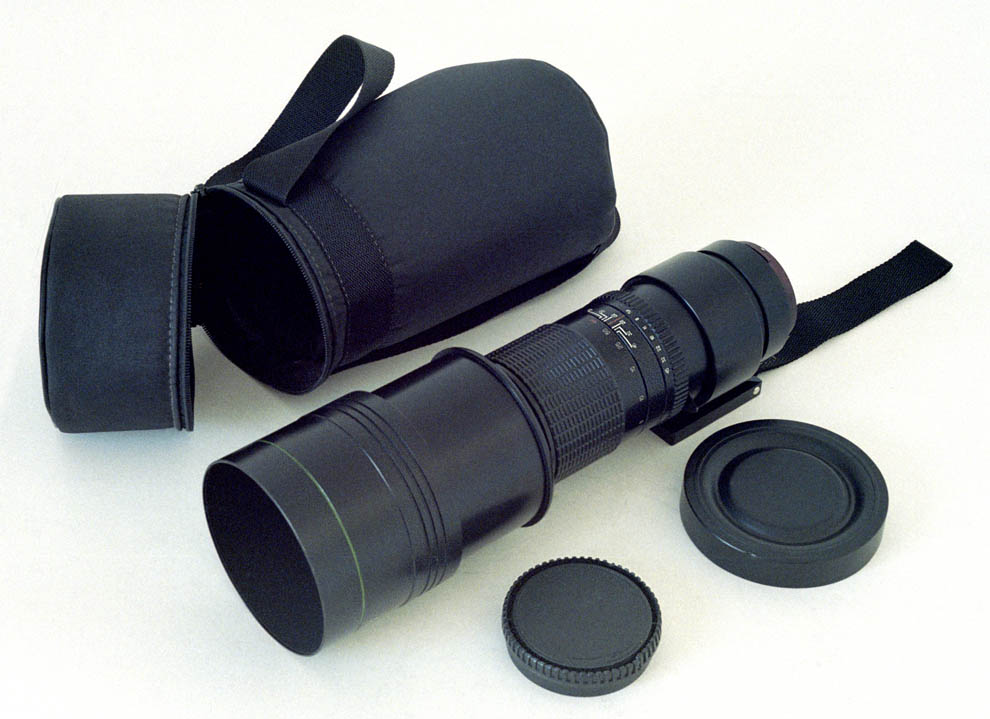 [C428-4A] The 500mm APO lens was supplied in a practical black nylon case of the style used by Arsat for its lenses since the early 1990s |
It is an APO – or apochromatic – lens. Under the entry “apochromat”, the Collins English Dictionary says: “apochromat a lens, consisting of three or more elements of different types of glass, that is designed to bring light of three colours to the same focal point, thus reducing its chromatic aberration”. Under the entry “apochromatic”, the same dictionary says: “apochromatic adj. (of a lens) almost free from spherical and chromatic aberration”. So any of the normal chromatic aberration – which occurs when lenses try to focus different colours to the the same place – should be “reduced” and there should be “almost” (to quote the dictionary) none of the infamous “colour fringeing” that is so obvious with some lenses (although it is rarely obvious at normal degrees of enlargement with lenses produced for the Pentacon Six)
One soon notices a few unusual things about this lens:
• the length of the lens does not change as one focusses (nor does
the front rotate, as is the case with some lenses);
• the aperture is located behind the rear-most element.
However, as this is well recessed within the barrel of the lens,
there is no danger of accidentally coming into contact with the
aperture blades.
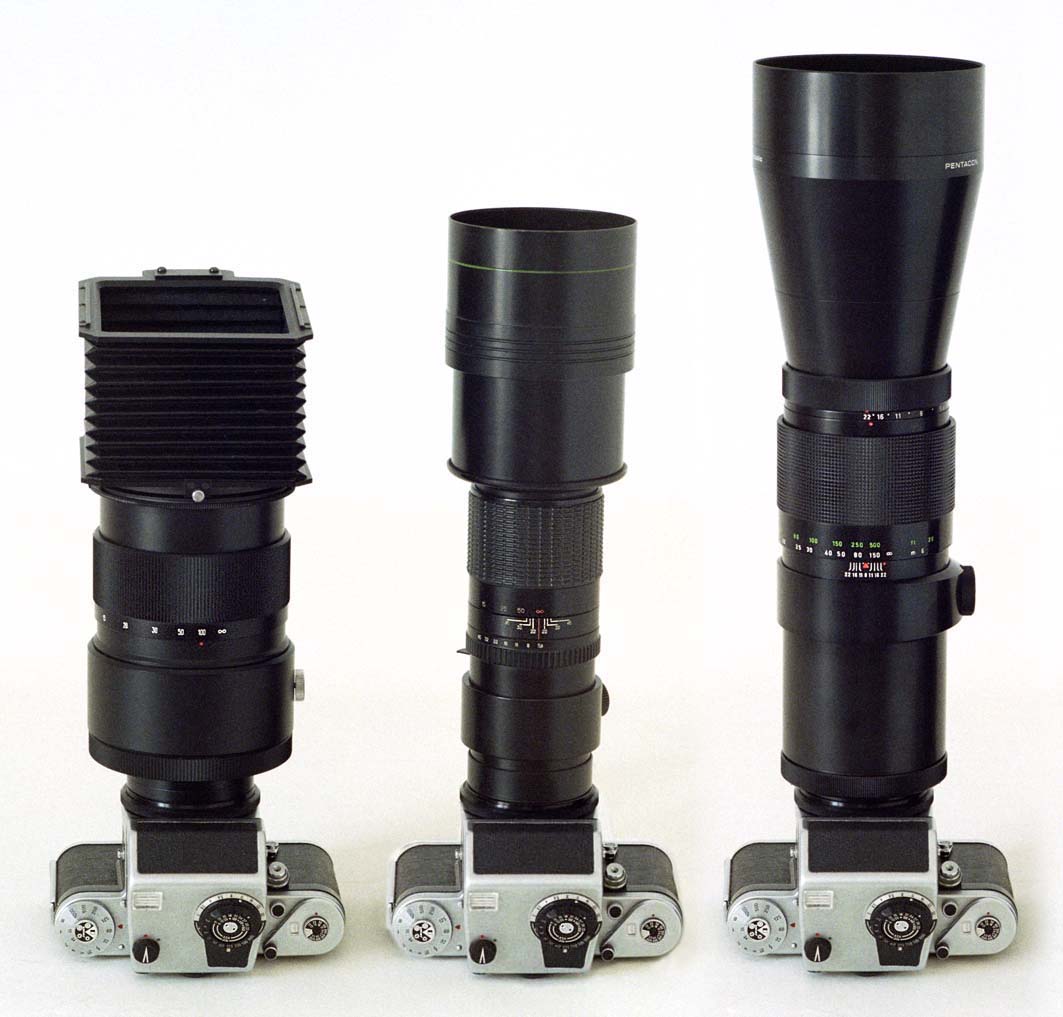 [C428-12A_13A] From left to right: Arsenal 600mm 3M – 3B mirror lens with Hasselblad compendium shade, Arsat 500mm APO lens with shade fully forward, Pentacon 500mm lens with shade |
First impressions of the lens are very positive. It is much
smaller than the Pentacon, measuring a mere 290mm long, compared
with the 370mm of the Pentacon. Its maximum diameter is
105mm, compared to the Pentacon’s 125.5mm. It weighs 1650g,
while the Pentacon lens weighs more than twice this, at 3500g
(that’s 3½ kilos!). It is multi-coated, and has a rotating
lockable collar that makes levelling the camera on the tripod
easy. The locking collar also has a large rectangular base
that would please those who have found the base on the Sonnars too
small for a really firm grip on their tripods.
 [C428-2A] Here the tripod base and the wrist strap can be clearly seen |
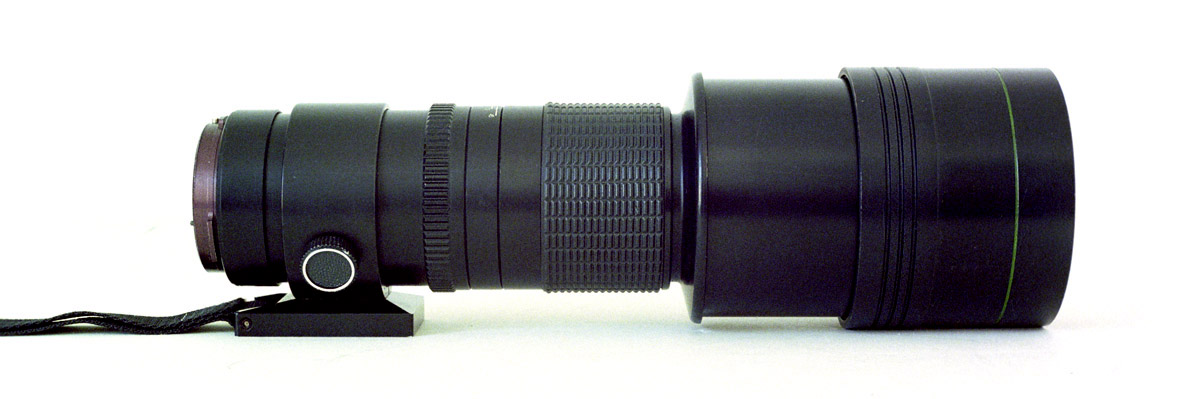
The APO lens has an integrated retracting lens hood (shade) which appears to be really effective. It also has a wrist strap, which I personally feel is a bit of a gimmick; I can’t see myself casually dangling this lens and an attached Pentacon Six camera from my wrist, nor entangling my arm with it when it’s on a tripod.
The lens has a minimum aperture of f/45! However, I found that when the shutter is fired, it never stops down to more than f/32. It can be forced down to f/45 by pressing the stop-down lever – but in reality I can never see myself needing such a small f/ stop. The recommended slowest shutter speed if using this lens hand-held is 1/500 sec, and in bright sunlight with 160ASA/23DIN film with this shutter speed an aperture of f/5.6 is called for. With 400ASA/27DIN film – the fastest I habitually use – the correct aperture would be f/8-f/11 To use even an aperture of f/22 with this film, I would need to use a shutter speed of 1/125 with this film – not advisable for a lens that magnifies this much, even with the camera on a tripod.
How does the performance of this lens compare with other ways of achieving a 500mm or 600mm focal length for the Pentacon Six? We will see the results in Part 2 of this review.
The Rubinar mirror lenses
The two Rubinar lenses are manufactured by LZOS just north of
Moscow and are designed for 35mm format, but sometimes they can be
found modified with a Pentacon Six mount. As well as
changing the mount from the standard M42 thread to the Pentacon
Six bayonet, the modifiers have had to adjust the focus so that
the lens still focuses at infinity when mounted on the Pentacon
Six, Kiev 60, etc. As Pentacon-Six to M42 conversion mounts
are easy to find, going for the P6 mount version seems attractive,
as the lenses can then be used for both formats, if – and it is a
big if – they adequately cover the larger 6×6 format.
 [C428-14A] Three mirror lenses with the Pentacon Six mount From Left to Right: 500mm f/8 Rubinar, 500mm f/5.6 Rubinar, 600mm 3M – 3B |
The results of my initial tests with the two Rubinars last spring
were disappointing, showing considerable vignetting or fall-off of
light towards the corners. In the case of the f/8 Rubinar,
as well as the blacking-out of the corners, there seemed to be
another clearly-defined circular darker area extending at least
half-way in from each side. In the case of the f/5.6
Rubinar, this was less obvious, but there still appears to be a
“hot spot” in the centre of the image. Here are those
results, compared with those achieved with the 600mm f/8 3M – 3B
mirror lens and with the Pentacon f/5.6 500mm lens. The 80mm
Biometar shot is included to give an indication of the magnifying
power of these four lenses.
 [C397-10] 500mm f/8 Rubinar with lens shade 1/500 sec |
 [C397-11_12] 500mm f/5.6 Rubinar with lens shade 1/1000 sec |
 [C397-13] 600mm f/8 3M – 3B with Hasselblad compendium lens shade 1/1000 |
 [C397-14_15] 500mm Pentacon with lens shade 1/1000 sec f/9.5 |
 [C397-9] Shot from the same spot with the 80mm Biometar 1/500 f/19 |
I wondered if this showed that the Rubinars just did not adequately cover the larger format, or if the lens hoods (shades) supplied with them (which were obviously designed with the 35mm format of 24mm × 36mm in mind) were causing the vignetting, so this time I decided to test these two lenses (and only these two) without their lens hoods. You can see the results of these tests on the next page (here).
Interestingly, image magnification of both the Rubinars is in fact nearer to 600mm than 500mm. In fact, both Rubinars magnify the image more than the 600mm 3M – 3B, and there is a slight difference between them, with the f/8 Rubinar magnifying fractionally more than the f/5.6 Rubinar.
Mirror lenses, of course, do not have variable apertures, as it is not possible to stop them down. So the only flexibility of exposure possible (other than changing the shutter speed) is by using a Neutral Density filter or filters. However, on this occasion I tested both Rubinars and the 3M – 3B with no ND filters.
Let me add that these images are not intended to have any
“pictorial” quality – but then that applies to many of the lens
test shots on this website. My aim in these tests has not
been to produce cleverly-composed images, but to subject the
lenses used to stringent tests – tests, in fact, which are harder
than those that they will on most occasions face in normal
use. Thus the blank and “boring” sky in the images above
provides a very demanding test of evenness of illumination across
the frame – or otherwise!
A further result with a different example of the 500mm “Pentacon” lens can be seen here (last picture on the page).
Arsenal Telear/Arsat f/5.6 250mm lens with Arsenal 2× converter
This lens was not used for the coffee house tests, but it is described here and a picture taken with it is shown.
Film
The film used for most of these tests was Fuji NPC160 negative film. For some subsequent re-tests, Fuji NPH 400 negative film was used. At normal degrees of enlargement, the difference in grain is not noticeable, although at some of the massive enlargements shown on the next page the grain of the higher-speed film can be seen. I have indicated those shots that were taken with NPH 400.
Camera
The camera was my favourite Pentacon Six TL – the same one that was used for most of the test pictures on this website. (Why is it my favourite? It’s the one that I’ve had the longest, and it’s never let me down – but then neither have the others, bought more recently.)
Colour
I believe that the slight colour variation that may be observed between images results largely from image processing. We are dealing here with negatives which have been scanned into the computer, and any scanner introduces its own colour casts (described by some manufacturers as “colour correction”!). I always set the scanner to do the minimum amount of processing, and definitely no colour correction or colour restauration. However, it is obviously necessary to remove the colour casts introduced by the scanner, and this I have done. Some images (as indicated on the next page) were under-exposed, and so corrections in my image-processing software have varied between images. I have tried to get a good match but have not completely succeeded. However, it seems to me that as regards colour, all these lenses produce satisfactory images, at least with negative film. I have not tested all of them with slide film yet. Natural lighting conditions also varied between the original shots, most of which were taken over a short period of time one day, and others that were taken subsequently with the higher-speed film.
Test Criteria
I have evaluated each lens according to three criteria:
Coverage: How much of the negative am I seeing in these tests?
The answer to this question is particularly important with this test, as in the case of some lenses we observe darkening at the edges or at least in the corners. Does this darker area actually form part of the negative that we are not supposed to be seeing?
It is important first to realise that in the so-called “6×6” format (2¼" square) the actual frame dimensions – for all manufacturers – are a “nominal” 56mm × 56mm. “Nominal” means that this is the generally-defined area that can be exposed (the dimensions of the “film gate”). For many manufacturers the actual frame aperture is 55.5mm × 55.5mm. This is not a “swindle”; exactly the same applies to other formats. Thus, with “35mm” film, that is the width of the film, but with sprocket holes top and bottom, the actual height of the exposed area is 24mm. Similar differences apply between the “nominal” and actual dimensions for “645” cameras.
The actual image size for “6×6” format is defined by none less than Hasselblad as 54mm × 54mm. Thus, Hasselblad Inc’s Technical Director (in the USA), Ernst Wildi, writes in “The Hasselblad Manual, 2nd Edition” (1982):
“The 2¼ in squareLikewise, according to Lothar Braas in his book “Das Kiev Mittelformathandbuch, Band 1: Die Kameras”, the usable area of a “6×6” frame is 54mm × 54mm.
Exact image size: 54 ×54 mm” (p. 3)
I used a major processing lab in London to develop my film and produce prints, and their enlarger mask is 53mm × 53mm, according to my calculations based on the prints they supplied. This is not unreasonable, as there can be slight variations in the height of the image on the film, depending on how the film has been loaded into the camera, as there is a slight vertical latitude (perhaps 1mm) and of course there are variations in the carriers and masks used in enlargers and scanners, and in the size of the aperture in slide mounts. In practice, it can often be quite difficult to get the film exactly square in the film carrier, so the enlarger or scanner mask size covers any slight error here.
The images in this new (2007) 500mm & 600mm test (and in the new 1000-1200mm test that follows it after the 1000mm page) are not based on the lab prints, but have been scanned in by me from the original negatives, using a top-of-the-range medium format film scanner. I have scanned using a scanning area of 6 × 7, in order to go to – and beyond! – the edges of the image on the film. I have then cropped the scan to a frame 54.29mm wide × 54.29mm high. Put another way, I have cropped 0.6mm (that is fractionally over half a millimeter) off each side of the “nominal” size of 55.5 × 55.5mm, and have still ended up using an image area larger than what you will obtain with a Hasselblad or other leading professional “6×6” cameras. So what you see on these tests is more than you will see in a lab print, in a standard “6 × 6” scan, or in a mounted slide. If frame coverage (lack of vignetting, quality of resolution) is good with the resulting scans, it is good. If it is not good (and with some lenses it is very bad!), you can decide how much of the frame you would be happy cropping in your prints or for your slides.
You can see more about the relationship between the viewfinder
image and the image on film here
(scroll down).
For more information on the size of various image
formats, see here.
(New in September 2021)
Resolution
I have evaluated resolution at all points of every image at an extremely high degree of magnification. If the whole image were enlarged by this amount, it would be 2.877 × 2.877 m (approximately 9' 5½" × 9' 5½"). For the purpose of illustrating resolution, I show a small section of each image. Naturally, the exact degree of enlargement on your computer screen will depend on the size of your monitor and the resolution at which it is set.
Sharpening and contrast
Scanners reduce the sharpness of the original image, and
it is therefore correct to re-adjust the scanned image in
order to restore the sharpness that has been lost. However,
for these tests I have not done this. This
means that the images that you will see on the next page of this
website (and those for the 1000-1200mm lenses) are actually less
sharp than you should obtain if printing straight from the
negative in the traditional way. I decided not to apply
sharpening as there is always a question of how much to
apply. In fact, many users of digital processing apply too
much sharpening, which results in ugly haloes round borders
between different components of the image. For instance, in
landscape pictures, look at the point where the top of a mountain
range and the sky meet.
I have also not increased contrast by adjusting the curves or brightness & contrast controls, although I have when necessary moved in one or both of the end pointers on the histogram to get the exposure right. So again, what you see here is less good than you should obtain from traditional printing or for slides.
In other words, I do not present here the best that these lenses can achieve. Why not? Because if I had applied variable sharpening and contrast adjustments to different images, I could have destroyed the validity of the comparisons between the lenses.
Bear in mind that with most lenses, the apparent contrast of the image increases progressively as the lens is stopped down.
Colour Fringeing
Each colour in the spectrum has a different wavelength, and as Newton’s experiments demonstrated 300 years ago, if you pass a beam of light through a prism onto a white surface, each colour will appear in a different place. This is the principle of refraction, and it causes enormous problems for lens designers, since each element in a lens behaves like a prism. The best lenses reduce colour fringeing to a minimum and usually make it invisible to the naked eye at normal degrees of enlargement and normal viewing distances.
Here I apply what is essentially an unfairly harsh test to these lenses. As with the resolution test, I enlarge the image to the point where if the whole frame were reproduced at the same size that it is on my screen, it would be 2.877 × 2.877 m (approximately 9' 5½" × 9' 5½"). I then view it from a distance of approximately 32" (80 cm). Naturally, one would never normally view an image this large – much bigger than any of us! – from this close up. This is equivalent to a linear magnification of the image of 53 times on my monitor with its resolution. I reproduce here a tiny section from the original image.
To go on to the next section, click below.
Further tests of 500mm & 600mm
lenses, Part 2
To see a square filter system mounted on the APO 500mm lens,
click here.
To go back to the beginning of the lens tests, click below and
then choose the focal length that you want to read about.
Back to beginning of lens tests
© TRA May 2007, March 2011
Latest revision: September 2021