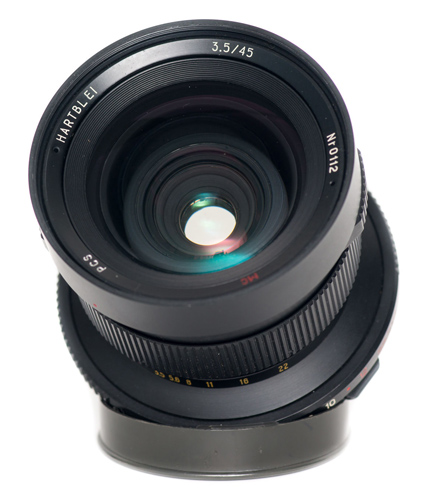
It is reported that the 45mm and 65mm
Hartblei shift lenses use the optical elements of the
Arsenal Mir-26B and Mir-38B, respectively.
Hartblei adds an excellent multi-coating that looks
far superior to that on the original Arsenal lenses.
One of the best ways to
test a lens in real-life situations is to take it on a
trip and leave behind any lens with the same focal
length at one would normally take. This
is what I did for a visit to Germany in September
2016. I left behind my normal wide-angle lens, the
45mm Mir 69 (see it here),
and instead took the Hartblei 45mm shift lens. How
did I get on? How did the lens perform? Here
is my report.
As well as providing information,
this website also provides some helpful instruction
on how to use the items shown here.
There are some important techniques
that help to ensure success when using shift lenses,
and some of these techniques are explained on this
page.
We can also often learn from other people’s mistakes
(in this case, mine!).
I hope that the following pictures and tips will do
more than just give information
on the Hartblei 45mm shift lens,
but will also inspire readers
to buy a shift lens, and help
them to achieve success with it.
I did consider taking the “Wiese
Technoplan-T” 45mm shift and tilt down (only) lens,
which is illustrated here.
This appears to be a rebadged version of the Hartblei shift
and tilt down lens. However, the lens was going to
travel in my backpack, and I was worried that – even
protected in its soft pouch – in the crush of luggage in the
overhead locker in the aeroplane, the spindle that controls
the tilt could be damaged, so I took the shift-only lens
(illustrated above) instead. For
architecture, which was my intended subject on this
trip, shift is important, and tilt is rarely needed.
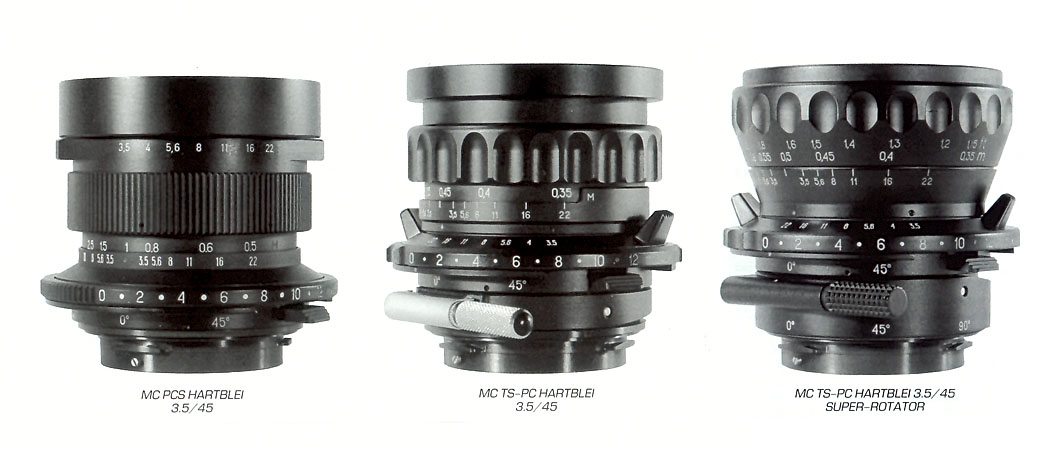
The following picture will remind you of the shape of the
three Hartblei 45mm shift and shift/tilt lenses.
From L to R: shift only, shift
(in any direction) & tilt down, shift &
tilt in any direction (“Super-Rotator”)
(Illustration from a Hartblei lens manual)
[hartshift.jpg]
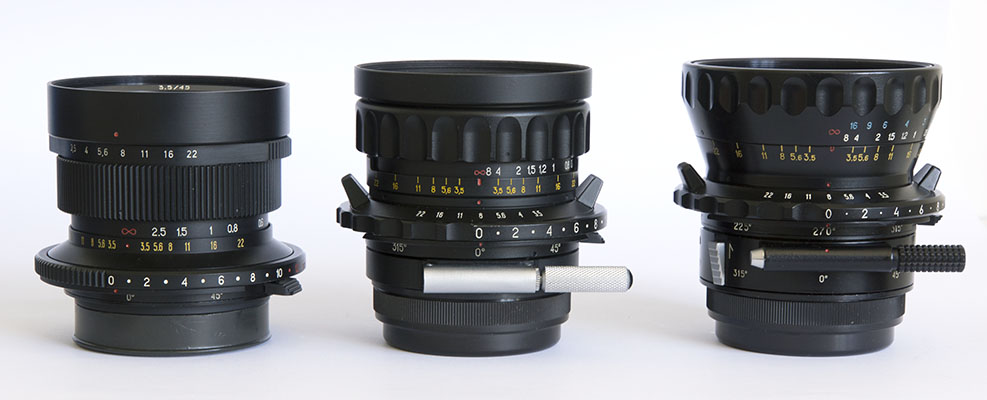
The same three lenses “in the
flesh”
(The middle one here is the rebadged version
bearing the name “Wiese”.)
[3x45T02.jpg]
Visitors to this website will probably recall that all
three of these lenses (and the Arsenal equivalent of the
shift-only version) will shift up to a maximum of 12mm, but
that users are advised not to shift the lenses more
than 10mm if shooting on the full 6×6 format,
which I was of course doing, on my usual Pentacon Six
camera.
It is important to remind readers
that “6×6” is only the nominal frame
size. This designation was made popular in the
1930s and continues in use up to the present day.
However, no “6×6” camera from any manufacturer
actually delivers a usable image that is 6
centimetres wide by 6 centimetres high.
Hasselblad specified the frame size for its “6×6”
cameras as being 54mm wide × 54mm high. The film
gate in the Pentacon Six that I took with me (and no
doubt all other Pentacon Sixes!) is approximately
55.43mm wide and 55.39mm high. However, as the
film is set back from the gate, pressed on the guide
rails above and below it, and since the image-forming
rays spread out from the lens to the film, the actual
image on the film is in fact fractionally larger than
the camera’s film gate itself, being approximately
55.5mm wide and 55.5mm high. The very edges of this
frame will not be printed in any enlarger with a
nominally “6×6” gate, nor will they be visible if a
reversal film is used and mounted in standard Medium
Format slide mounts.
If you examine a film exposed in a Pentacon Six (or
almost certainly with any other medium format camera),
you will see an image that is larger than 54mm ×
54mm. However, only the image area that is
54mm square is intended to be used. It
is important to say this for two reasons:
some modern film scanners
enable us to scan an area of the film that is
substantially larger than this 54mm square area – even
right into the film rebates at the top and the bottom
of the film;
with shift lenses, we must not
expect coverage to extend to a full 60mm wide and
high, nor even the actual full width and height of the
image recorded on the film. Therefore, at
extreme shift positions, we may observe
vignetting (darkening of the some of the corners
of the image on the film), but this may be in
an area of the frame that is beyond the intended
54mm × 54mm coverage.
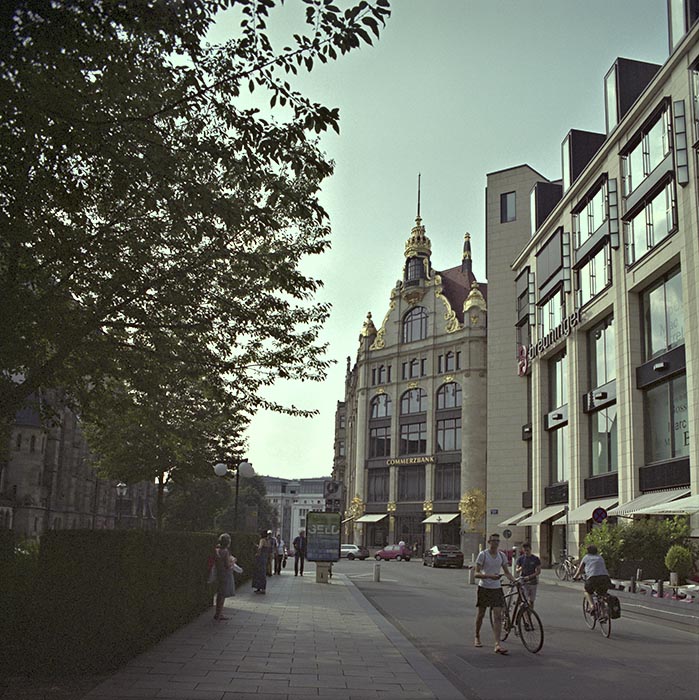
To start with, let us compare the non-shifted and shifted
results with this lens.
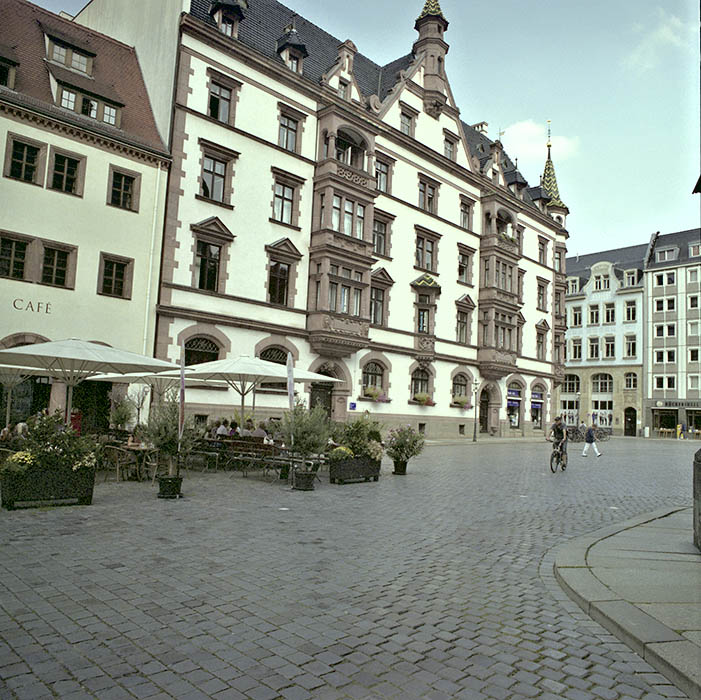
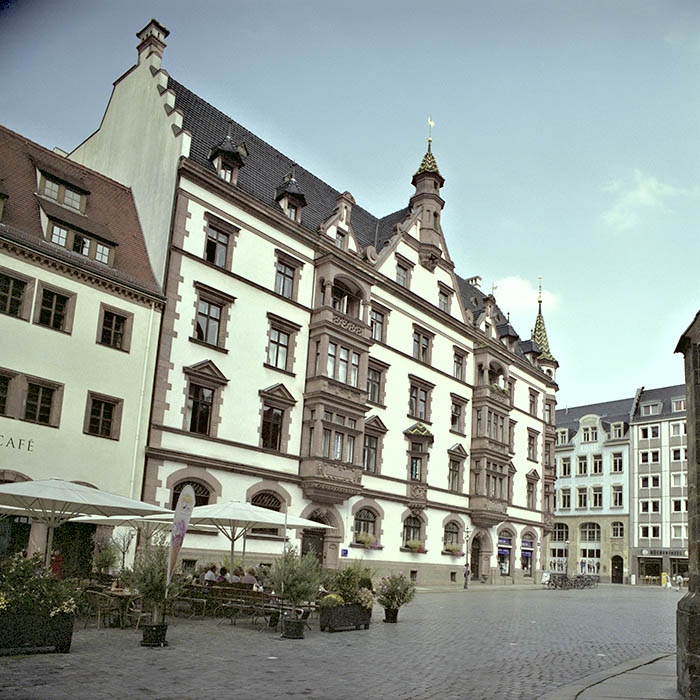
A street in Leipzig
Both of these pictures were taken with the Hartblei 45mm
shift-only lens on a Pentacon Six, using Fuji PRO400H
film. Exposure for both was 1/500 sec at f/11,
hand-held.
With the lens set at zero shift
[C547_7.jgp]
With the lens shifted 10mm up
[C547_6.jpg]
Alignment of the camera is clearly
wrong with both of these photographs. I aligned
the camera carefully with the side of the building in
the foreground on the right-hand edge of the frame, so
that feature and the buiding in the distance behind it
are parallel to the right-hand edge of the frame.
I should instead have made
sure that the centre of the image was parallel
with the sides of the frame (i.e., truly
vertical). That way, keystoning would
have been less obvious, whereas in these images it is
quite pronounced on the opposite (left-hand) side of
each image. Here I also ignored three other basic
principles of architectural photography:
Use a tripod (In
these two pictures, this would have avoided the slight
framing difference between the shots, the second of
which shows less of the left of the scene and more of
the right.)
When using a wide-angle lens,
mount a bubble level on the camera
(Two-way bubble levels are easy to find, and one
should have been mounted on an accessory shoe on the
prism, as here
and here –
scroll down for clearer images of this.)
Work slowly and methodically.
So, if we disregard these errors,
we observe that when the lens is not shifted up, a lot
of the paved street surface is seen and the top of the
main building is cut off. With the lens shifted up
the maximum amount recommended for 6×6 cameras, a lot of
the unwanted street surface is eliminated, and the top
of the building is included within the frame.
However, even with a wide-angle lens and essentially
full shift, it has still been necessary
to tilt the camera up a little in order to include the
top of the building and any such tilt becomes extremely
obvious when a wide-angle lens is used.
Even more of interest is the
darkening of the top, left-hand corner of the
frame when the lens is shifted.However,
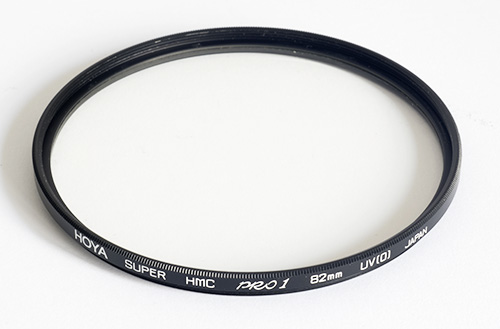
I must point out that the person who sold this shift
lens to me kindly (??!) supplied it with a lovely
Hoya Super HMC PRO1 UV filter mounted on
it. I believe that it is the mount
of the UV filter that is
causing the vignetting. I
have therefore now removed the filter and put it on
one of the non-shift 45mm Mir-26B lenses from which
all these shift versions are derived.
And so we learn another rule to apply when using
these extremely wide-angle shift and shift/tilt
lenses:
Do not put a filter on the lens.
For the same reason, it is generally unwise to put a
lens hood or shade on a shift lens – even though the
Super-Rotator was supplied with one. (This
lens hood can be seen in the last photograph on this page.)
We must also bear in mind that for this test I have
been quite unforgiving and, except where indicated,
have not cropped the images.
Let us now look at some
further images shot with the Hartblei 45mm
shift-only lens (all of them, still with the
filter fitted to the lens!).
This is the filter that was on
the lens
[hoya82mm.jpg]
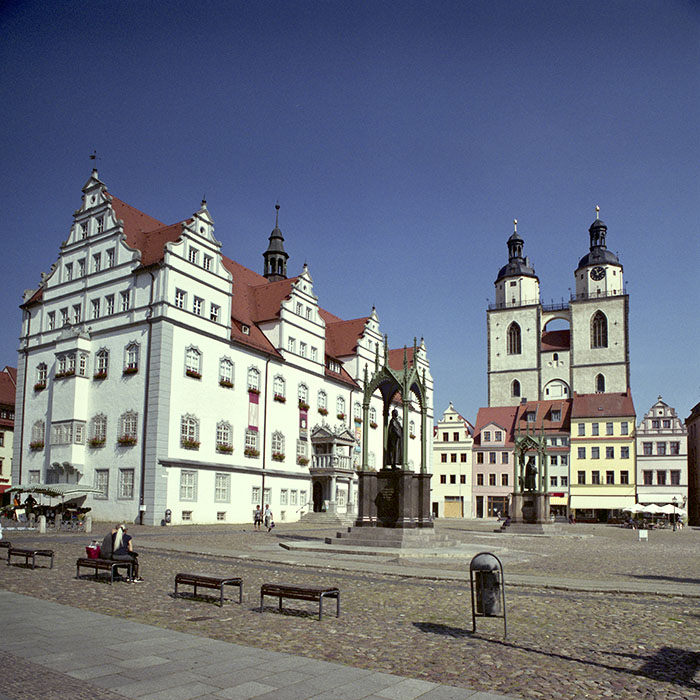
Lutherstadt
Wittenberg Pentacon Six with 45mm Hartblei shift only
lens and Fuji PRO400H film
9mm shift up 1/500 f/22
In this shot (also hand-held), the camera has been
aligned more accurately.
The lens has been shifted up slightly less and while
some vignetting is present, it is not particularly
obvious.
[C546_11.jpg]
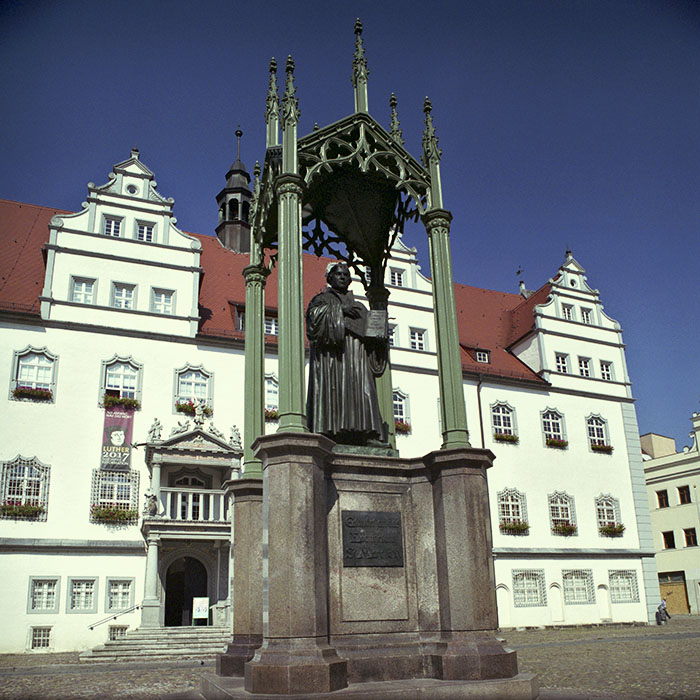
10mm shift up 1/1000 sec f/11
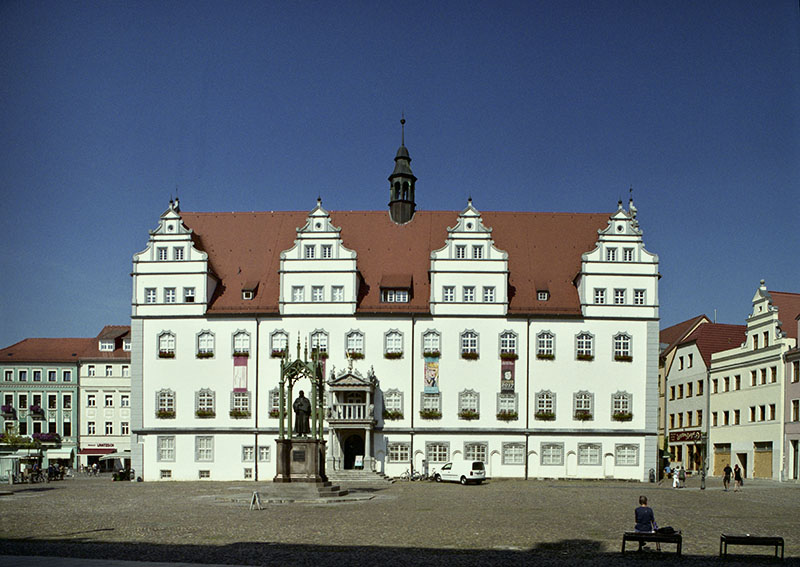
Luther Denkmal (Martin Luther Memorial)
It was not possible to avoid tilting the camera up
here, but by using a 10mm upward shift on the lens I
have been able to reduce the amount of tilt and so
minimise the keystoning effect.
[C546_7.jpg]
In both images, some
vignetting is observable in the top corners, but it
is not excessively obtrusive.
We will look at three further
pictures from “Luther city Wittenberg”, which in 2016
was preparing for the 500th anniversary of the
Reformation in 2017. All three are cropped out of
the full frame.
45mm Hartblei shift only lens 9mm shift up 1/1000
f/11
This image shows the full width of the 6×6 frame,
but has been cropped top and bottom to improve the
composition.
There is no vignetting, but I do detect a slight
amount of the barrel distortion for which the
Mir-26B is well-known (see here).
It could easily be corrected in software, but here
we are looking at the image as it was recorded by
the Hartblei 45mm shift lens.
[C546_4crp.jpg]
The image to the right is a very
small portion of the total frame, which can be seen
immediately above it on this page.
It shows the excellent resolution of the Hartblei
45mm shift lens, as well as the total absence of
chromatic aberrations (colour fringeing) and also
the effectiveness of Hartblei’s Multi Coating, which
has totally prevented reflections from the bright
building degrading the quality of the shadow areas
of the image.
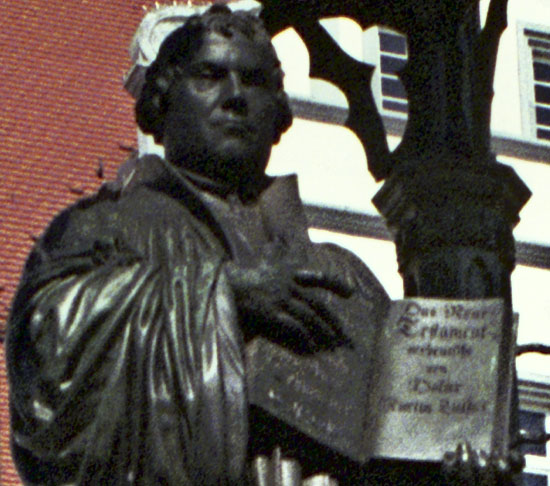
A further crop of the same
image, reproduced below this text, this time being
a tiny portion of the original image, shows the
capabilities of this lens and of the 6×6 format of
the Pentacon Six.
[C546_7c2.jpg]
I can definitely read some of the text on the right-hand
page, which says, “Das Neue Testament verdeutscht
von Doktor Martin Luther” (“The New Testament
translated into German by Doctor Martin
Luther”). If I had used the slower Fuji160
film, the resolution would have been better and the
text easier to read.
[C546_7c.jpg]
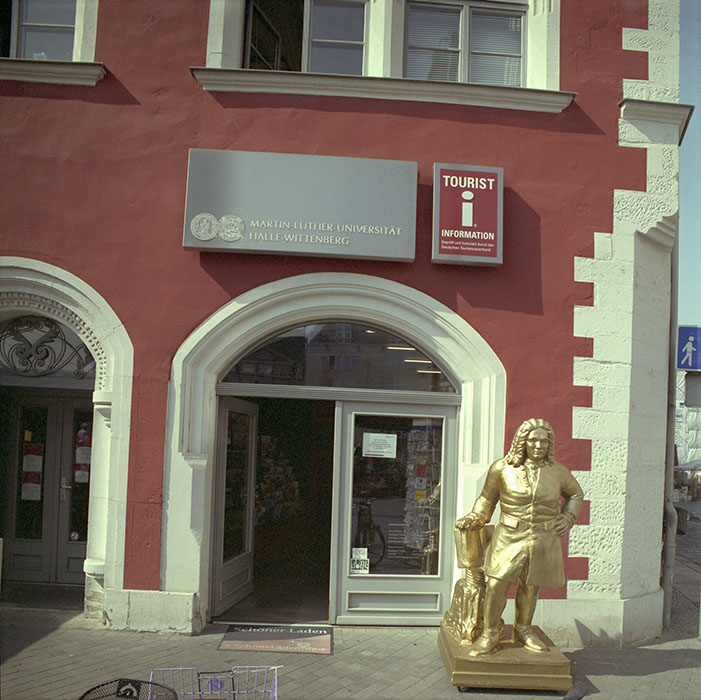
We go to the
famous, historic, university city of Halle for the
next shot. Halle now calls itself “Händelstadt
Halle”, in honour of its famous son Georg Friedrich
Händel, known in English as “Handel”, the composer of
the music for the world-famous “Handel’s
Messiah”. (We also note in passing, however,
that Halle University now styles itself
“Martin-Luther-Universität Halle-Wittenberg”.)
This is a
“grab shot” of the tourist information office and the
first picture shows the whole of the frame.
Again, I am shooting with Fuji PRO400H. Here I
shifted up by just 6mm to reduce the intrusion into
the shot of the parked bicycles – a common feature of
German cities! The exposure was 1/250 sec at
f/16
I obviously was not square on to the building, nor
was the camera horizontal.
We notice that there is no vignetting, but the
infamous barrel distortion is very obvious with the
window near the top of the frame.
[C546_16.jpg]
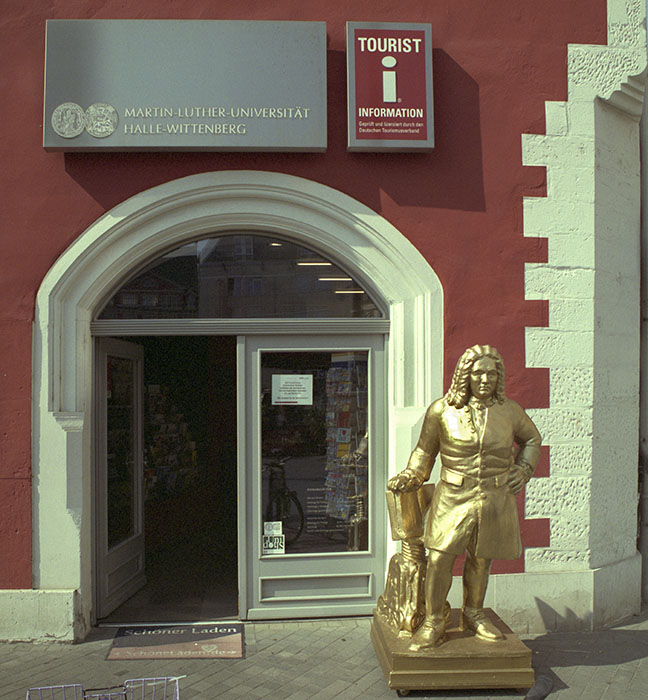
Straightening the image and cropping it results in a
much more satisfactory composition in which the
barrel distortion is not obvious. However, the
angle of the bottom of the door reveals that the
back of the camera was not parallel with the
building.
In spite of this, we have a satisfactory picture
that has benefitted from the shift capacity of this
Hartblei lens.
[C546_16crp.jpg]
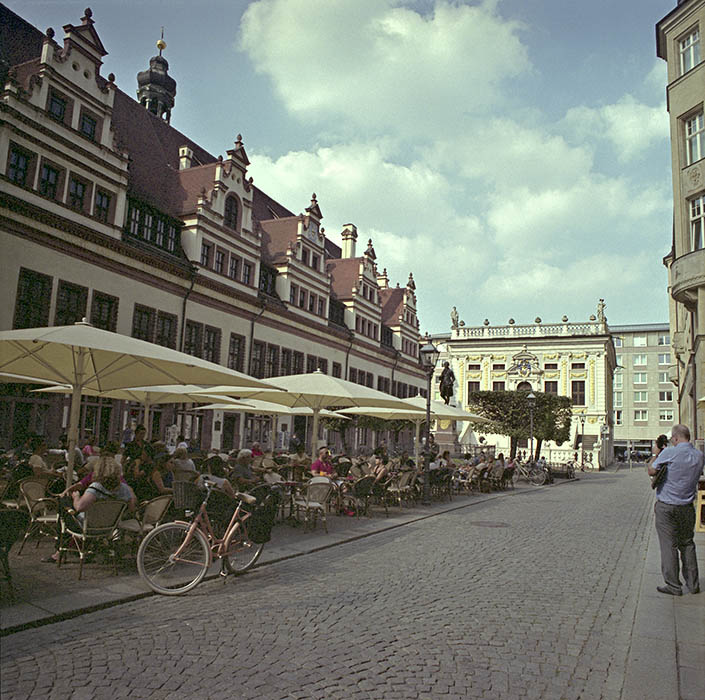
We will end this review of the
Hartblei 45mm shift-only lens with three more pictures,
this time from the city of Leipzig, which is in eastern
Germany. Again, we are shooting with Fuji PRO400H
– we should have had more confidence that the fine
weather was going to last, and have loaded the 160 film!
Shift is 10mm up, exposure is 1/500 sec at f/11
Exposure was difficult, and the left-hand side of
the image, which was in shadow, is under-exposed.
This has made more obvious the vignetting in the top
left-hand corner, which is, however, somewhat
camuflaged by the tree.
[C547_11-12.jpg]
45mm Hartblei shift only lens, 0mm shift. exposure:
1/500 sec f/14
Just because the lens has the capacity to shift, one
doesn’t have to shift it,
if no shift is needed!
[C547_9.jpg]
45mm Hartblei shift only lens 10mm shift up,
exposure: 1/500 sec at f/11
This shows the full width of the frame. It has
been cropped top and bottom, to suit the
composition, but no perspective correction or
rotating was needed.
This was clearly a case where the shift facility
enable me to avoid converging verticals, and also to
reduce the impact of the traffic on the image.
The wall shows slogans that were used in the mass
demonstrations on the streets in the last days of
the GDR dictatorship in Autumn 1989. Photos
must be greatly reduced before they can be uploaded
and displayed on this website, but in the original,
full-resolution image it is easily possible to read
slogans of the time such as “Wir sind das Volk” (“We
are the people”), “Keine Gewalt” (“No use of
force”), “Die Mauer muss weg” (“The Wall must go”),
“Freiheit” (“Freedom”), “Frei Wahlen” (“Free
elections”) and “Demokratie” (“Deomocracy”).
[C547_14.jpg]
Conclusion
I enjoyed taking this lens with me
on my trip to Germany, and when, on my next trip, I took
the much smaller Mir-69 non-shift lens, I really missed
the shift function. I found that metering with
this lens was fast, using my usual, stop-down metering
mode:
Set suitable shutter speed on
camera and meter
Set lens to full aperture, focus
and compose (in this case, shifting the lens, if
desired)
Switch on the meter
Turn the aperture ring until the
needle in the viewfinder aligns with the index mark.
Fire!
I found this very fast and easy to
operate – although perhaps I should sometimes have taken
a little more time composing some images more carefully!
A further picture taken with this lens can be seen here.
There is a report on the Hartblei 45mm “Super-Rotator” version of
this lens here, and results
obtained with the Wiese shift-only version of this lens can be
seen here.
If you are working through the lens data
section, to go on to the next section, the Hartblei 150mm lens,
click here.
If you are working through the lens testssection, to go to the next section, further advantages of
shift lenses, click here.
To go back to the beginning of the Lens Data section, click below
and then choose the range of lenses that you want to read about.