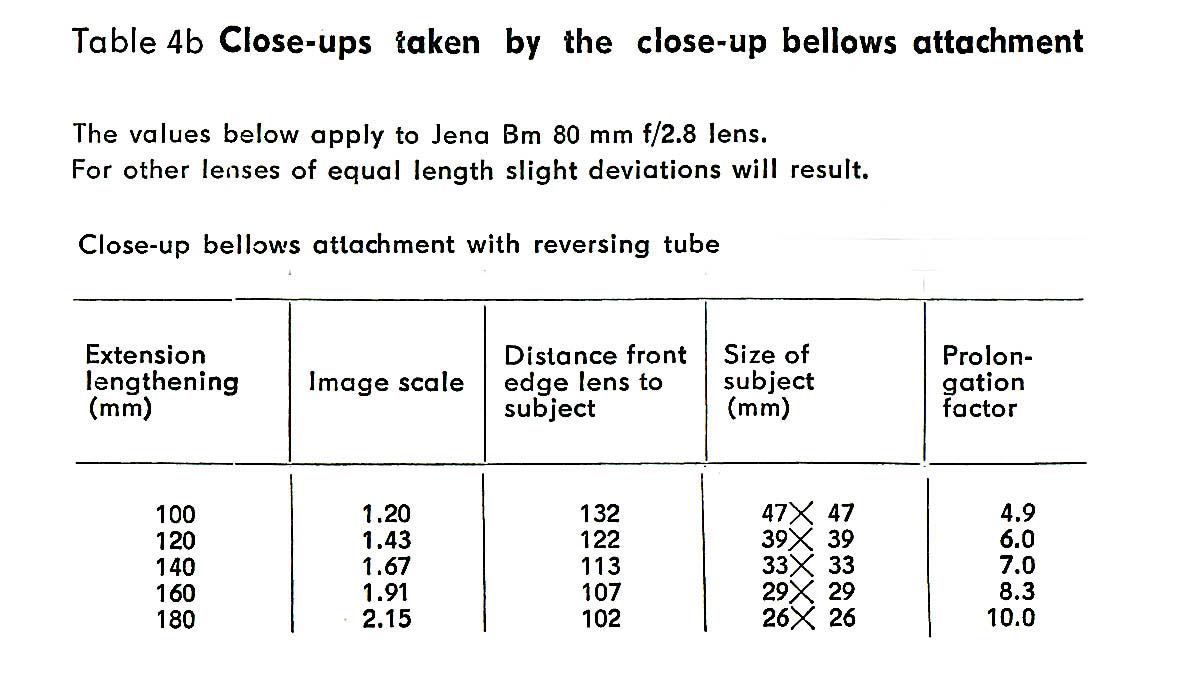
The Pentacon Six System
by TRA

Extensions & Exposure Factors
with Tubes & Bellows


The four types of extension tubes available from Pentacon:
Manual tubes in black or chrome finish (above)
and auto tubes in black or chome finish (below)
The dimensions on the black auto tubes have been added by me.
[4tubtypes.jpg]


The Manual Tubes

The manual tubes consist of a front tube (“A” in the image on the right) with a mount to receive Pentacon Six lenses at one end and a screw thread at the other, and a rear tube (“B” in the image on the right) with a mount to go on the Pentacon Six body at one end, and a screw thread at the other.  Each of these tubes is 9mm long, and both tubes are needed at all times, either just joined together, or with one or more of three spacer tubes of different lengths between them.

The screw thread used appears to be 68mm, apparently with the normal pitch for this size of 0.75, although I have yet to check that.

The dimensions of the other tubes are:

Tube I        8mm
Tube II       16mm
Tube III      32mm

The various combinations provide (without any gaps) image scales on film from 0.21:1 (fractionally more than one-fifth life-size) to 0.98:1 (fractionally under life-size), when used with the 80mm Biometar lens and making use of its focussing ring.

The big disadvantage of the manual tubes is that there is no automatic operation of the lens diaphragm pin, so it is necessary to open up the lens fully to focus, and then stop it down to the chosen aperture before taking the photograph.

This can be overcome by the use of the special extension tube with aperture control, and a double cable release.  This tube is 20mm long, and it can be used on its own or with the manual tubes, providing image scales from 0.24:1 to 1.02:1 (fractionally over life-size)

Here the manual tubes are being used with the special extension tube and double cable release in order to retain automatic aperture operation.

The special extension tube is labelled “Z” in the chart below.  Pentacon’s order number for this tube was 208 560.

For a long time I believed that these manual tubes were only ever available in plain metal finish outside (they are matt black inside).  However, thanks to a Pentacon collector who is a renowned expert, I now know that some manual tubes were made with a black finish.  They are seldom seen!

This chart shows the entensions obtained, image scales, image size and other information for photography using the manual tubes with the 80mm Biometar lens.

Exposure prolongation factors

Light readings from a hand-held meter will need to be increased to allow for the increased extension between the lens and the film.

The basic principle is that the longer the extension used, the weaker (dimmer) the light reaching the film.

It is necessary to compensate for this either by using a slower shutter speed (to let the existing amount of light in for longer) or by using a larger aperture (to let more light in for the existing time duration), or by a combination of both of these changes.  But how much compensation is needed?

The Pentacon literature tells us, by giving us what in English they call “prolongation factors”.  In German these are called “Verlängerungsfaktoren”.

A “prolongation factor” of “1” would be meaningless, since it would mean “increase your exposure by a factor of 1”.  That is to say, there would be no change at all.

However, a prolongation factor of “1.5” would mean “increase your exposure by 50%.”

Since each slower shutter speed increases the exposure by 100% (i.e., it doubles the exposure time), we can’t achieve a 50% increase by changing the shutter speed.  But we can achieve this by opening up the lens aperture by half a stop.  For instance, if our hand-held meter told us to give 1/125 sec at f/8, in order to achieve a 50% increase in the light reaching the film, we would give an exposure of 1/125 sec but open up the lens aperture to the détente point on the lens between f/8 and f/5.6.  This is marked with a dot or a narrow vertical line on the aperture ring of many lenses.

An extension factor of 2.0 means “multiply your exposure by a factor of 2” or double your exposure”.  In the above example, we could either change the shutter speed to 1/60 sec and leave the lens aperture unchanged or open the lens aperture one full stop to f/5.6 and leave the shutter speed unchanged.  Either of these changes would double the total light intensity falling on the film.

Which change you choose depends on other factors:

  • If the subject is moving, you may need to keep the higher shutter speed, so you will open up the lens aperture.  However, this will reduce the depth of field.
  • Therefore, if the subject is not moving, you will leave the lens aperture where it was and use a slower exposure, instead.  (I assume that for macro work the camera is on a tripod!)
   
Click on this table to view a larger version of it.

This chart gives exposure factors when using the 80mm lens.
For exposure factors with other lenses, please see lower down this page.

In practice, depth of field is extremely shallow with macro photography, and normally smaller apertures would be recommended – either with increased light to compensate (if the subject is moving) or a much slower shutter speed (if the subject is not moving).

If you are use a metering prism, none of this compensation is necessary, as the meter will give you the correct reading – an excellent reason to get and use a TTL metering prism!

Exposure prolongation factors enable you to compensate, when the light falling on the film will be less bright than the light falling on a hand-held light meter.  Assuming that you have been careful to ensure that the light falling on the hand-held meter is the same as the light falling on the subject to be photographed, less light will fall on the film in either of two circumstances:

  • when extension tubes or bellows have been used between the lens and the camera;
  • when you have put onto the lens a filter that reduces the intensity of the light.

In either case, the effect on the film will be the same, and for this reason, filters that do reduce the amount of light falling on the film (some do not!) should be marked with an exposure prolongation factor, just like the factors on the extension tube charts.  You will find a helpful explanation of this on the filters page on this website, where the factors are, logically, called “filter factors”.  That page also has a helpful chart that explains this further.  You can see the page here (scroll down for the chart).

The Pentacon Order Number for the manual tubes was was 208 530.  You can see an illustration of the special extension tube here (scroll down).  I have called it an aperture control ring, because that is essentially what it is!

The Automatic Tubes

I recommend that if possible you obtain the automatic tubes.  These contain a plunger that transmits the camera instruction to stop down the lens aperture when firing.  The order number for the automatic tubes was 208 810.  Early versions of these tubes were produced in plain metal finish outside, although later on they were available with a shiny black finish outside.  All versions are of course matt black inside.  The dimensions of the auto tubes are as follows:
 
Tube I      15mm
Tube II     22.5mm
Tube III    30mm
Tube IV    60mm
 

In conjunction with the 80mm standard lens, these tubes provide image scales between 0.18:1 and 1.62:1.

Image scales, image size and other information for photography using the automatic tubes with the 80mm Biometar lens.

To see more information on the automatic tubes, click here.

You can see the effect of using these automatic tubes here

Click on this table to view a larger version of it.

Special Ring

There is also a 10mm extension ring which is not intended to be combined with any of the above rings; it merely fills the gap in the image scale between 0.1:1 and 0.18:1, i.e., the maximum extension of the lens (8.5mm) and the No 1 tube (15mm).  Pentacon said that if this ring is the first one to be put onto the camera, you should release the shutter before the lens is inserted and locked.  Data related to using this ring is in the above chart.

The Pentacon Order Number for the 10mm ring was was 208 811.  To see the special ring, click here.
 
Image scales & extension factors with other lenses

Pentacon also gave brief information on using the auto tubes with some other Carl Zeiss lenses.

If you look at the table to the right, you will see that a given extension increase will require MORE compensation with a wide-angle lens and LESS compentation with a longer lens.  There is a simple reason for this.

If you add an extension 80mm long between an 80mm lens and the camera, you will be doubling the distance of the lens from the film, and so reducing the light intensity to one quarter (please believe me on this; now is not the time to explain it).  The prolongation factor will be (approximately) 4, so to compensate, you will need to open up the lens by two stops OR lengthen the exposure time by two settings (for instance, by using 1/30 sec instead of 1/125 sec), or a combination of these two.

However, if you add an extension 80mm long between a 120mm lens and the camera, you will be increasing the distance of the lens from the film by only two-thirds of the focal length, so the light loss will be less, and the exposure factor will be smaller, in this case, approximately 3.  The helpful chart on the filters page (here) will show you that you need to open up the aperture by 1½ stops, or choose the next slower shutter speed and open up the lens by half a stop.
  
Click on this table to view a larger version of it.

Pentacon does not give factors for using tubes with other lenses, as they are rarely used in macro photography.  However, application of the above principle will indicate that if you added an 80mm extension between the camera and the 180mm Sonnar lens, you would be increasing the distance of the lens from the film by somewhat less than half of its focal length.  The exposure compensation would therefore be in the range of about 2.  That is to say, you would need to open up the lens by ONE stop OR increase the exposure time by one setting, for instance, from 1/125 to 1/60 sec (assuming that the camera was on a tripod and the subject was not moving!).

You should be cautious about using significant lengths of extension with lenses that were not designed for such extensions, as this can result in unexpected consequences.  You can see what I mean here.

However, you may wish to get closer to your subject than is possible with a long lens at its closest-focussing point.  This can in particular be necessary when using the 150mm Kaleinar lens for portrait photography, but may also apply with some close-up photography with the 180mm Sonnar lens.
In such a case, you will need to use an automatic tube, and the 15mm tube will probably give you all the extra extension that you need (or at most, the 22.5mm tube).
In such a case, the exposure factor will be insignificant.  If you are worried about under-exposure, you could open up the lens by half a stop, but if you do not the reduction in light intensity reaching the film should be well within the exposure lattitude of the film.

The anxiety about getting the exposure exactly right was at its height in the 1950s, when using colour film was new and the exposure lattitude of film was very limited – especially with slide (“reversal”) film.
If you are using modern colour negative film and follow the guidance on this page and on the filter page,
you should get satisfactory exposures every time.
Naturally, for a special, unrepeatable, shoot, carry out tests in advance, making careful notes.
Bellows

The Pentacon bellows provide variable extension nominally from 20mm to 100mm and image scales with the standard 80mm lens from 0.25:1 (one quarter of life-size) to 1.25:1 (larger than life-size). 

With a double cable release, lens aperture automation is retained without the need for the special extension tube referred to above.

You can see further information on the Pentacon Six bellows here and on the Exakta 66 bellows here.

Image scales and other information for a range of bellows extensions is given in this table:
Click on this table to view a larger version of it.
For extreme close up work, it is possible to mount the 80mm Biometar lens reversed on the bellows (or for that matter, straight onto the body or one or more of the extension tubes), using Pentacon’s special reversing tube (which is illustrated here – scroll down).  This results in much greater magnification.  Here are the relevant exposure details:
Click on this table to view a larger version of it.
With the lens reversed, it is still possible to retain lens aperture automation by using the special tube described above in the section on maintaining aperture automation when using manual tubes (the “aperture control ring”).  This tube was often supplied with the double cable release.

You can see more information on the Pentacon Six bellows – and a better illustration of the set-up in this picture – here and on the Exakta 66 bellows here.

The Pentacon Order Number for the bellows was was 208 750.

The Pentacon Order Number for the double cable release was 210050


The four types of Pentacon extension tube sets, from L to R:
manual (chrome), manual (black), auto (chrome), auto (black)
(The size labels that I have added to the black auto tubes may just be visible in this picture.)
[4tubtyp2.jpg]


To go back to the beginning of the macro section, click here.

To go on to the next section, click below.

The Pentacon Six bellows

Home

© TRA January 2006.  Latest revision: September 2017