Medium Format
Lenses with the Pentacon Six Mount
A comparative test
by TRA
Controlling Focus with
the Pentacon Six
One of the great advantages of using a Medium
Format camera is the control of focus that it gives to the
user. With a Medium Format camera like the Pentacon Six
you can control the sharp and out-of-focus areas of the image
for pictorial purposes. At the two extremes are:
- differential focussing
- hyperfocal focussing.
This control is achieved by
varying the depth of field.
Depth of Field
When the image in a camera is
focussed, a point or plane at a certain distance from the
camera is selected to be the sharpest point. There will
be an area in front of and behind this point which will be in
acceptably sharp focus. This area is called the “depth
of field”. (Often abbreviated to “DOF” in lens
tables.) Approximately one third of the depth of
field is in front of the point of focus, and two-thirds
is behind it.
Obviously, the image
doesn’t suddenly change from sharp to unsharp; there
is a gradual transition, with the image becoming increasing
unsharp the further the object is from the plane of sharp
focus. Using a mathematical formula, lens designers
decide how far away from the plane of sharpest focus can be
still considered to be acceptably sharp, and lenses of
professional quality have usually indicated this with “depth
of field” indications on the barrel of the lens. The great
thing about this is that the photographer can then choose
what (s)he wants to have in focus or out of focus in the
image!
See examples of depth of field in macro
photography here.
Depth of field is determined by:
- the focal length of the lens
- the aperture selected
- the distance of the subject from the camera.
Focal length
Depth of field is shallower with longer lenses (for
instance, 300mm) and deeper with shorter or wide-angle lenses (for
instance, 50mm).
Aperture
Depth of field is shallower with wide apertures
(for instance, f/2.8) and deeper with small apertures (for
instance, f/16).
Distance
The depth of field is greater (deeper) the further
the subject is from the camera. With subjects that are
very close to the camera, the depth of field is small
(shallow). In macro
photography, the depth of field may only be a few millimeters.
Sometimes it is impossible to obtain the desired
depth of field with a given lens, because using an extremely
small lens aperture may result in the need for
impractically-long shutter speeds. In such cases, it is
possible to increase depth of field by using a tilt lens.
Differential Focussing
When using differential focussing, the photographer
chooses to throw certain parts of the image deliberately out of
focus, to concentrate the attention of the viewer on a selected
part of the image. This is commonly done with portraits,
where the main focus should be on the eyes, with a gradual
decrease in sharpness in front of and behind the plane of sharpest
focus.
To achieve maximum differential focus, it is
necessary to use:
- longer lenses (for instance, the 180mm
Sonnar, which is one of the great portrait lenses of the
world)
- large apertures (i.e., smaller aperture
numbers, for instance, f/2.8).
To control the area of sharpest focus, it is
possible to refer to the markings on the lens barrel, but the best
way of ensuring precise focus is by observing the image on the
ground glass screen in the viewfinder, possibly with the help of a
magnifier head instead of the prism,
or the prism magnifying attachment or
“Focussing Telescope” on the back of the prism.
In order to use these wide apertures, you may
need to use a fast shutter speed to avoid over
exposure. The exact speed chosen will depend on the
“speed” – i.e., the sensitivity – of the film and the
prevailing lighting conditions. To be able to use very
wide apertures it can be useful to have a camera with a top
speed of 1/1000 sec, such as the Pentacon Six, unlike those with
a top speed of only 1/500 sec, such as most Hasselblads (the 500
C/M, for instance), the Norita 66, etc.
Compare the depth of
field with these two images
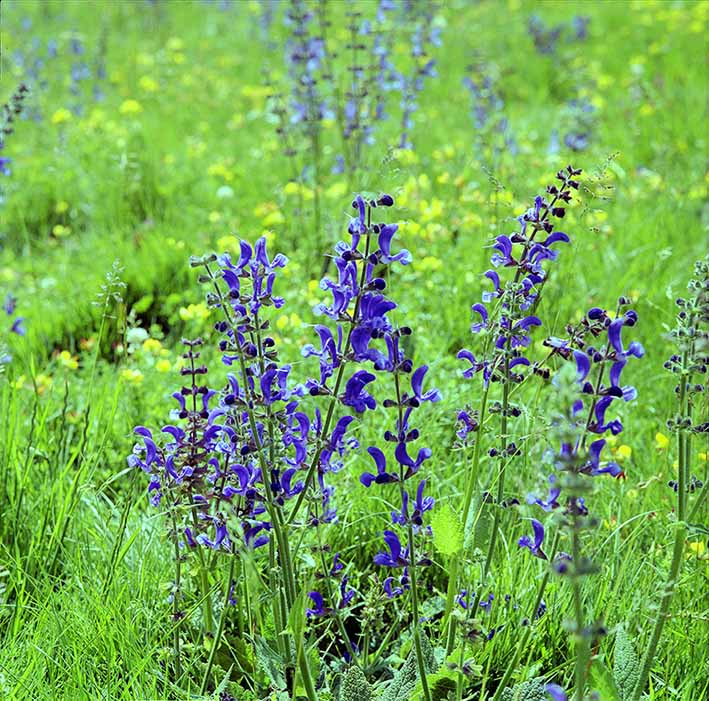
Pentacon Six with Kodak 160 ISO negative film
120mm Arsenal Vega 28 lens, closest focus, 1/60 f/16
Scanned with Epson V750 Perfection PRO with VueScan
v.9.5.17.
[C337-6]
|
|
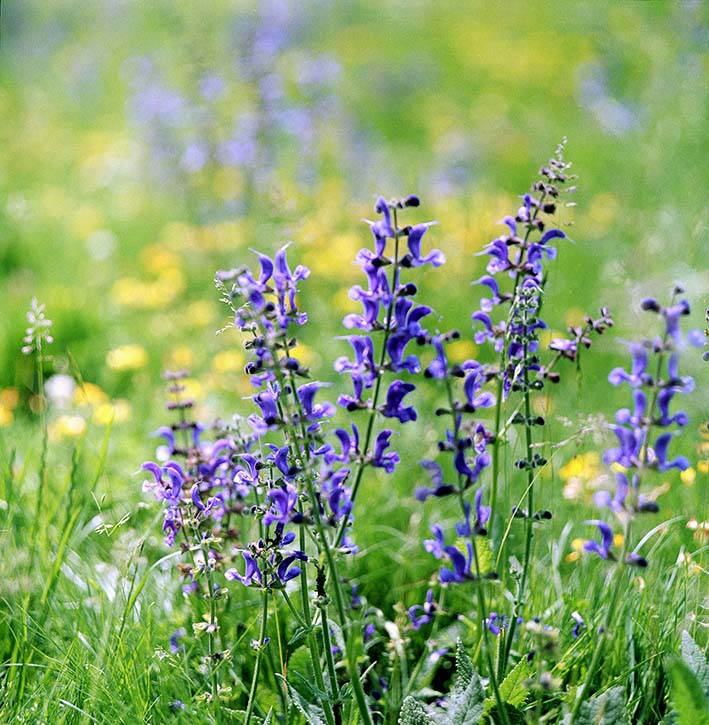
Pentacon Six with Kodak 160 ISO negative film
120mm Arsenal Vega 28 lens, closest focus, 1/1000 f/4
Scanned with Minolta Dimage Scan Multi PRO with Minolta
driver
[C337-7]
|
Note that these two negatives have been scanned
with different scanners and different software (and,
incidentally, more than ten years apart, which shows that film
is a good storage medium). The different scanners and
software have resulted in slight differences of colour.
The negative holders for each scanner were also different,
resulting in a slight cropping of the bottom of the left-hand
image. (If having an exact match had been essential, I
would have re-scanned the second image with the Epson scanner
and VueScan software.)
Two factors reduce the depth of field with both
of these images:
- the 120mm lens is slightly longer than the
standard lens (and so will naturally have a shallower depth of
field than lenses with a shorter focal length, such as the
80mm, 65mm, 50mm lenses, etc)
- I have used the closest focussing distance of
the lens, and the closer one focusses, the shallower the depth
of field with any lens.
The image on the left was taken first. I aimed
for the greatest depth of field possible. I was using the
camera hand-held and 1/60 sec is slower than would normally be
recommended with a 120mm lens, but with a good posture and hold
it is possible to achieve sharp pictures at this speed hand-held
with the Pentacon Six (unlike with the Pentax
6×7!). To get accurate exposure at this speed with
the prevailing light, I was only able to stop down to f/16, even
though the minimum aperture on this lens is f/22. If I had
used the minimum aperture of f/22 at 1/60, the image would have
been under-exposed (by "one stop").
However, I was not sure about the image: perhaps
there was too much background detail, distracting the viewer's
attention from the the flowers in the foreground. So I
decided to go to the opposite extreme.
The image on the right was taken a few seconds
later. I knelt on the ground in order to get as low as
possible and chose the fastest shutter speed, 1/1000 sec, which
enabled me to open up the lens to f/4. If I had used the
maximum aperture of f/2.8 at 1/1000, the image would have been
over-exposed (by "one stop"). Of course, if I had had a
neutral density filter (or a polarizing filter) with me, I could
have put that on the lens and opened up to f/2.8 -- but one
rarely carries all possible accessories. Not all of the
foreground flowers are at the same distance from the lens, so
some of them are less sharp. Nevertheless, the background
is thrown fully out of focus, which I consider produces a much
more pleasing picture. With a slight crop of the left and
right-hand edges of the image (especially the left), I have made
a vertical print about 40 cm tall that my wife and I enjoy
having on a wall in our home.
Perhaps the second image shows that images with out-of-focus
areas can be pleasing.
You can learn more about the effects of different formats
and lenses on depth of field here.
Bokeh
The word used to describe the out-of-focus areas
of the image is “bokeh”, which is apparently a
word of Japanese origin. The aim in most cases is to
obtain out-of-focus areas that do not draw attention from the
main subject of the image, and this is generally achieved by
lenses which have a large number of aperture blades, as these
produce a round aperture, as opposed to those lenses with 5 or 6
blades, which produce a pentagon or hexagon shape when stopped
down.
In the opinion of many people, the worst bokeh is
produced by mirror lenses, which tend to render out-of-focus
highlights as donut shapes. However, this is a question of
style and fashion, and a few years ago such shapes were all the
rage. The fashion will undoubtedly return. In any
case, you do not have to be governed by fashion!
Every picture can tell a
story!
|
The following pictures tell a story a story from a
delightful summer’s day in an English garden, nearly forty
years ago. The camera was a Pentacon Six
(non-TL). The lens was a single-coated 80mm
Biometar. The film was Kodacolor II (100 ASA / 21
DIN). Metering was provided by the Pentacon Six
metering pentaprism.
I wanted the focus of the story and therefore also of the
pictures to be the two little girls, so I set a wide
aperture. The exact aperture is not recorded in my
notes, but it was probably between f/4 and f/5.6, as the
sun was behind my subjects and so I was exposing for the
shadows. I set the shutter speed to 1/250 second and
adjusted the aperture as required to give the correct
exposure. (In passing, we note that, shooting
into the sun with this single-coated Biometar,
there is a total absence of flare.) Readers
will perhaps remember from other pages on this website
(for instance, here) that
the closer one focusses, the shallower the depth of field,
and here I was quite close to the two little girls.
(I had obviously also crouched down, in order to be at the
right height for pictures of two three-year-olds.)
The little girl on the left wanted to give some flowers to
her cousin, who is on the right – or perhaps her mother
had suggested this to her. In any case, her mother
was close behind, keeping a careful and loving eye on her
little child. I wanted to convey this, but the focus
of the story, the action and the picture had to be the two
girls – and the flowers. Hence the choice of a wide
aperture. The mother is present in the picture, and
family members and friends will recognise her, but she is
deliberately out of focus, so that we concentrate our
attention on the two girls and the flowers.
|
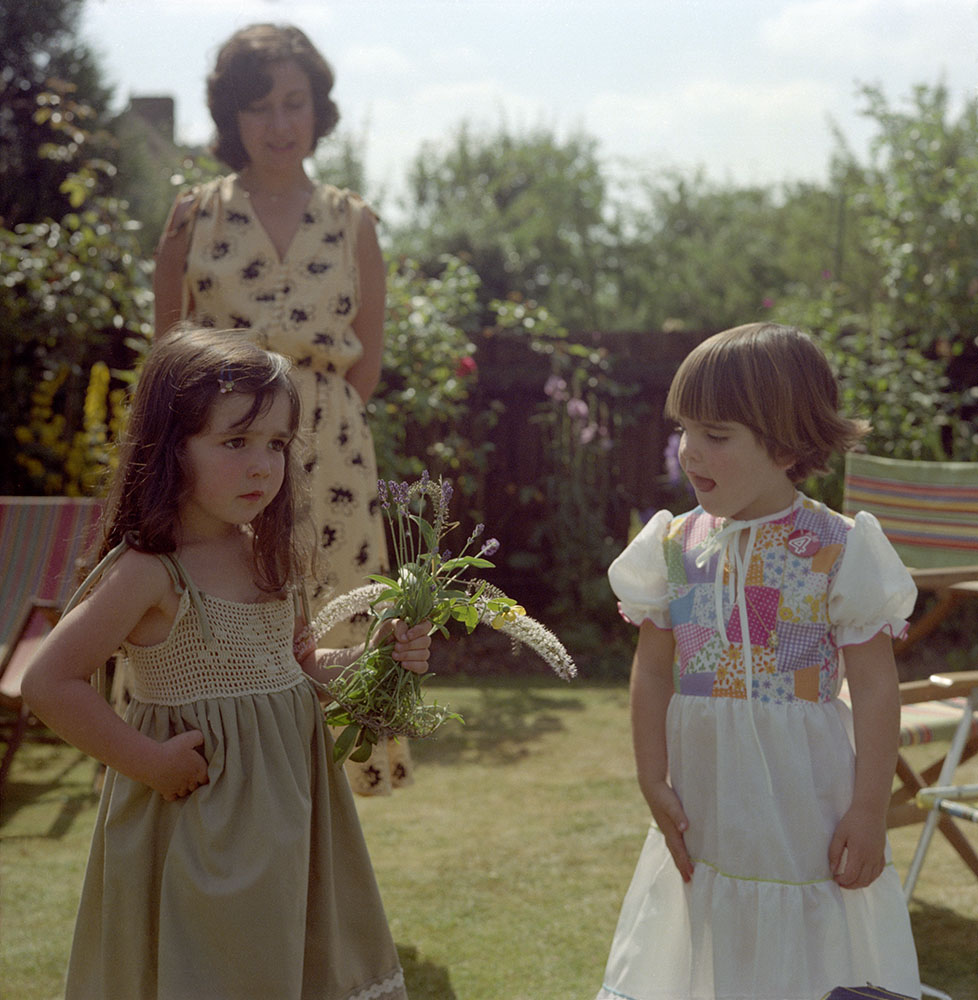
[C62_8.jpg]
|
|
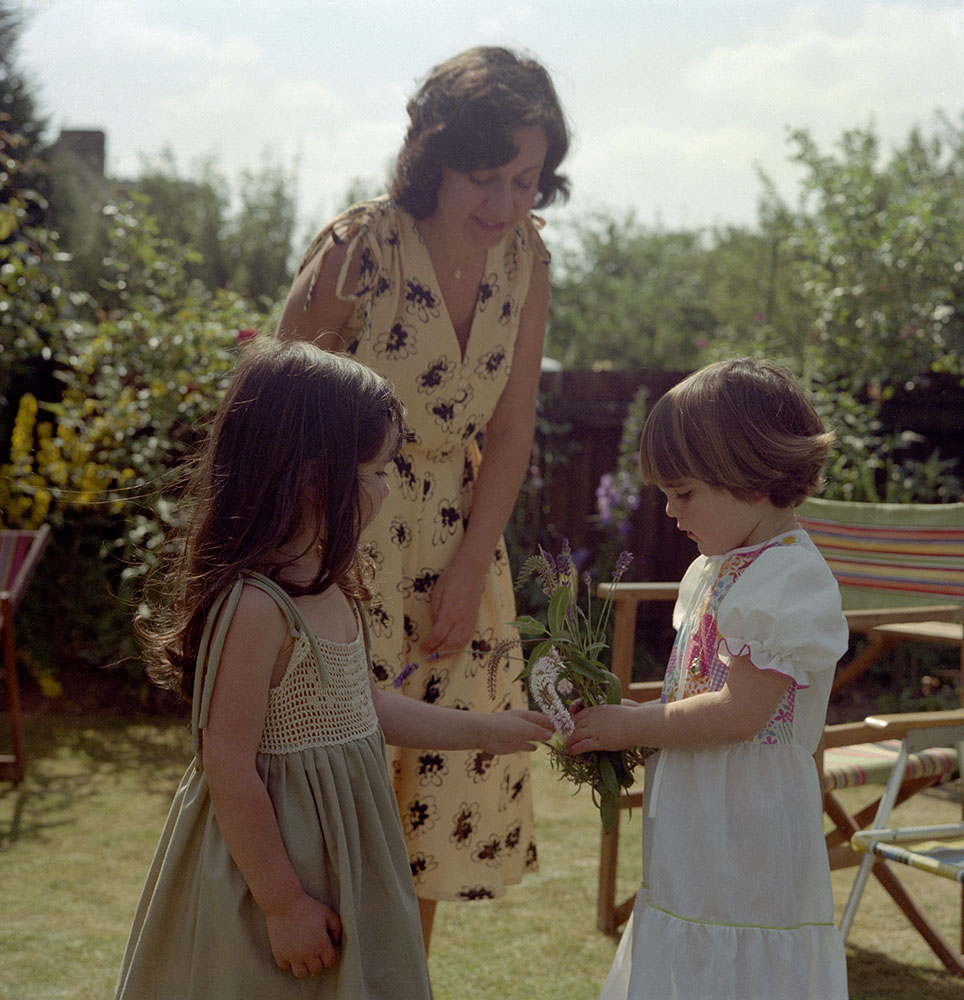
[C62_9.jpg]
|
Angela, on the left, seems to be
thinking. The attention of Jacqui, on the right, has
obviously been drawn to the flowers. We can see the
context of an English garden in summertime, but as it is
deliberately out of focus, our attention is not distracted
by it.
|
|
Angela has given the flowers to Jacqui,
who is now contemplating them. Angela’s mother has
come closer, moving nearer to the plane that has been
focussed on, but while her contented smile is clear to
see, the focus is still on the two little cousins and the
flowers.
|
In both of these photos we observe the pleasant
out-of-focus bokeh of the background leaves and
plants. What they are is recognisable, and they
contribute to the story told by the pictures, by telling
us where this episode is taking place, but they do not
distract our attention from the focus of the action.
Such control is not available with a mobile phone or
most small digital cameras. However,
with a medium format camera like the Pentacon Six,
the photographer can use differential focus to
direct the viewer's attention subtly to the desired
subject of the photograph.
|
|
Advice
for viewing these pictures
As people browse the internet more and more on mobile
phones, tablets, etc., it is important to point out
that on such small screens it will probably be
impossible to see the effect that is described
here. A minimum recommended image size to
appreciate the differential focus would be in the
region of 5"×5" (approx 13cm×13cm), which is normally
the minimum size of prints produced for images taken
with 120 film. To appreciate the effect fully, I
recommend viewing these images at 8"×8" (approx
20cm×20cm) or larger. Like all pictures
taken with the Pentacon Six, the original negatives
can be easily enlarged to sizes in excess of 2ft×2ft
(approx 60cm×60cm) without any loss of detail or
image quality. Naturally, to produce copies
that can be downloaded from the internet within a
reasonable period of time, I have had to reduce the
resolution of these scans very substantially. |
Hyperfocal Focussing
Hyperfocal focussing does the opposite to
what we have illustrated above with a shallow plane that
is focussed on, leaving other parts of the image deliberately out
of focus; it maximimises the depth of field of the image,
rendering most or even all of the image in sharp focus, both those
components that are close to the camera and those that are far
away. This is frequently desirable with landscapes, where
the image at the virtual “infinity” distance is sharp, and so is
perhaps a foreground of branches or leaves that may be framing the
image.
To achieve maximum hyperfocal focus, it is
necessary to use:
- standard or shorter lenses
- very small apertures (i.e., larger numbers,
for instance, f/16).
To control the hyperfocal distances, it is necessary
to refer to the markings on the lens barrel, although stopping
down the lens can give some indication in the viewfinder of the
depth of field (at the cost of temporarily darkening the image in
the viewfinder).
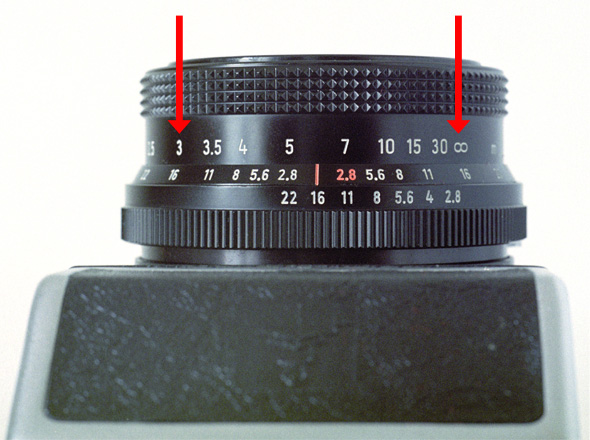
The following two pictures of the 80mm Biometar
lens on the Pentacon Six help to explain how to achieve
hyperfocal focus.
The ring nearest the camera is the aperture
control ring, with the aperture numbers engraved on it.
Set the chosen aperture against the red index mark just in front
of the aperture ring.
(The right 2.8 is in red, as this is the
index mark that you need to use, instead of the red line, if
shooting on Infra-Red film.)
Either side of the red index mark, the aperture
values are engraved on the fixed ring.
These tell you the available depth of field.
If the main subject is at “infinity” I could focus
at infinity (the oo symbol), but this would “waste” some of the
available depth of field.

Here the lens aperture is set at f/2.8,
the maximum aperture.
I have moved the infinity mark opposite
the right-hand 2.8 mark.
By looking at the left-hand 2.8
mark, I can see that everything will be acceptably
sharp from 15 metres to infinity.
[C463-14.jpg]
|
|
Here the lens aperture is set at f/16,
which is very small, although not the smallest on this
lens.
I have moved the infinity mark opposite
the right-hand 16 mark.
By looking at the left-hand 16
mark, I can see that everything will be acceptably
sharp from 3 metres to infinity.
[C463-13.jpg]
|
Notes
1) To use the smaller apertures, you may need to
use a slower shutter speed – again depending on the film speed
and the light available. In some cases, use of a tripod
will be advisable (generally for shutter speeds longer than
1/125 sec if using the 80mm Biometar).
2) It is generally reported that the
depth-of-field scales on the “Soviet” lenses (Arsenal factory,
etc) are over-optimistic, so the zone of acceptable focus may be
less than expected. You can compensate for this in the
following way:
If you set the infinity mark to f/16, for example,
set the actual aperture ring on the lens to f/22 (and adjust the
shutter speed accordingly).
Conclusion
Choosing which parts of the image to have in
focus or out of focus requires more thinking than using a
“point-and-shoot” camera or a camera with an auto-focus
lens. But it takes the control away from the camera
and puts the photographer in control of the image!
Your own experience will soon tell you the settings that give
you the results that you find most acceptable for each
situation.
See also the explanation here.
Back to Frequently-Asked Questions.
Back to Operating Instructions.
To go back to the beginning of the lens tests, click below and
then choose the focal length that you want to read about.
Back to beginning of lens tests
Home
© TRA June 2009. Latest revision: November 2017