Pentacon Six Mount Cameras
by TRA
Loading the Pentacon Six and
Exakta 66
|
How-to-do-it Video Tutorial
I have made and up-loaded a video
that shows you how to load the Pentacon Six. I suggest that you read
this description and study the photos here first. Then you can click
on the link at the bottom of this page, to see the video. |
Loading the Pentacon Six or Exakta 66 is not difficult. I find
it far easier to load than a Hasselblad (or Kiev 88!) film magazine.
But nor is it as easy as loading many 35mm cameras. Get the loading
wrong with any of these cameras, and youre going to have problems, the
most common of which is overlapping frames. But having said that,
overlapping frames is not common at all, if the camera is loaded properly.
I am grateful to Ron Spillman for his permission to reproduce his article,
Snagless
Pentacon Loading, which was published in Modern Photography in October
1972. To read Ron Spillmans instructions, click here.
I have followed Ron Spillmans instructions since I first bought a Pentacon
Six in 1977. I have now produced new, colour photographs of the loading
procedure, and new instructions. They essentially follow Ron Spillmans
instructions, but are a little more detailed. Sit down and take your
time. It really is easy!! A written description of how
to tie shoe laces, for someone who had never done it, would be even longer
than this, but I expect that you learnt to tie laces as a child, so dont
be put off by the description. Here it is:

Loading 1 |
|
Sit down, put the camera face-down on your
lap and open the back.
If necessary, pull the spool-holder knobs on the bottom
of the camera down and transfer the empty spool from the feed chamber (on
the left) to the take-up chamber (on the right). (You can lock the
spool holders in the out position by rotating them slightly to the right.
Return them to the in position by rotating them back to the left.)
Return the right-hand spool-holder knob back to its rest
position, and turn the take-up spool a little to the right, to make sure
that it has engaged properly at the top and bottom.
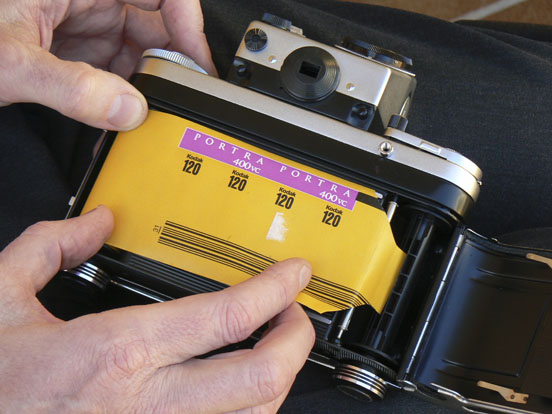
Then carefully remove the paper label from the new spool
and holding it carefully as shown in the photo to the left, to ensure
that it does not become loose place the full spool in the feed chamber
and return the spool-holder knob to its rest position.
Keeping one or two fingers of your left hand on the full
spool, to ensure that it doesnt unwind, with your right hand pull the
paper leader over to the take-up spool and feed it into the slot as far
as it will go, as in image 2.
Loading 2 |
Loading 2-wrong |
|
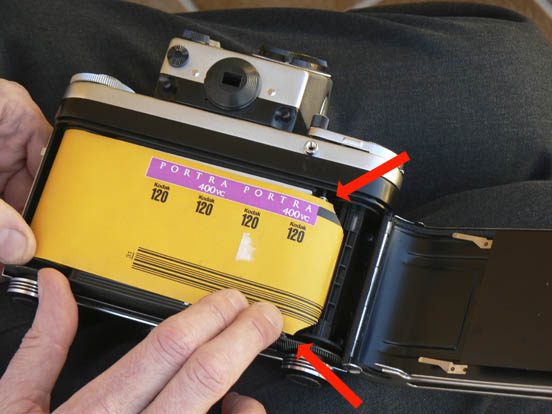
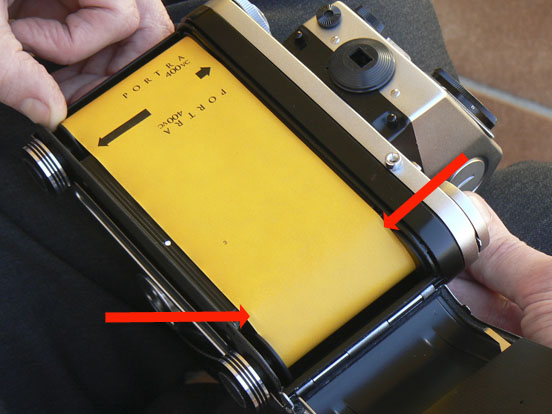
Image 2- wrong shows you how NOT to do it!
Here, with careless loading, the film leader is crooked.
Look in particular at the two points indicated by the arrows. You
can see that as soon as I start winding, the backing paper (and then the
film) will not load properly onto the take-up spool. For this picture
I have exaggerated the error, but if the film isnt centred correctly,
you will have problems. This is not a feature of the Pentacon Six
but of all cameras that use 120 or 220 film.
Load the film straight and you wont have a problem. |
Loading 3 |
|
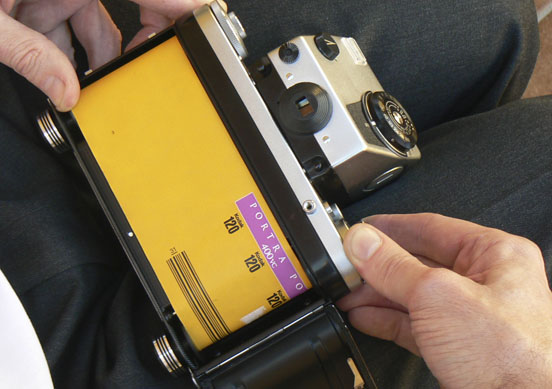
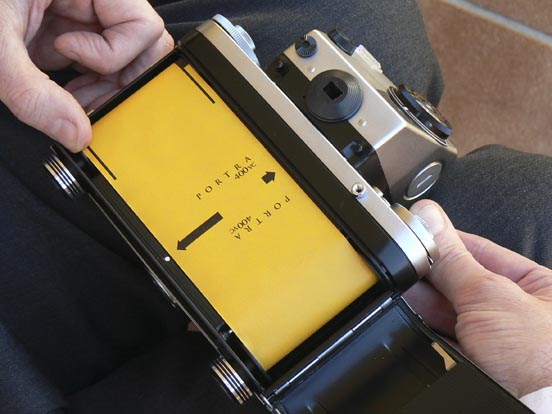
Once the tab of the leader paper is well inserted
in the slot on the take-up spool, carefully wind the film advance lever
fully forward, and keep it there, making sure that the paper does
not slip and that the top and bottom of the backing paper fit smoothly
within the two ends of the spool. Note that this is the only point where
I deviate slightly from Ron Spillmans original instructions, but this
works just as well and makes loading with only two hands easier!
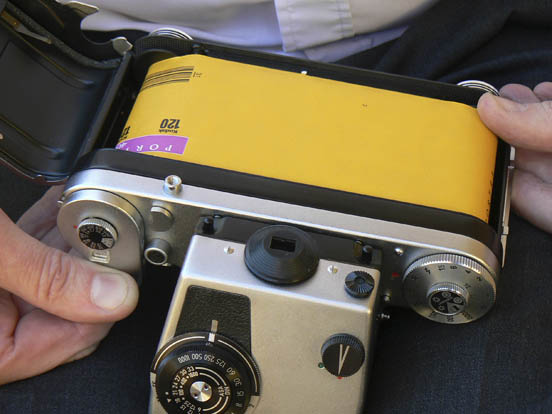
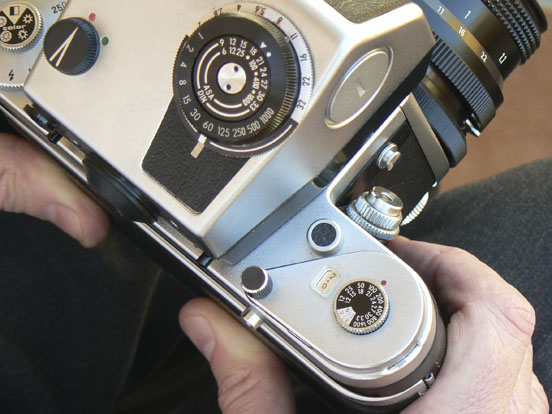
This view from a different angle makes it clear that the
film advance lever is all the way forward, against the little knob on the
top plate of the camera. Note how the thumb of my left hand is holding
the feed spool to keep the tension tight. This is important!
Loading 4 |
Loading 5 |
|
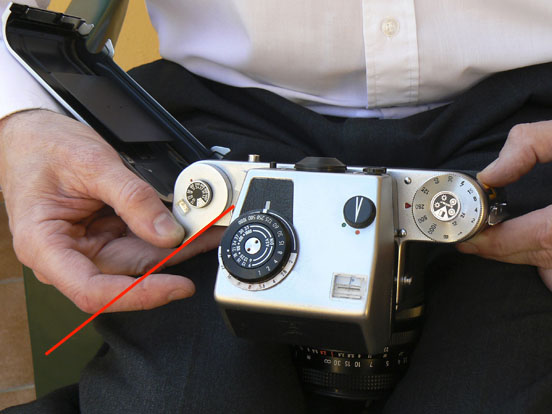
Rock the lever back and forth through about
45 degrees or a little less! to advance the film, but never
let the lever go back farther than shown in this picture (emphasised by
red line). Use the thumb of your other hand as a tensioner to keep
the rolled film taut on the take-up (and feed) spool.
If you let the lever come back further than the point
indicated, you will find that you cant inch it any more (rock it to
and fro); you will have to return it all the way back to the start point
its rest position , fire the shutter, and then move it all the way
forward again. This may make it difficult or impossible for you to
align the arrow on the backing paper with the index dot beneath the film
gate, since you will have to advance the lever all the way to the end of
its travel, at which point the arrows on the backing paper may have passed
the white index point beneath the film gate. (In fact, that is not
a serious problem, as there is a spare length of film at the beginning
and end of the film. If this happens, just close the back and continue
as per the instructions below, by image Loading 7.)
|
Loading 6 |
|
As shown in the illustration, I sometimes
put the thumb of my left hand on the edge of the flat plastic top or bottom
cap of the feed spool, instead of on the backing paper. This ensures
that the film on both spools is kept nice and tight.
The degree of tension maintained by the thumb of my left
hand is such that, as I advance the film, I can see a raised line of dots
in the backing paper, as the teeth of the film advance control spindle
dig into the paper. (Digitally enhanced, i.e., exaggerated, and arrowed
in the picture to the left.) |
This actually causes dark dots on rebate of film, as you
can see from this scan of the edge of a film. The regular spacing
of these dots shows that there has been no slippage as the film advanced.

(Top part of the film shown, only. After processing,
these dots can be seen along both the top and the bottom rebates.)
Loading 7 |
|
When the arrows on the backing paper are aligned
with the white index spot (see the picture on the left), with the thumb
of my right hand I gently return the film advance lever to its parked position
[NEVER release the lever and let it spring back on its own; always bring
it back gently to its rest position], and close the back of the camera.
(I advise against trying to get 13 frames on a
roll, by stopping before the arrows reach the index mark. This can
be another cause of overlapping frames with some cameras but generally
with the Kiev 60, not with the Pentacon Six. The beginning and end
of the film is used by the processing lab or even by yourself, if you
do your own processing! to attach clips to the film, so trying
to squeeze in an extra shot can result in damage to the first, as well
as the last frame.)
Fire the shutter. |

Loading 8 |
|
Wind the lever all the way forward to the
stop pint, return it to its rest position and fire the shutter. Do
this three times. Dont press the release while lever is in the advanced
position. |
Loading 9 |
|
Wind the lever a fourth time to bring the
frame counter to 1, that is the dot between 0 and 2.
You are ready to start taking photographs! |
I have used Ron Spillmans instructions (or the slight variation described
here) with every roll since I first bought a Pentacon Six in 1977, and
use a similar loading procedure with my Exakta 66. I carry a copy
of the instructions in the back of my camera case at all times. It
is
possible to do this with only two hands, and keeping the tension on the
two spools is a very important part of it. If the film unrolls and
is loose, you WILL get overlapping frames. If it is taut, you WONT
(unless the camera is faulty).
Link to Loading Video
Click the following link to see
the video that I have made:
http://www.youtube.com/watch?v=v8cwSKUrQII
This is not the only video on the
internet on how to load film into the Pentacon Six, but some of the others
are wrong.
The conversion into .wmv format
and the compression for uploading
have reduced the image quality
of the video considerably,
which is why I recommend that you
study the above photographs first.
Enjoy loading your Pentacon Six
for problem-free spacing!
|
In fact, frame spacing with the Pentacon Six compares very
favourably with what you are likely to obtain on a Hasselblad!
See examples here.
To see how to check the spacing without having to wait
for a film to be processed, see here.
If your camera is faulty, a service from a repair person familiar with
the Pentacon Six / Exakta 66 should cure the problem. I recommend
Tom Page in England, Pentacon Service and Rolf-Dieter Baier in Germany
and Hans Roskam in the Netherlands. U.S. friends speak highly of
the work of Trescam in New Jersey, although like many of the best repairers
there is usually quite a slow turn-round time because of the amount of
work he has.
If all this doesnt work, get Rolf-Dieter Baier to fit his control unit,
which gives you a visual confirmation that you have advanced the film far
enough. You can contact him via his website (see my
Links
page).
If you have spacing problems and believe that there is a fault with
your Pentacon Six, you may find this link
helpful.
Spacing test video
I have made a spacing test video and uploaded it to YouTube.
You can find it here:
http://www.youtube.com/watch?v=l1vQNV7F0Pw
To go back to the cameras page, click here.
To go back to the instructions main page, click here.
To go back to the Frequently-Asked Questions page, click here.
To go on to the lens review, click below.
Lens review
To choose other options, click below.
Home
© TRA February 2002
Latest revison: April 2013